What you are saying is that my transmission is no easy fix?
Could there be even a slight chance that the B4 cover/pin or spring is moving to slow to get this kind of flare 3 to 4 ?


Here's something you could check as a slight chance effort. When I put my transmission back together I had a 2-3 and 3-2 shifting problem (needed adaptation) and I wanted to check the B4 servo movement spec again. Here's what I did to try and determine if the B4 servo movement spec was correct. No guarantees how accurate this is but the measurement numbers looked reasonable to me. I think it will at least give you an idea if the B4 servo movement spec is close or not.greffel wrote: ↑24 Mar 2021, 10:45 If it's not possible to travel this summer due to Covid I might go for this rebuild to have some fun
What you are saying is that my transmission is no easy fix?
Could there be even a slight chance that the B4 cover/pin or spring is moving to slow to get this kind of flare 3 to 4 ?
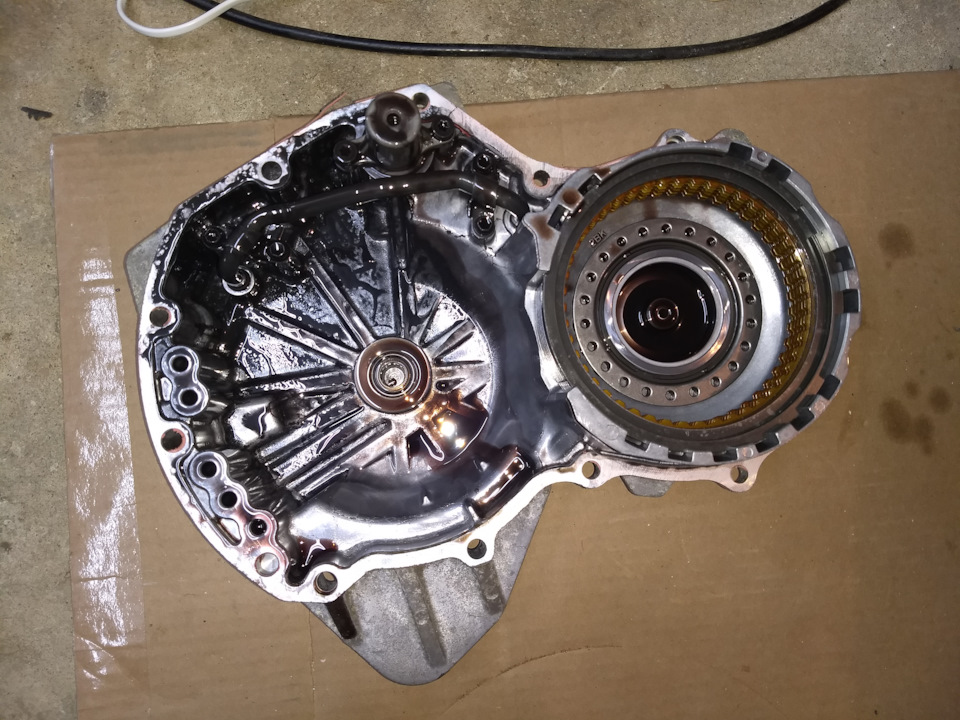
Good that you're not finding any obvious mechanical damage. If the steels look overheated then they should be replaced. In the rebuild kit that I linked to it did not include the steels. I took a gamble the steels wouldn't be needed and that turned out to be the case with my transmission, frictions were worn but not to the point of damaging the steels plates and no overheating.vtl wrote: ↑24 Mar 2021, 21:17 I'm half way down tearing it apart, struggling to separate halves (without waking up the kids). So far mechanically everything looks alright, besides some overheated steel, plus apparent clutch pack failure in torque converter.
The transmission has ~220k miles, it was refilled with fresh ATF once at 110k. When I got it at 217k, I did a couple of drain&fills, it was yuck! The car was driveable, however the shifts quality was according to ATF change intervals.
On another resource I was pointed to the fact the "overheated" parts are just tempered, so they come new in black/bluish color. So all is good. Didn't measure the thickness of frictions nor bushing bores, but all looks to me. The whole transmission probably was in a very good condition until torque converter decided to give up.firstv70volvo wrote: ↑25 Mar 2021, 08:28 Good that you're not finding any obvious mechanical damage. If the steels look overheated then they should be replaced. In the rebuild kit that I linked to it did not include the steels. I took a gamble the steels wouldn't be needed and that turned out to be the case with my transmission, frictions were worn but not to the point of damaging the steels plates and no overheating.
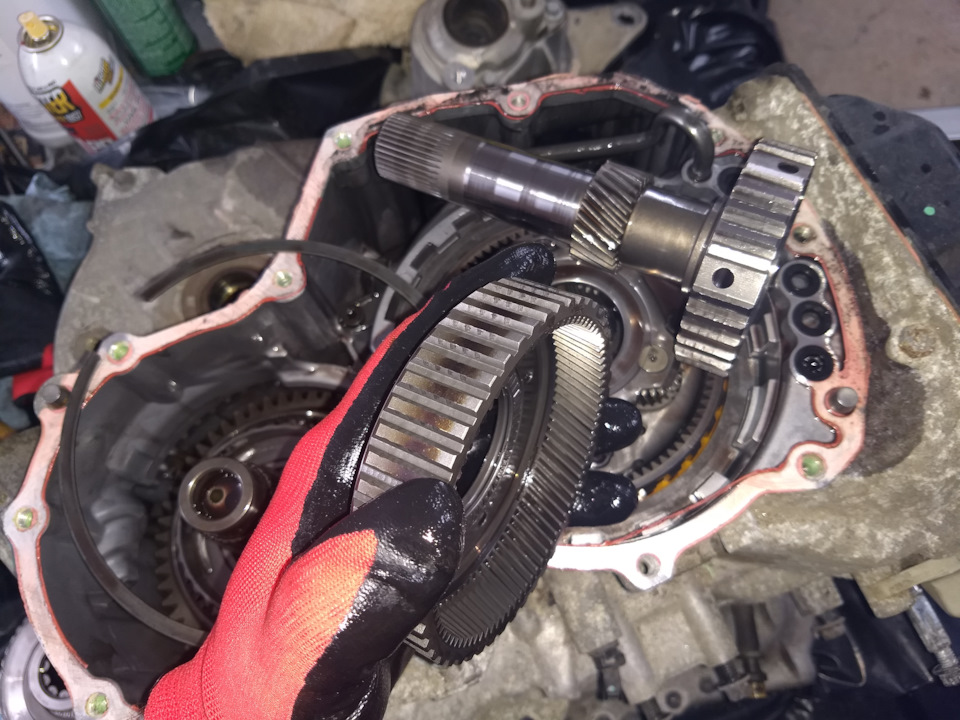
The bushings look good. I'll measure their bores today and decide if they need a replacement. Thanks for the link!firstv70volvo wrote: ↑25 Mar 2021, 08:28 From the photo I see you're working on a 51SN with the single sun gear shaft. This reduces the number of bushings you'll need to check or replace by two.
I've been working on my notes about the bushings and here's what I have so far.
busings.pdf
Check all the bushing carefully and don't be surprised if many of them are fine. The only bushing I saw that had any signs of being worn was the bushing in the oil pump housing.
You can get a whole new piston from GM, but it is not cheap ($80'ish). I decided to remove shim 2 (1.73 mm) from the piston assembly, and it help to remediate progressing jolts quite a bit.firstv70volvo wrote: ↑25 Mar 2021, 08:28 For Greffel I am going attach the link below again as a method for checking his 3rd gear band servo piston travel with his transmission still in the car. If you have the opportunity with the transmission you're working it would good to know the length of the rod check measurement method when the 3rd gear brake band is compressed and the length of the servo pin in your transmission. He wanted to know if there was any slight chance of doing anything else to deal with the 3-4 flare before having to tear into his transmission.
B4 servo spec measurement.pdf
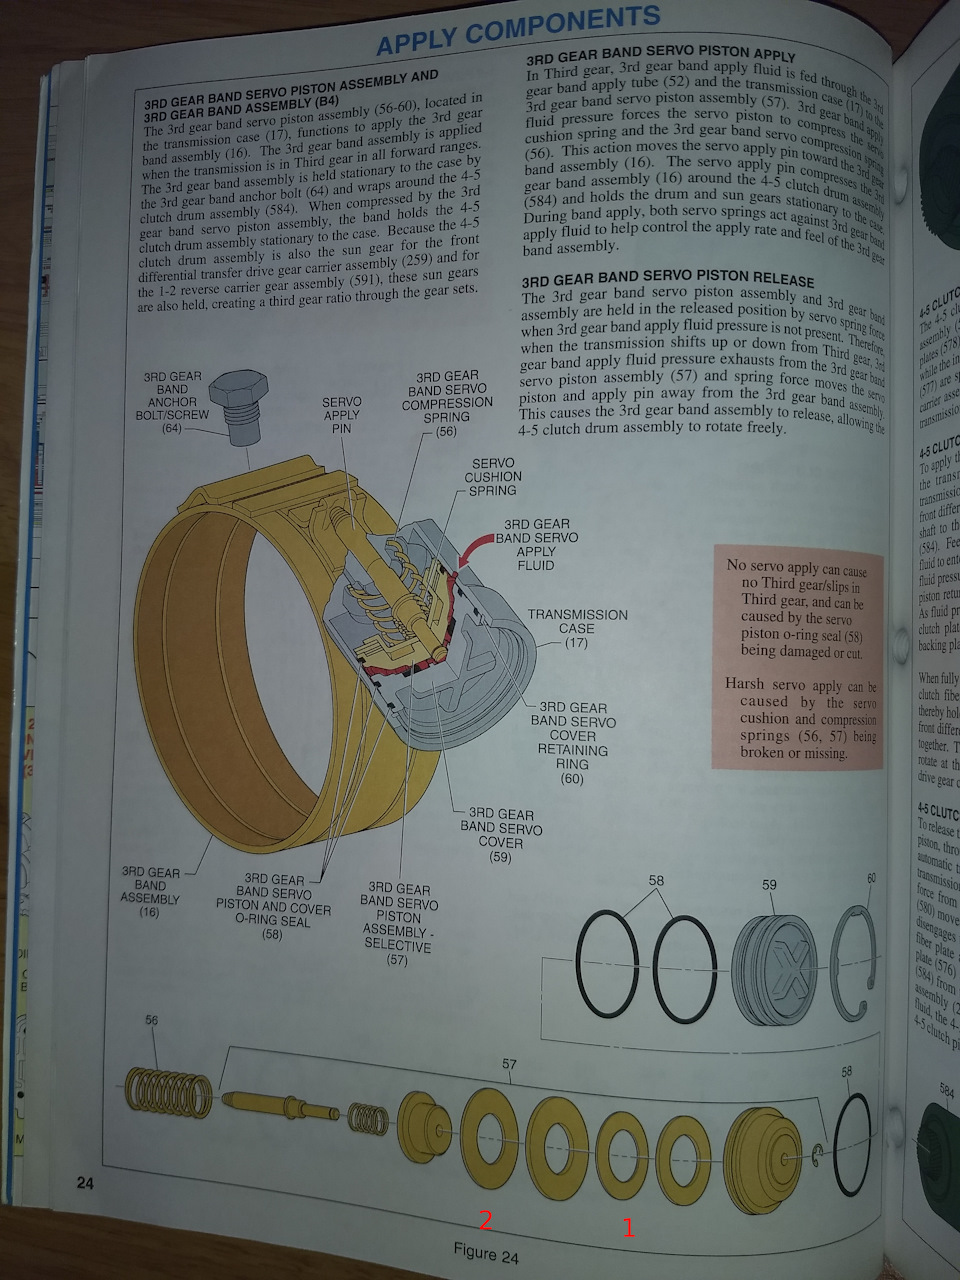
Yes, a metal or even wooden rod dowel that will fit inside the servo pin bore hole. Push on it firmly to compress the 3rd brake band and mark it carefully on the inside edge of the bridge piece across the opening. I'll be curious what this measurement is as I think it will give you an idea if your way out of spec or not on the servo piston travel. For more accuracy is might be best to taper the end of the rod similar to the servo pin so it fits in the brake band the same.
Edit I've revised the method previously described to simplify and make more accurate.firstv70volvo wrote: ↑25 Mar 2021, 10:38Yes, a metal or even wooden rod dowel that will fit inside the servo pin bore hole. Push on it firmly to compress the 3rd brake band and mark it carefully on the inside edge of the bridge piece across the opening. I'll be curious what this measurement is as I think it will give you an idea if your way out of spec or not on the servo piston travel. For more accuracy is might be best to taper the end of the rod similar to the servo pin so it fits in the brake band the same.