


Things Needed
- • Parts: my dealer charged me $140 for all the below including tax; FCP Groton didn't sell the bolts (you can try calling) but with shipping buying from them would've saved me $35 on the seals alone. They sell OEM seals I believe. You will need :
- SIX (6) torque converter to flexplate bolts (Part #979671)
- Rear Main Seal Volvo Part #9458178
TEN (10) flexplate to crankshaft bolts, needed if replacing RMS (Volvo part 1275375)
TWO (2) Transmission output axle shaft seals Volvo Part #6843112
Transmission pump seal sealing the torque converter Volvo Part #9495017
- O-rings for oil-cooler (transmission) lines Volvo Part #6842413 2x and #6842414 2x
O-rings for heater-core lines 3545586 2x or kit #3545662
Oil-pan o-rings and gasket compound (if replacing the oil pan o-rings) Part #30637867 1x, #8642560 1x, #8642559 1x, & #1161059
Axle nuts #3546510 2x or #9157371 2x (according to VADIS, VIN 121429 and above)
Upper torque bar bolts
• Load leveler. Also a Harbor Freight item, get the 2-ton unit, w/ coupon $34 + tax.
• Upgraded chains and attachment pieces, two of them (called “Quick Links” item #T7645136, 5/16” I believe) from Lowe's Hardware (didn't trust the chains from Harbor Freight's load leveler, they looked flimsy). I bought chain tested for I believe 1300# and the attachment pieces were rated at 1700#. Buy enough chain, I measured out how much the load leveler came with and added a little bit extra. All told around $20.
• If you don't have a transmission jack or other similar jack you can use the engine hoist with an additional one or two quick links of the same size as above along with about 14' (two 7' sections) of chain (for safety; I used one 7’ section and it was doable but unsteady). I bought slightly smaller chain, it was around $1.50/ft to save on cost, just make sure the Quick Links fit into it. If you buy the Harbor Freight engine hoist the quick links will fit into the hook making it a good match. Around $25.
• Some sort of wedge tool, I ended up using an air hammer chisel however if I were doing it again I would try to find some type of wooden wedge like a door stop. See step #14 under Removing the Axles.
• Besides that you need the standard stuff, sockets/extensions/swivels/torx bits (I bought mine from Harbor Freight as well, the set was around $7). You’ll need a torque wrench and an angle gauge for some of the bolts, namely the flexplate bolts.
• The Haynes Manual and the Volvo Service Manual for your car is also a good reference. In fact I primarily used the Haynes, I don’t follow the exact order but this is meant more as a supplement to it, in order to help locate the items mentions in the steps.
Section (A) Prepping the car
The objective of section A is to get the car ready to be taken apart.
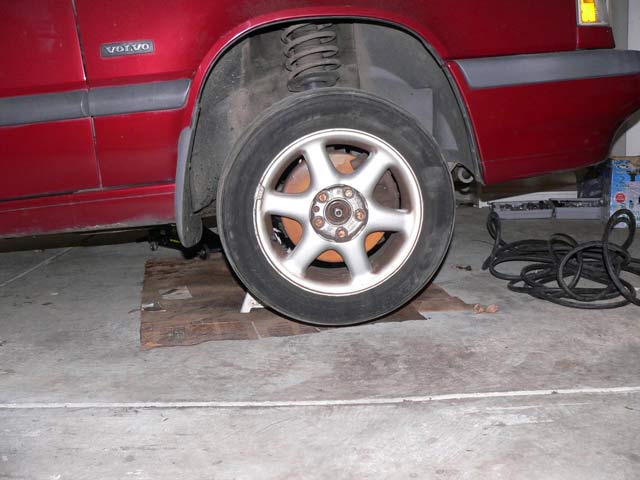
- 1) Loosen lug nuts and jack up car and place on jack stands. Note: if you don’t have an impact gun you will need to loosen the axle nuts first, momentarily skip to step #7 to crack them loose then come back to step #2. (1, 2)

2) Disconnect negative battery cable
3) Drain all fluids - oil, coolant, and transmission oil
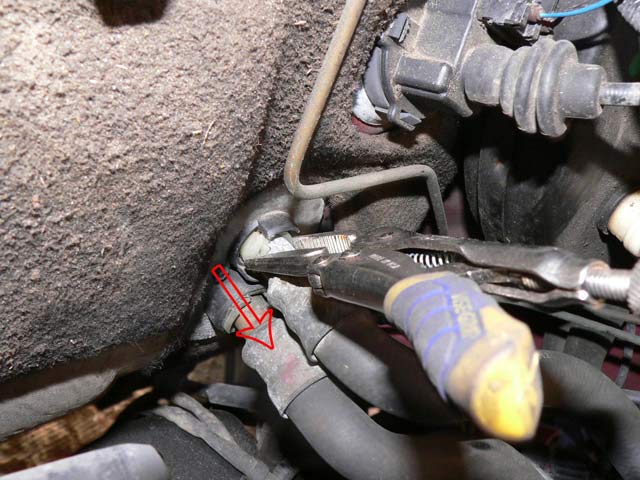
4) Remove the heater core hoses from the firewall connection point. I used vice grips to hold the plastic clips in while tugging backward. You do this now because there is still fluid in the lines and it will drip down on the open transmission axle holes if you wait till later. (2.5, 2.51)

5) Remove the accessory belt, and accessory belt tensioner (2 bolts)
Section (A) Prepping the car is complete.
Section (B) Removing the axles
The objective of section B is to remove the drivers and passengers side axles from the transmission.
- 6) Remove front wheels
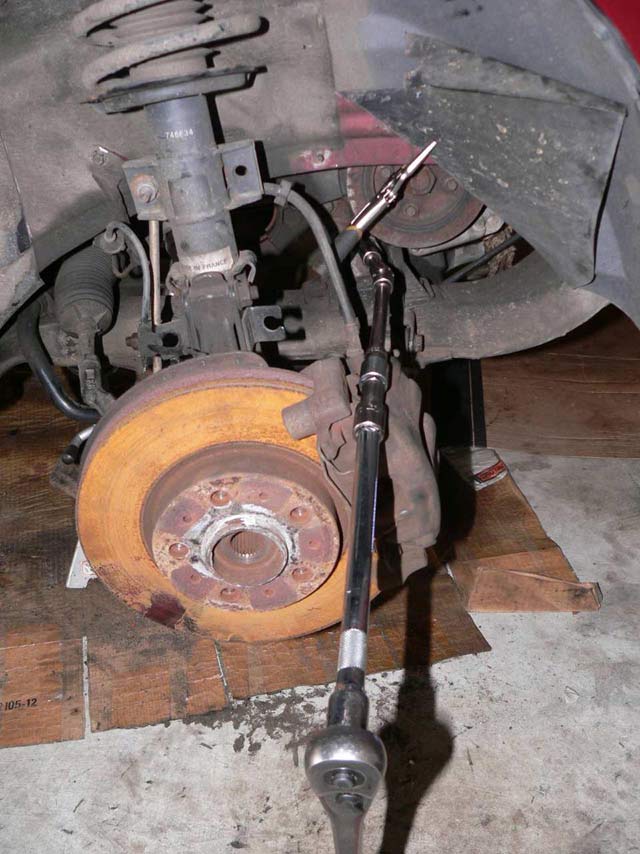
7) Remove axle nuts holding axle to wheel. 36mm I believe. I rented an axle nut set at Advance Auto instead of buying the socket (free with return). (3)

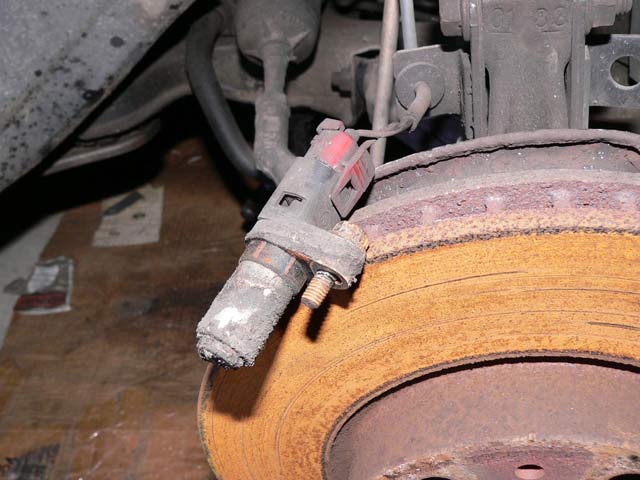
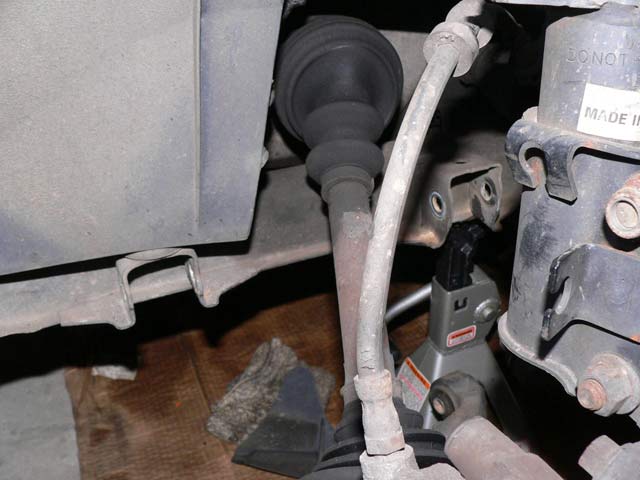
8.) To do it the "right way" Volvo says to remove the ABS Sensors however I found that isn't necessary. To remove, you must undo the bolt holding the sensor to the steering knuckles (top of steering knuckle) undo the bolt holding the wiring on to the sidewall. Also release the wiring from the strut (rubber grommet). (4, 5, 7)


9) Volvo has you remove the ball joint however I found it was impossible unless you have a ball joint spreader (FCP sells them, as well as Harbor Freight, I believe for $15). I didn't so I removed the two bolts holding the control arm to the sub frame: Passengers side (8)
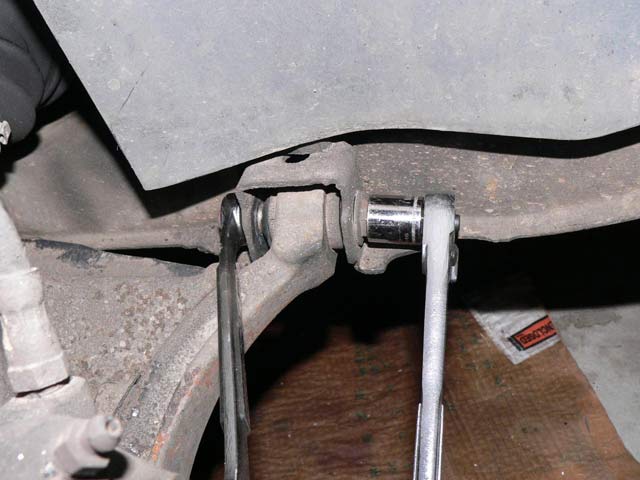
Drivers side (8.1, 8.2).

Once removed one side was stuck (bad bushings) and had to be pounded out (9) but the other sides just fell down.
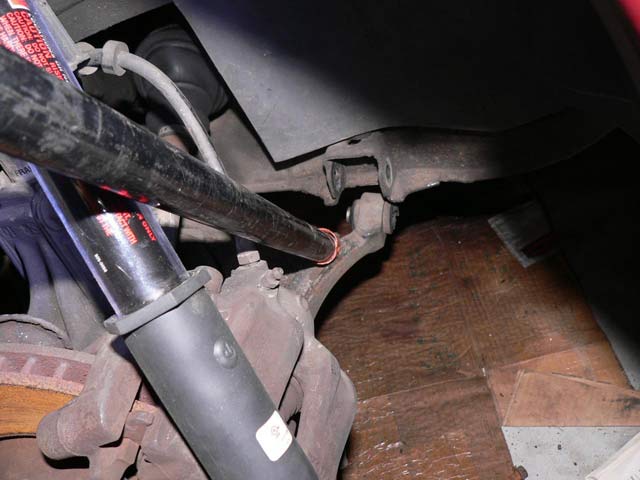
10) Release axle from steering knuckle. To release the axle tap it inward with an extension (that's what I did) about 1/2" or so (it will move inward). Pull outward on the steering knuckle and the axle will "pop" out. (10, 11)


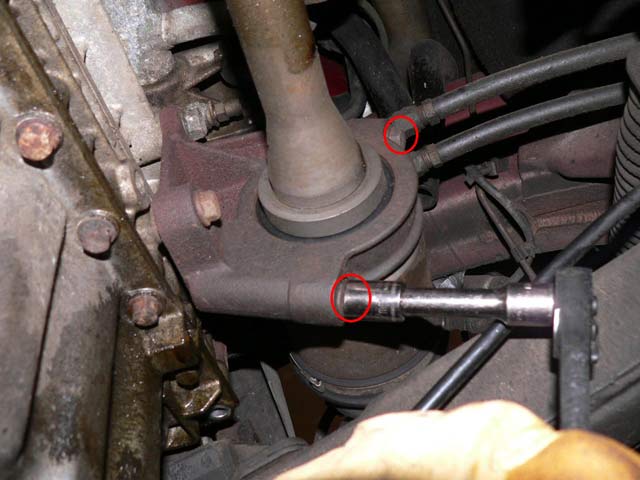
11) Remove the "right drive shaft intermediate bearing cap" on passenger side. Two bolts hold the attachment that holds the axle in place. (12, 13)
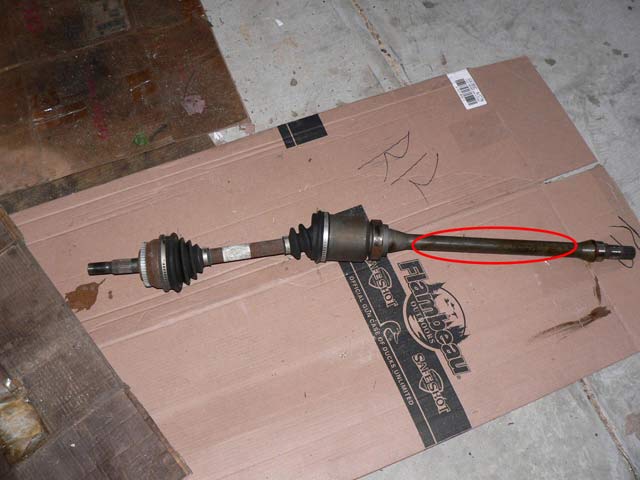
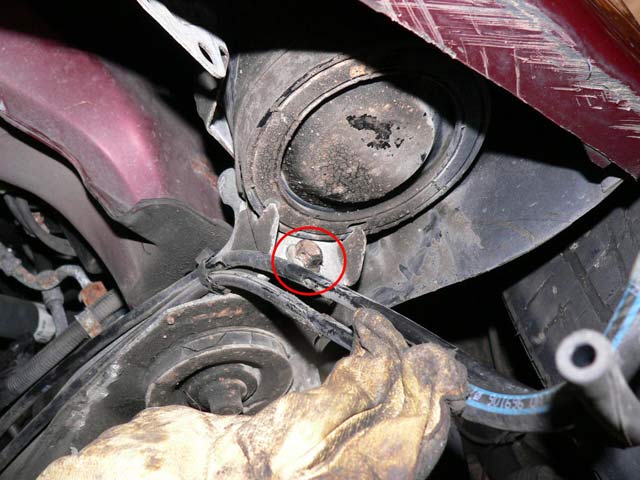
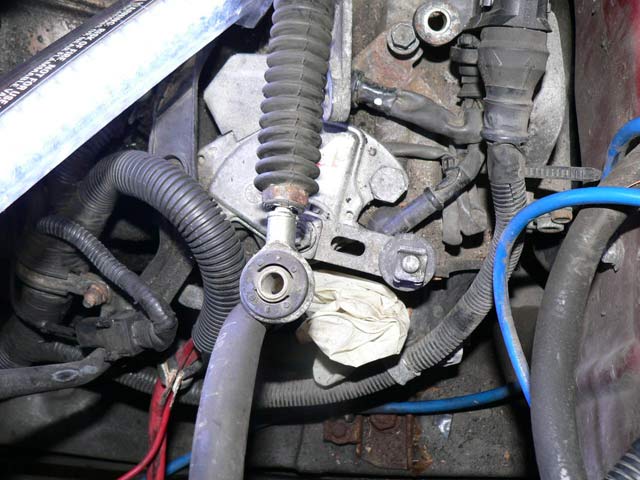
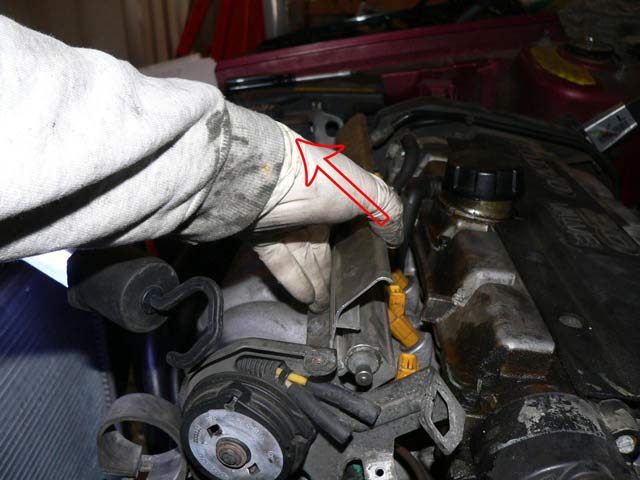
12) Next pull the passenger side axle out of the transmission holding the highlighted area while underneath the car. Pull it outward toward the wheel well. (14)
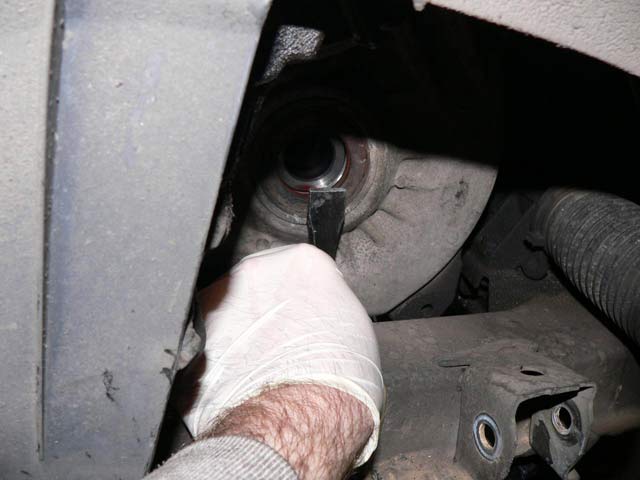
13) Cap off the transmission. I stuffed a paper towel in. (15)

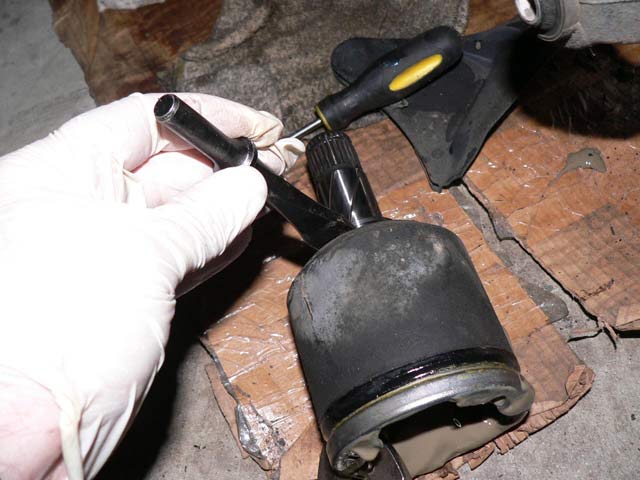
14) The drivers side is similar however I couldn't pull the axle out. I tried but ended up doing this: (18).
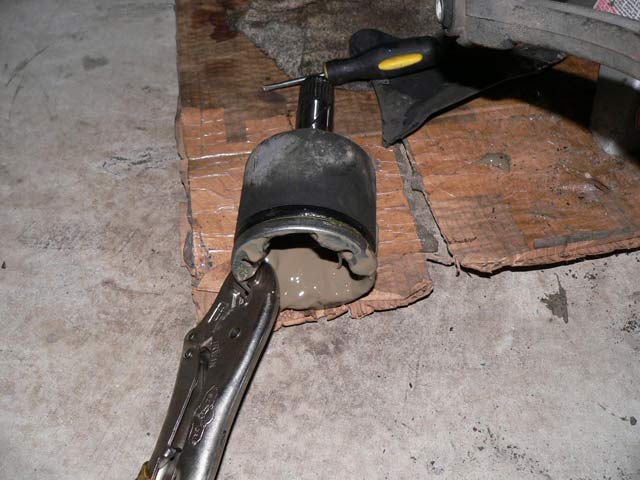
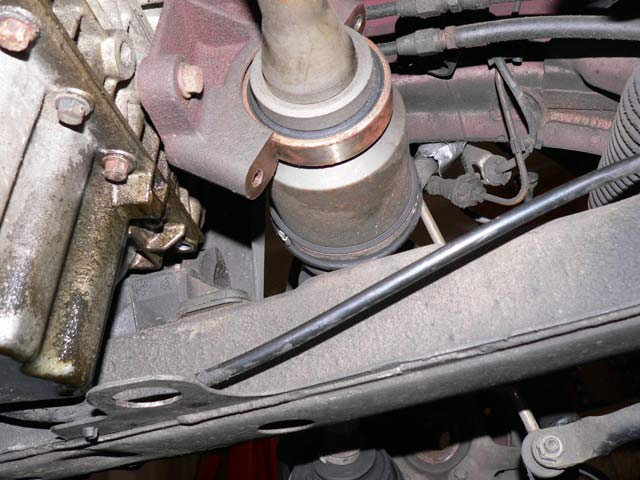
This is because the boot clamp failed, it wasn't designed to be pulled on. Even vice grips wouldn't get it out of the transmission, and later discovered there is a circlip holding it in. Anyway, to get around that you must use a fat chisel or wedge tool and hammer it lightly in to separate the axle from the transmission. Remember to cap off the passenger side as well. (19, 20)
I then reconnected the control arm bolts and put the tires back on so you can lower the car and move it around if needed. Note if you do this you will need to reinstall the axles into the hub and torque down the axle nut or you run the risk of ruining the wheel bearings. An alternative, if you need to move the car around, is to place the wheels on dollies.
Section (C) Removing engine compartment components
The objective of section C is to remove all major components of the engine compartment that are in the way of lifting out the engine and transmission.
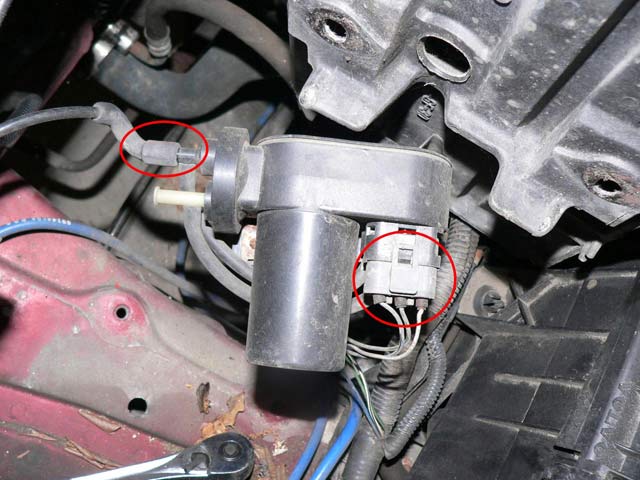
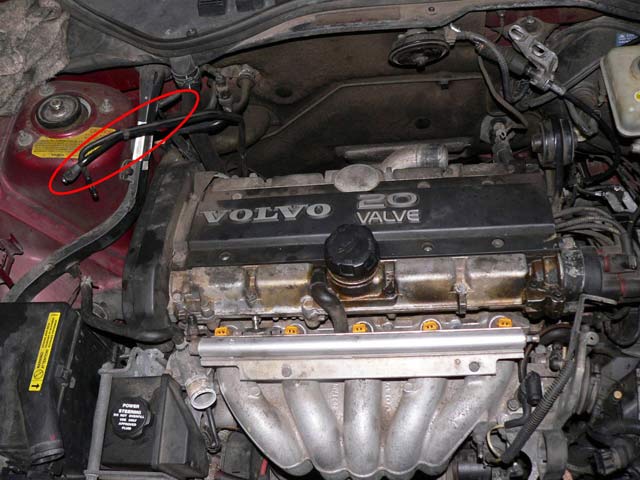
- 15) Disconnect the vacuum hoses from the EVAP canister located under the drivers side front area. To remove I had to undo the bolt holding the canister on the car and flip it down. I then reattached the canister. Note: This is a step Volvo has but after doing it I see no reason that it is needed. (21, 22).

16) Remove the battery and battery shelf. I also had to remove these attachments on the underside of the tray. (23, 24)

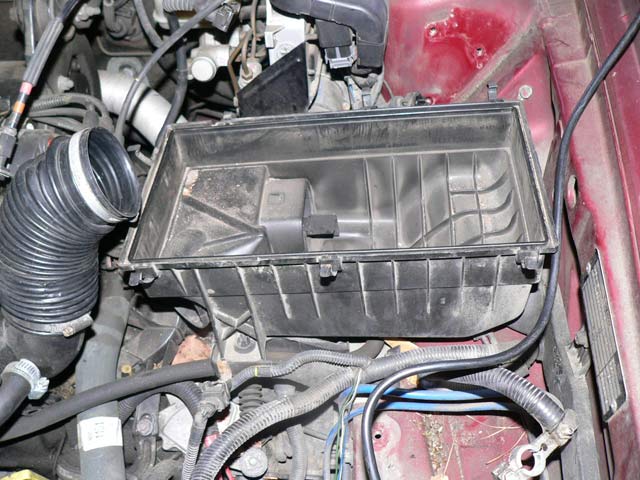
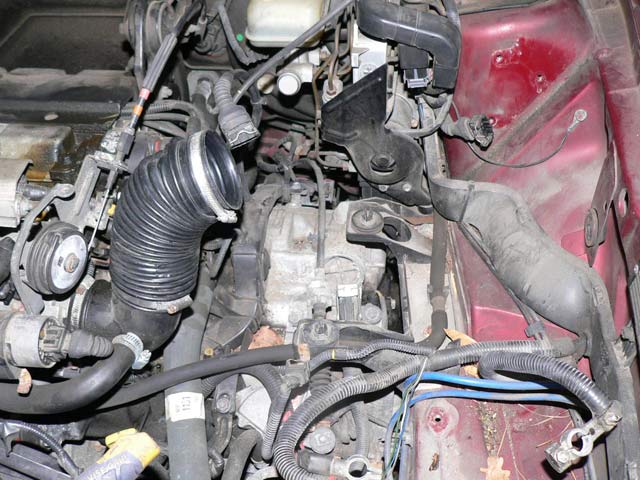
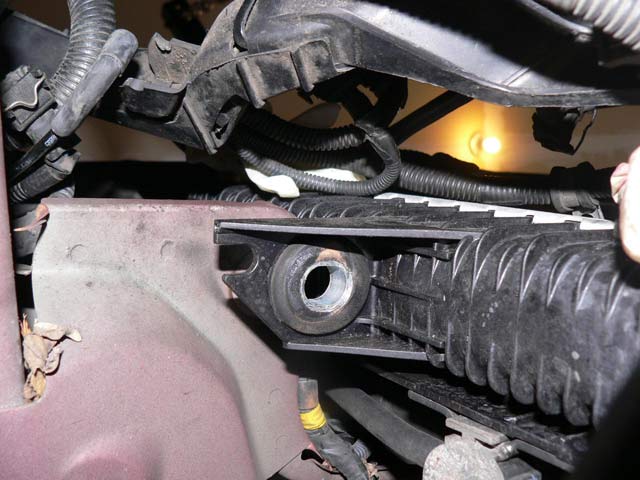
17) Remove the air cleaner assembly (aka air box).- a) To start you must undo the clips holding the top on and remove the MAF sensor. I circled where they are but there might be a few more clips in back. Basically just remove the air filter lid. (25, 26)

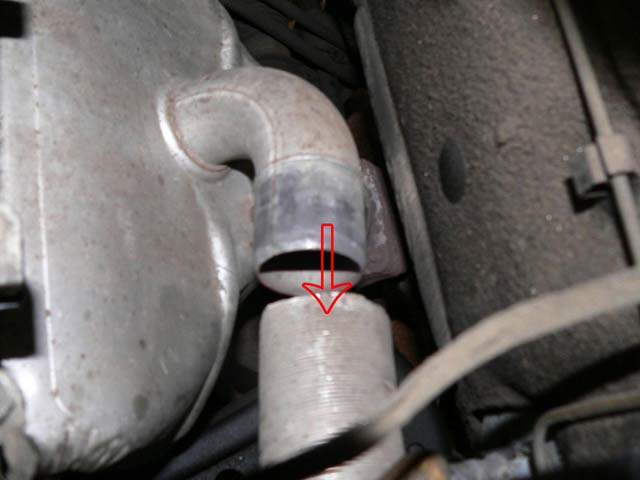
b) Once that is done undo the tube from the exhaust manifold cover. (27)
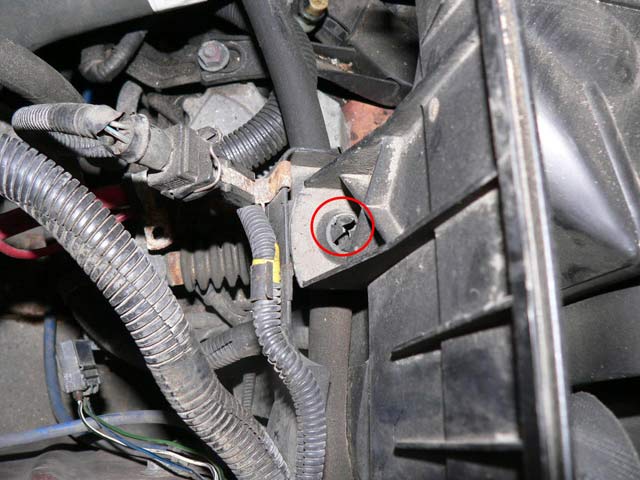
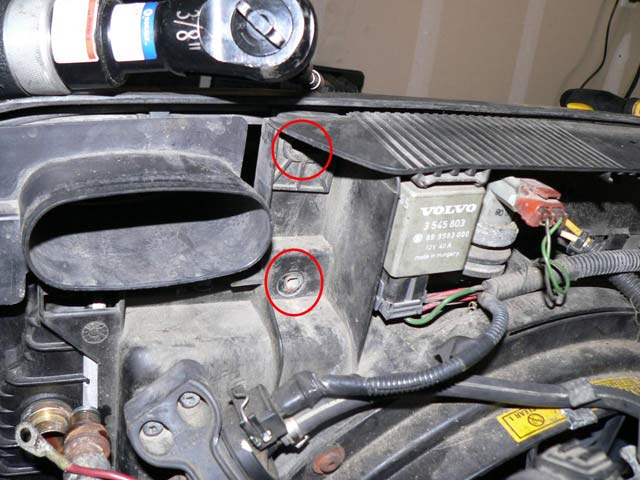
c) Then simply pull up rather harshly to remove the airbox from the clips (circled, there are two total that hold it down) (28)
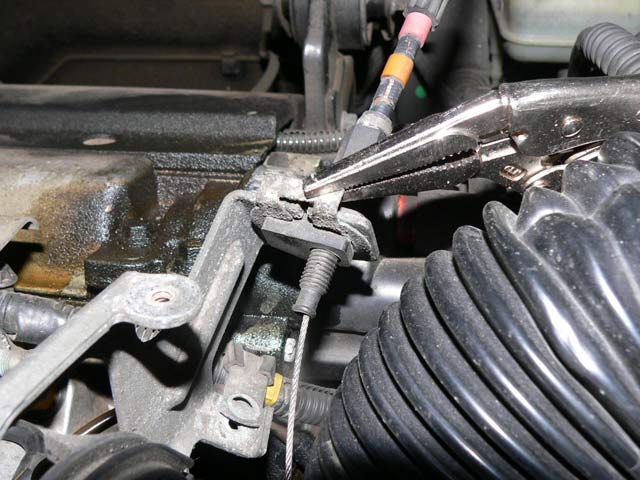
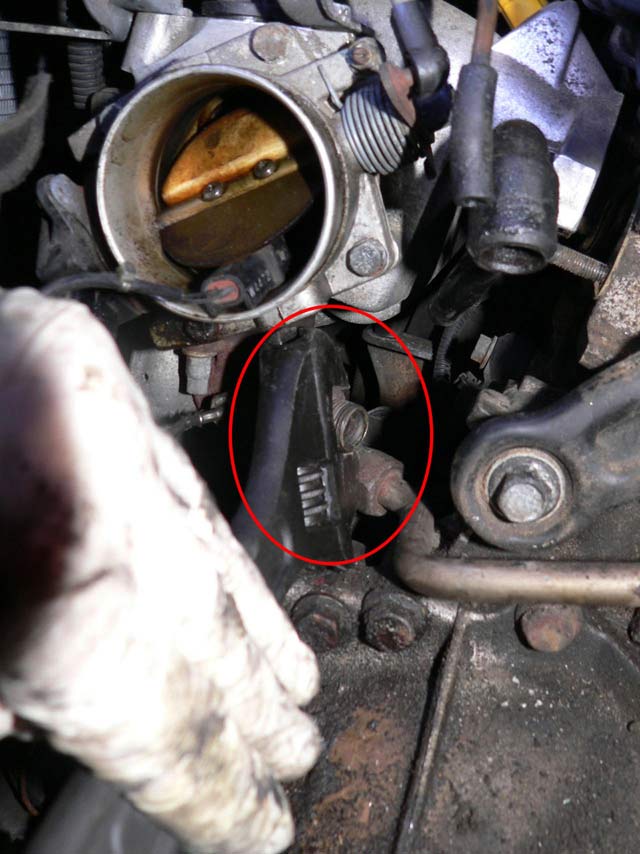
18) Remove the throttle cable. To do so pull the end of the cable from the "catch" in the spring operated section. You may have to twist slightly. Then remove the clip holding the throttle cable to the mounting point by using vice grips and pulling upward. I replaced the clip once the throttle cable was released so I wouldn't lose it. (30, 31, 32)

19) Remove the airbox mounting plate. Two bolts hold it on. You also must disconnect the large vacuum line to slide it out. Or at least that is what I did. Later I noticed you can disconnect it from the engine (follow it) and slide the air box tray out that way. Also there are one or two electrical connections to the air box tray that must be unclipped. (33, 34, 34.1, 35)

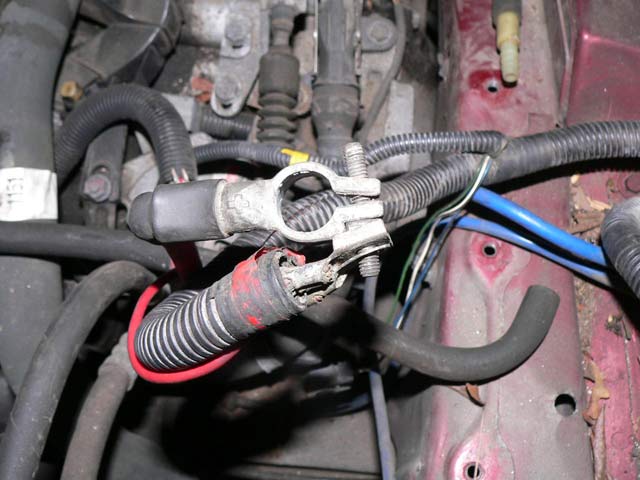
20) I believe the next step for me was to separate the battery cables. I took a shot of my other car's cables so I could attach in the same order again. (36, 37)

21) Remove the "upper engine steady bar" holding the engine to the firewall and place aside. Unbolt it at the engine and the firewall side, so as to remove it from the engine compartment altogether. Haynes calls for new bolts upon reinstall. Also remove the small ground cable next to it. (38)

- a) To start you must undo the clips holding the top on and remove the MAF sensor. I circled where they are but there might be a few more clips in back. Basically just remove the air filter lid. (25, 26)
Section (D) Removal of engine electrical components and wiring harness
The objective of section D is to remove the wiring harness and attachments to the engine.
- 22) If you didn't disconnect this vacuum line in step 19 do so now. (41)

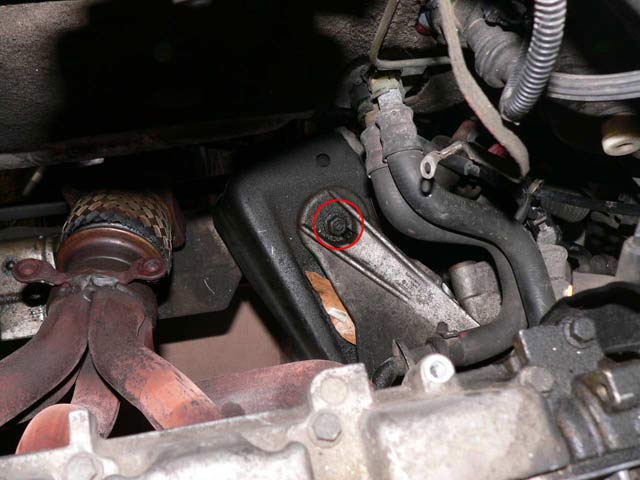
23) Disconnect the O2 sensors at their wiring harness connection. To do so you must pull up on the red tabs. One went easily and the other was difficult for me. Also undo the bolt circled in red on pic 42. (42, 43)


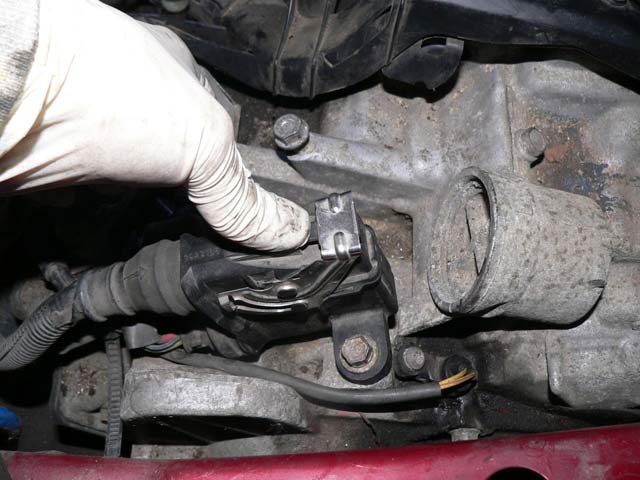
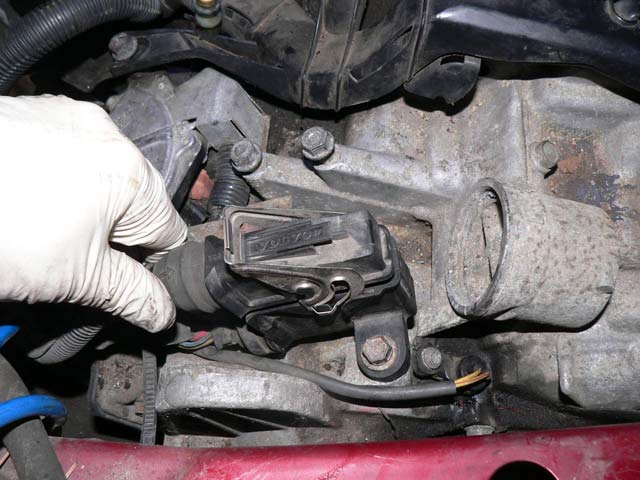
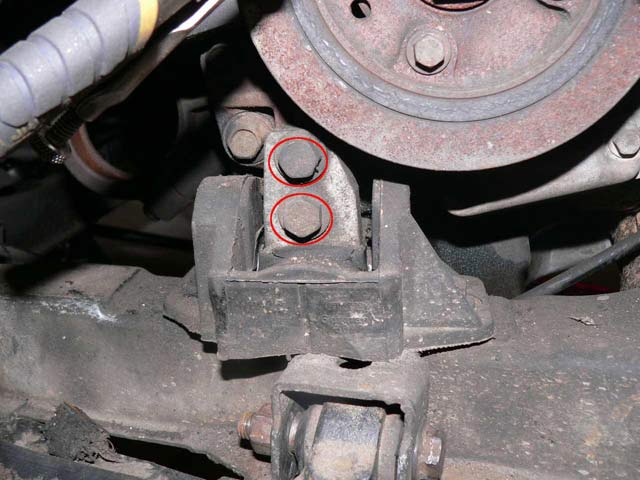
24) Release the transmission gear selector from the top of the transmission. Undo both bolts circled in red and then undo the clip at the end of it. I placed the clip back so as to not lose it. (44, 45, 46, 47)


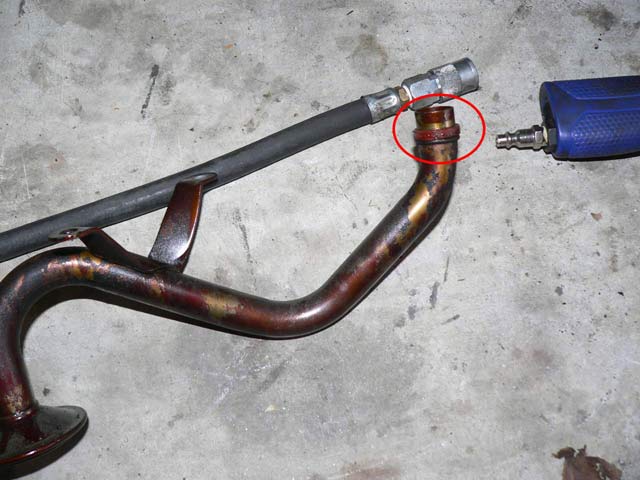
25) Undo the transmission oil cooler lines and coolant lines to the radiator. You either need special pliers (I believe they are called snap ring) or brute force to mangle the “quick connector” of the transmission oil lines. Upon reconnecting these lines buy new o-rings. Also remove the hose from the radiator to the ECU box (48, 50).


26) Remove the radiator fan shroud. There are 4 bolts total, two on each side. Then remove the electrical connections. After that just lift up and it will pull away (51, 52, 53).

27) Undo this vacuum line (54)

28) Undo the bolt holding the negative battery cable to the frame near the center engine mount. (55)

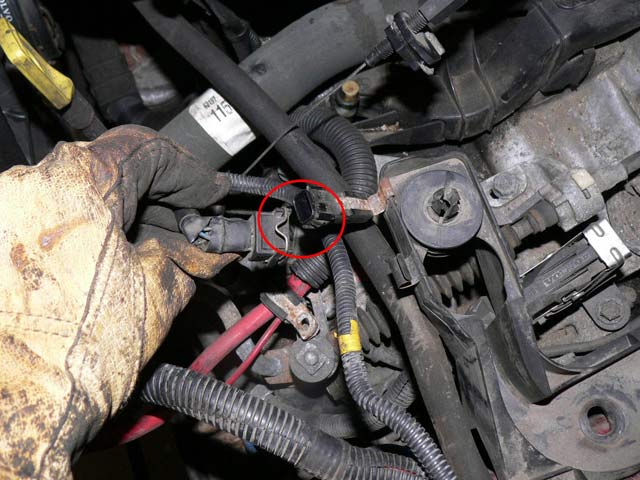
29) Remove the transmission “main loom connector” on the top of the transmission. To do so push down on the center plastic tab and pull the metal bar upward, then lift up. (56, 57)
30) To release this wiring bundle I had to undo the clamp bolt and rotate the clamp upward. You don't have to completely undo the bolt, just enough to rotate it. (58)
31) Remove the fuel lines and electrical connections to injectors. First release the fuel pressure by undoing the cap at the drivers side end of the fuel rail and pushing the valve with a screw driver. This will squirt fuel out and release pressure (sorry forgot pics). Then:
- a) First remove the cover by pulling upward/forward on the cover (59)
b) Then unclip each fuel injector electrical connection by pushing on the small metal spring clip (60)
and move the whole bunch to the drivers side (61).

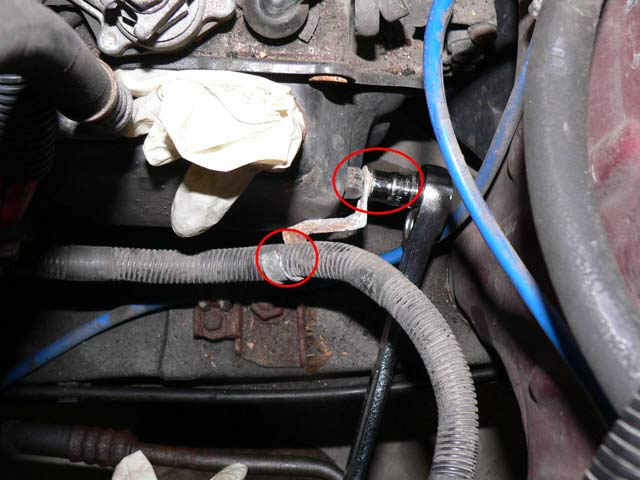
c) Next undo the bolts holding the fuel lines to the engine, one in back and one on top. Also undo the ground strap on the left side of the engine. (62, 63).

d) Unhook the fuel lines from the fuel rail, one is secured by just hose clamps and the other must be unbolted (64)

e) Move them to the back side of the engine compartment to get them out of the way (66)

33) Unclip the EVAP sensor. Note I just circled the back portion as a reference to what sensor it was. (68)

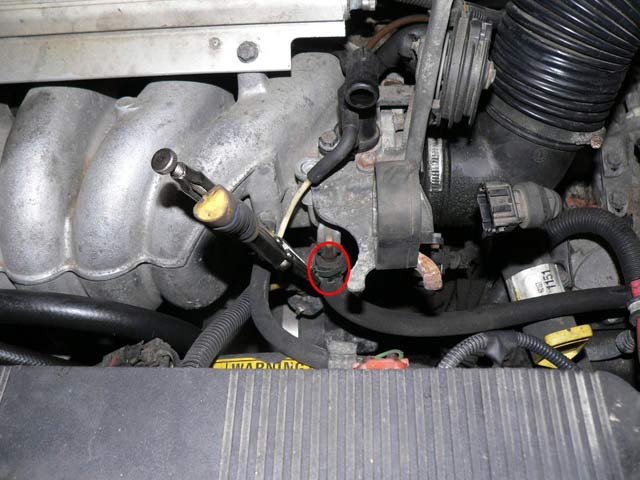
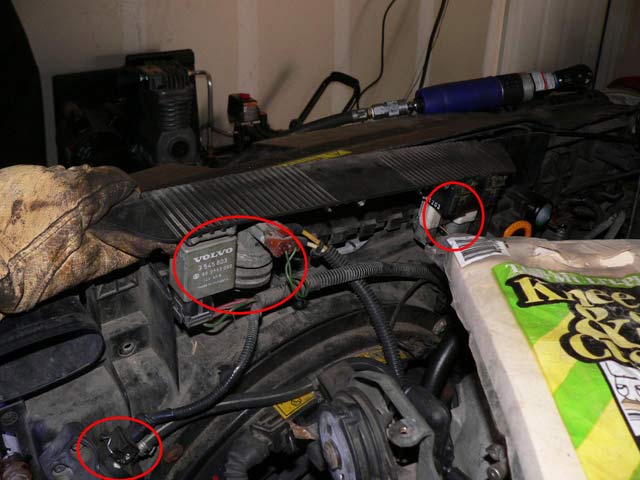
34) Unclip the cam position sensor (top one) and crank position sensors (bottom one). On the crankshaft sensor you need to actually undo the clip holding it to the engine as well (69, 70)


35) Undo this sensor, no idea what it is, it's on the transmission behind the hole for the passenger side. I believe it’s the speedometer. (71)

36) After that you can pull the wiring harness upward (72)
37) Remove this bolt to further remove the wiring harness. Also a good idea to remove the dipstick now, just one bolt holding it on (wiggle the dipstick, just to the right of the circled bolt). (73)

Result: (74)

- a) First remove the cover by pulling upward/forward on the cover (59)
Section (E) Removal of Intake manifold and connections inside
The objective of section E is to remove the intake manifold and all the electrical connections of the wiring harness to get it out of the way.
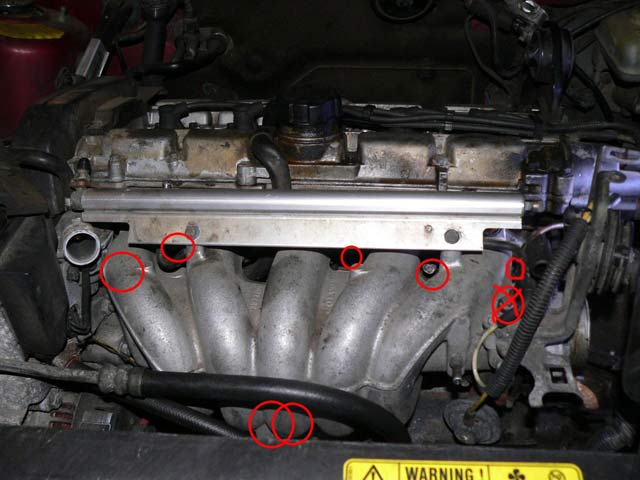
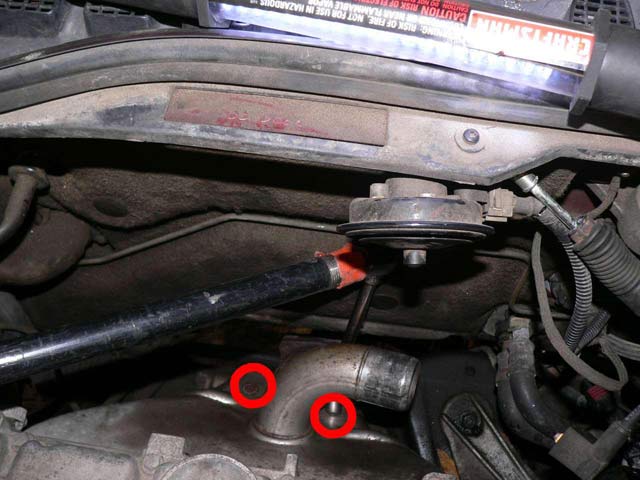
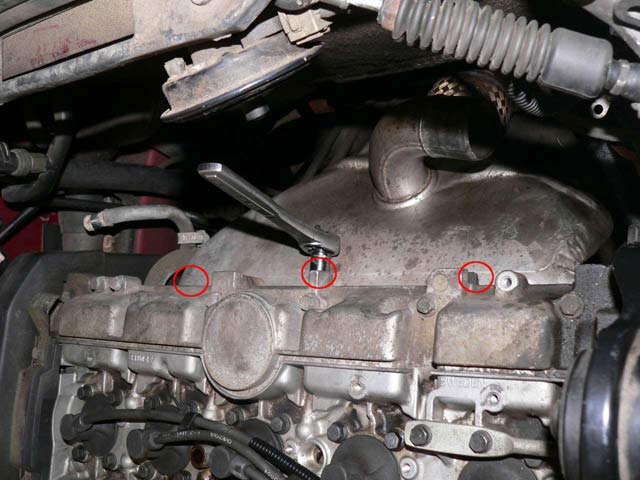
- 38) Remove intake manifold bolts. The tops have to be removed completely you can just loosen the bottom ones. Also undo the dipstick bolt and the intake manifold bolt on the bottom. Sorry no pics, I circled where they are approximately located. (75)
39) Undo the EGR line if equipped. It's a big nut I used an adjustable wrench (76)
40) With that done remove the intake manifold, it should lift up easily, lift up toward the ceiling. (77)

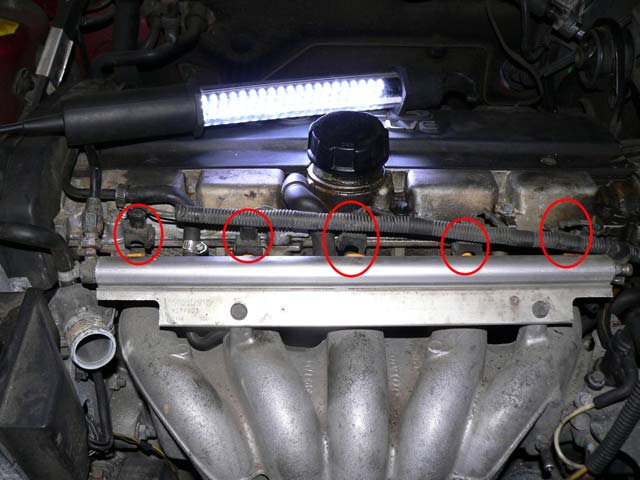
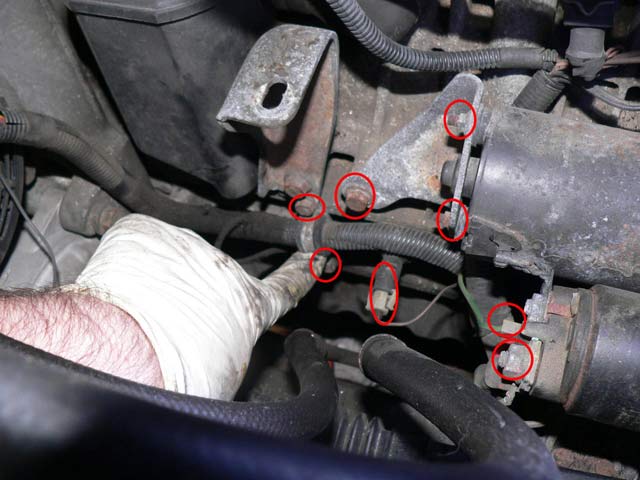
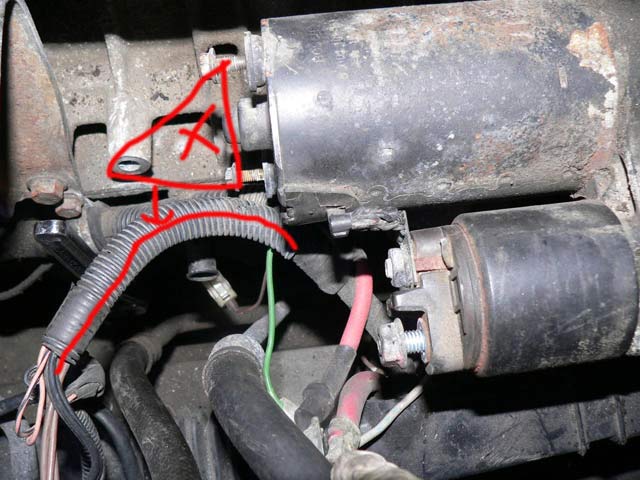
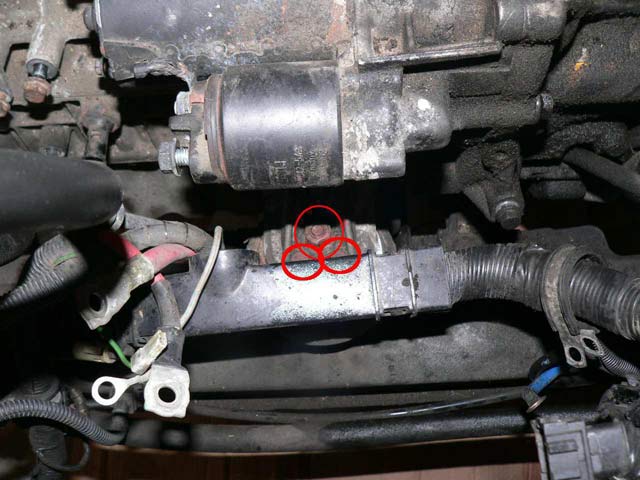
41) These are the connections (red) you must undo. Also note you must remove the starter mounting plate (yellow). Might want to label them. (78, 79, 80, 81, 82, 83).


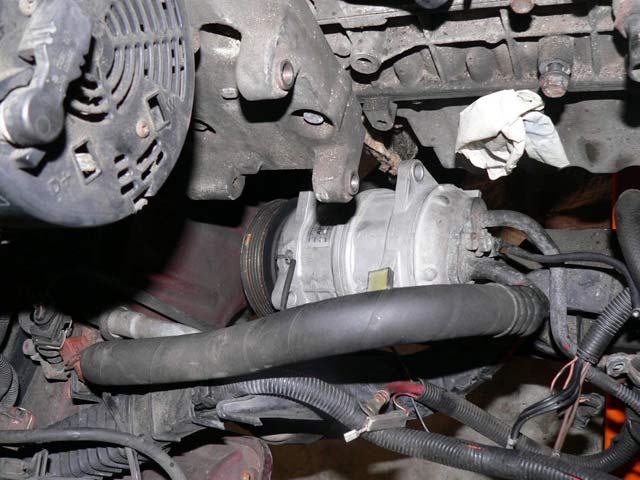
42) Undo the a/c compressor mounting bolts. Two here and two on the other side, which I could only get to once I started lifting the engine out. If you have low R134a it would be a lot easier to just disconnect the lines in the back and leave the compressor attached to the engine accessory mount. (84)
Section (F) Removal of engine and transmission
The objective of section F is to remove the last few components attached to the engine, remove the engine mounts, and lift the engine and transmission out of the car.
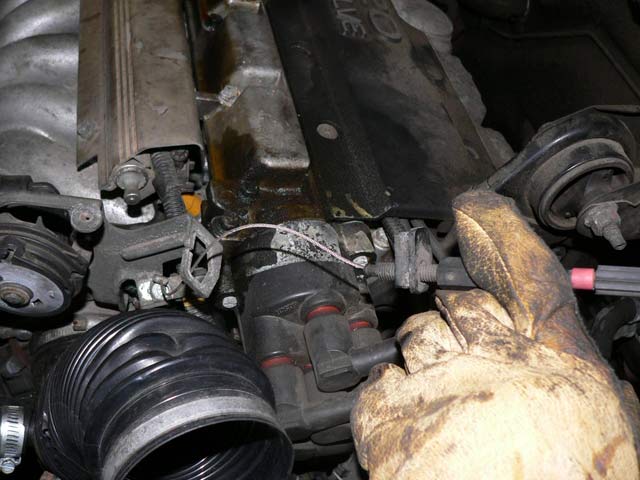
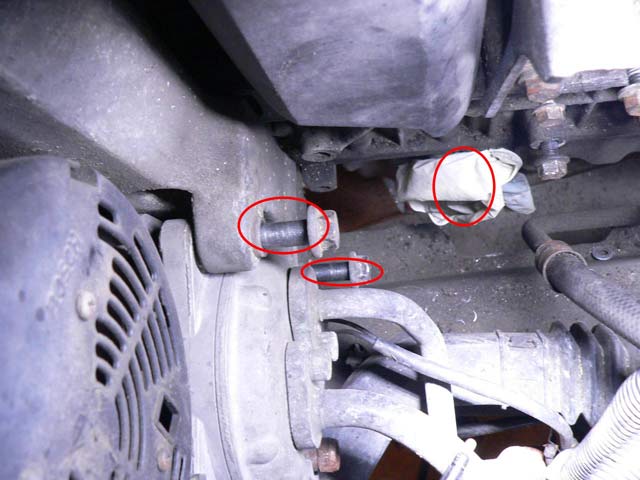
- 43) Remove the power steering pump. To do so you must remove the guard plate bolt and guard plate. Then remove the 5 bolts holding the pump on to the accessory part of the engine. Two are on the side with the guard plate bolt and three are accessed going thru the holes in the pulley. Once removed leave the pump in place until you are ready to take the engine out of the car. (85, 87, 88, 89)


44) I removed the exhaust manifold cover however on further inspection you don't need to do so. If you want to remove it, there are two bolts on the lower section and three holding it on to the upper section of the engine block. They were rusty and even with PB Blaster were difficult to get off. (90, 91)
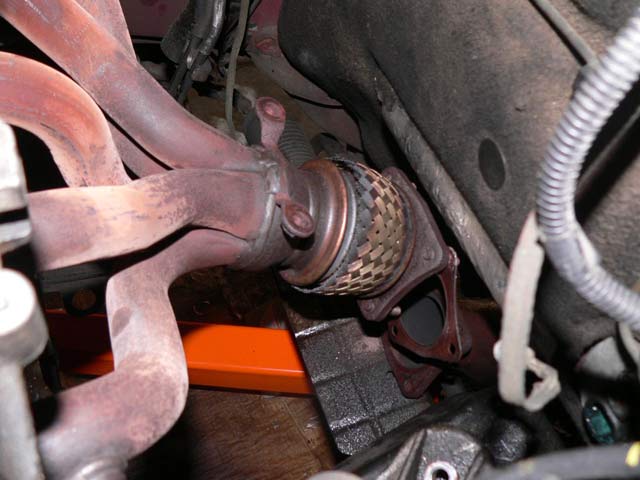
45) Disconnect the exhaust front pipe at the manifold flange joint. To do this there are four bolts accessed from underneath the car. You need a swivel, and PB Blaster to loosen them up. (92)
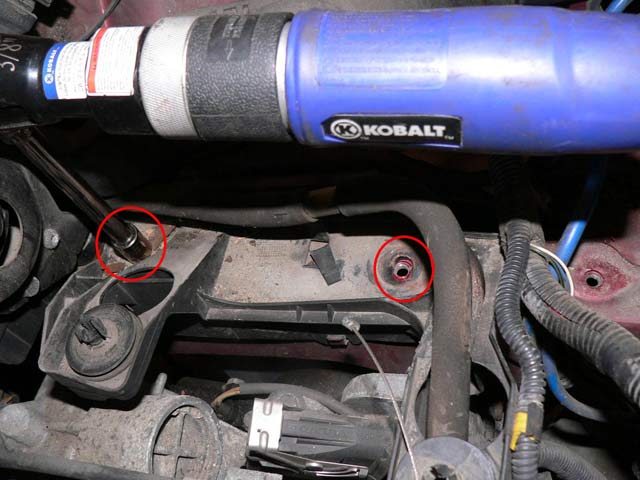
46) Remove the front engine mount bolt, and two additional smaller bolts holding the wiring harness in place. (93, 94, 94.5)


47) Remove the additional wiring harness bolt to the left of the front engine mount. (95)

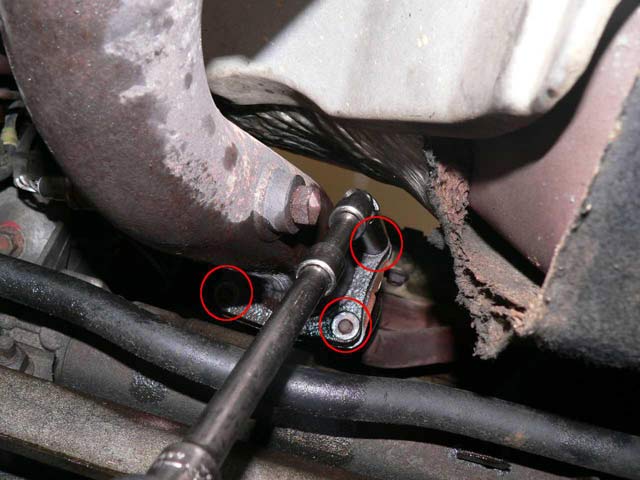
48) Remove the two bolts securing the lower engine steady bar bracket to the transmission (96)

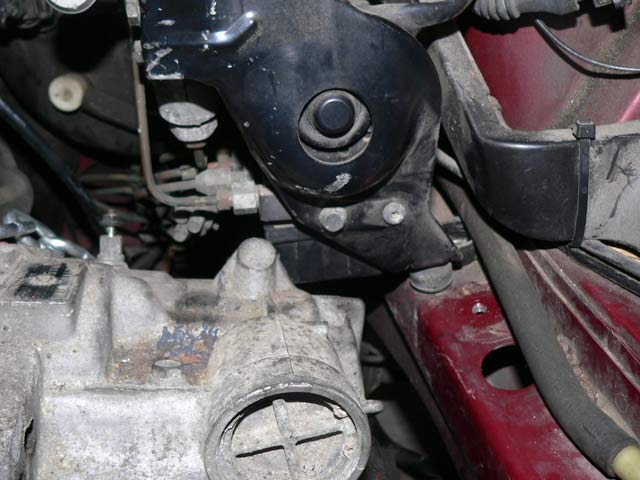
49) Remove the two bolts holding the passenger side engine mount to the engine. I had to use vice grips to hold the trim panel back (see picture) and long extensions with swivels. (97, 98)
50) Remove the upper nut on rear engine mount. (99).
----
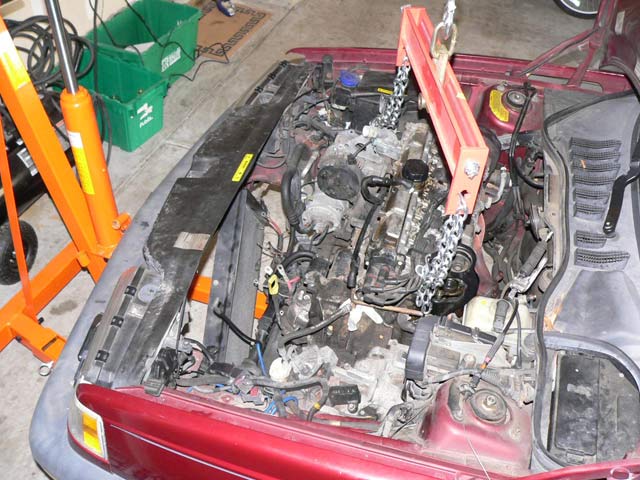
Lifting out the engine
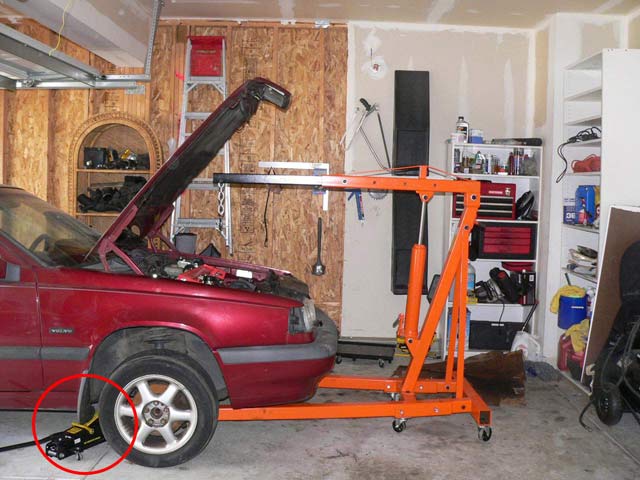
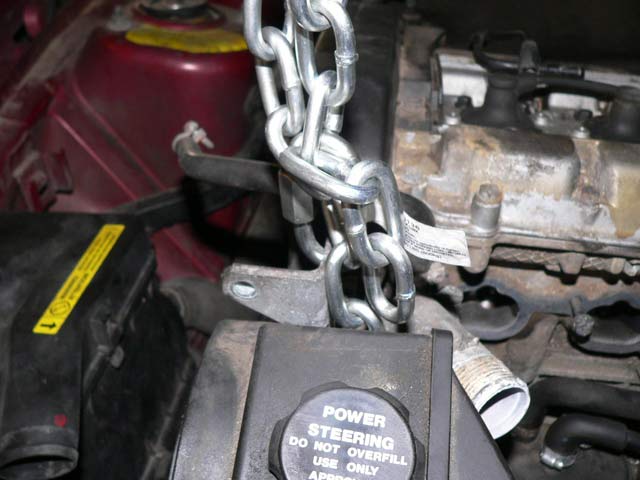
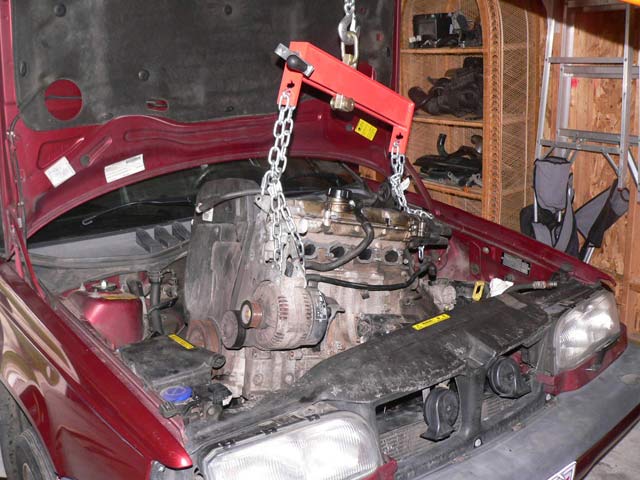
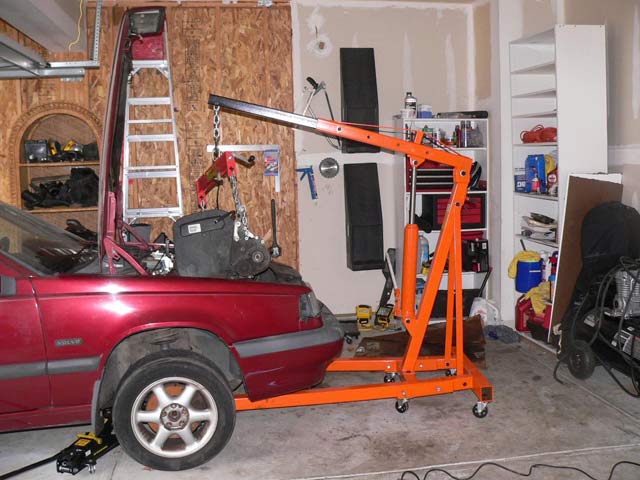
51) Give yourself plenty of room to lift it out (also remember to move hood to vertical position using tabs on side near hinges). You can lower the car off jack stands and just use a jack to raise the subframe an inch or two. This gets the jack stands out of your way. Attach the hoist and load leveler via chains and attachment pieces “Quick Links”. I bought higher rated chain and the Quick Links at Lowe's hardware. (101, 102, 103)

After doing this a few times (note difference in pics), I found a better way to attach the load leveler. You run a chain from the pax side axle holder up to the same place on the accessory mounting plate. Then attach a quick link in the middle, and then attach the load leveler chain there. This will insure as you lift you don’t torque the engine left to right due to lifting at different points. I did it this way the second time I pulled it out, and it seemed to work better. (104.1, 104.2, 104.3)


52) Place the power steering pump on the lip of the hood out of the way. (105)
53) At this point I elected to remove the radiator, it's just two bolts on the bottom and the 4 bolts securing the condenser to the radiator. I elected to remove it because I didn't want to damage the radiator at all (Volvo says to use plywood to protect it) and I wanted more room. In retrospect you have plenty of room and it’s a big PITA to reinstall it. I’d leave it in. (106)
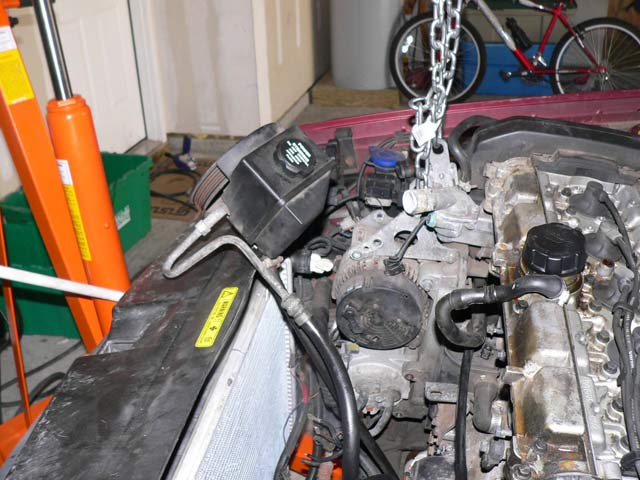
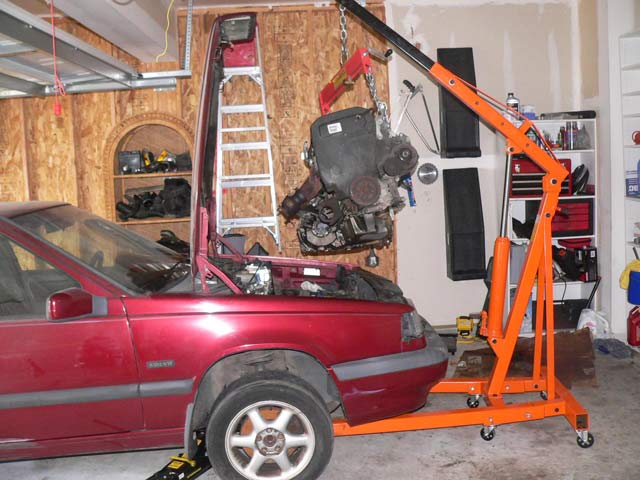
54) Start hoisting. Use the load leveler to tilt the engine up on the passenger side (107, 108, 108.1)


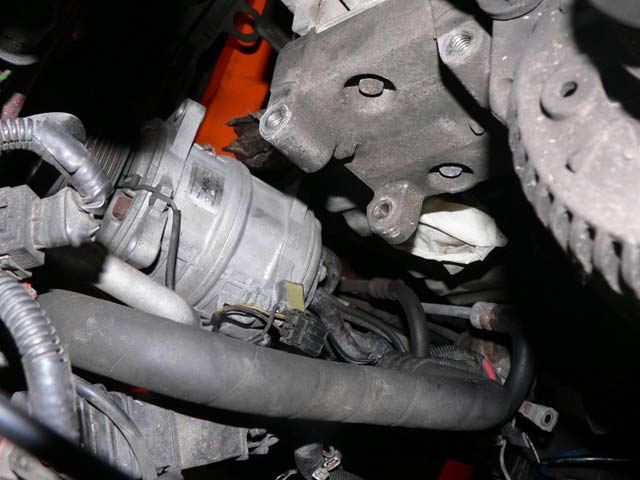
55) Once room opened up I could remove the two bolts holding the compressor on the engine accessory mounting plate and rest the compressor on the sub frame. I also moved the power steering pump down on the sub frame as well. (109, 110)
56) As you lift be careful of the exhaust pipe. It will separate from the exhaust. (111, 111.5, 111.51)
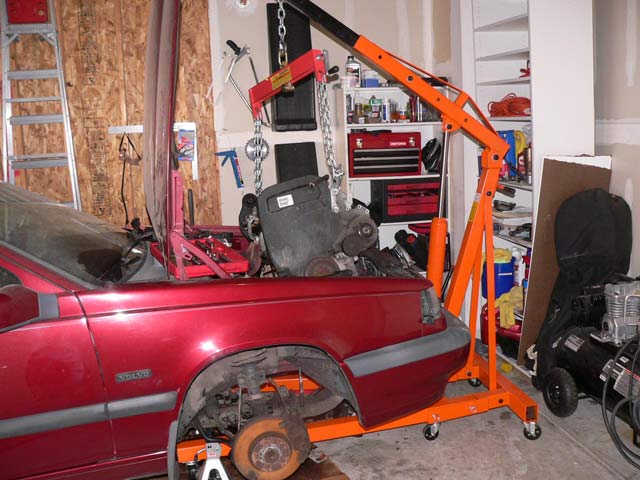

57) Careful of the ABS/brake box. It will hang up there if you don't tilt it correctly. You also have to push and pull the engine hoist toward and away from the car as you bring it up. Experiment. (112.4, 112.5, 113, 114, 115, 116, 117)

58) You can see the damaged (bent) brake line and the heat shield. Two reasons for this. 1) I didn't have enough room to put the engine hoist in front of the car the first time I pulled it out. As you lift the engine I had the hoist behind the lifting point and that pulled the engine back toward the firewall as it lifted. You need room to position the hoist further back from the car initially and as the engine comes up the hoist lifting point moves toward the front of the car so the hoist will need to be pushed toward the car to keep the engine coming straight up. Also reason 2) I first tried to lift the engine out without removing the radiator and I was worried I would damage it. (118)

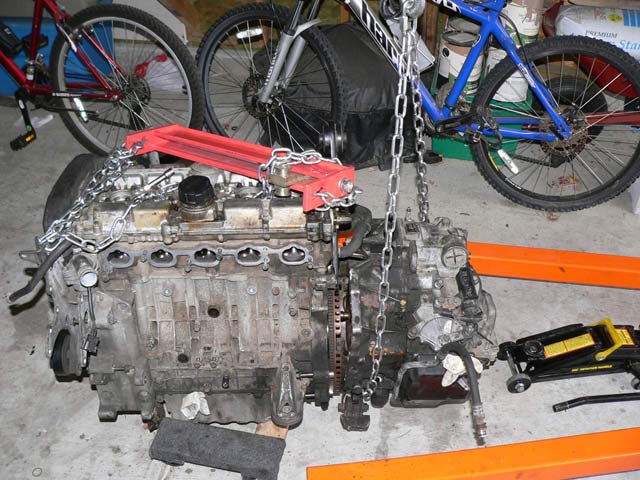
59) I used a Harbor Freight dolly and cinder blocks to rest the engine/transmission on to be able to move it around. (119)

Note: If you are going to separate the engine/tranny right away, don’t bother with this step. Proceed to step #60.
Section (G) Separation of engine and transmission
The objective of section G is to separate the engine from the transmission.
- 60) After trying many different ways, I came upon this procedure.
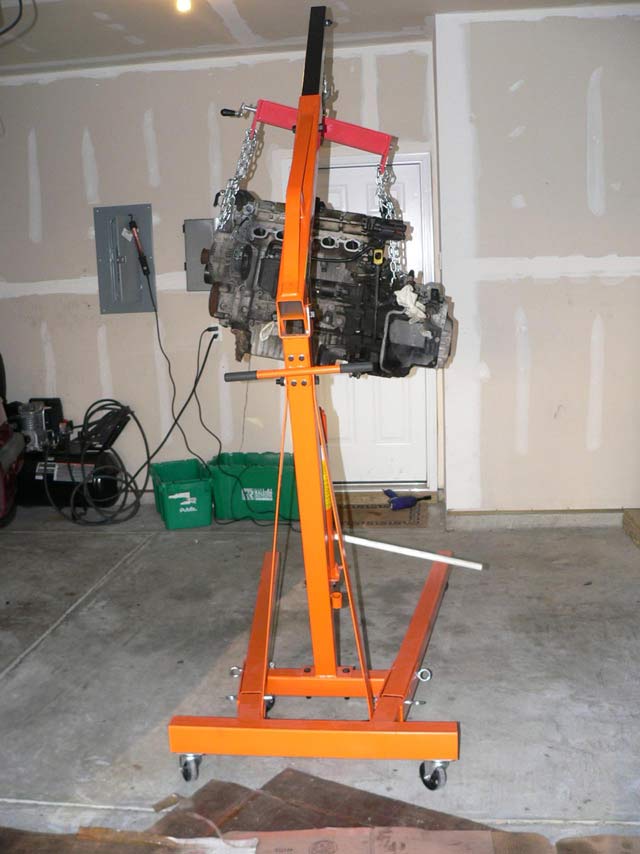
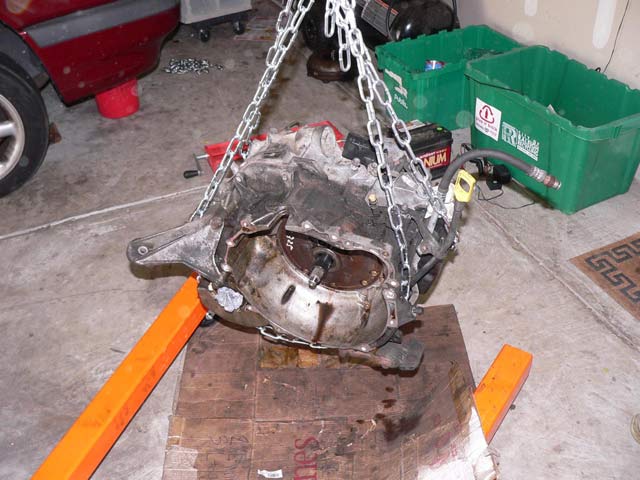
- • Starting with the engine/transmission in this position…having just pulled it out (120)

• Lay the engine this way across the dolly, and lower it down slowly. (120.1)

• Slide a jack underneath the transmission – it will be offset as far as center of gravity goes, so your goal is to prop up the transmission and let the tension off the engine hoist. (120.2)
• Unhook the load leveler, and take one of the longer pieces of chain and a quick link and wrap it around the transmission. Use two chains if you are smart – I did until I got lazy (this was the 3rd of 4th time I separated the transmission…(120.3)

• Add tension to the transmission, enough so that it unloads the jack slightly. (120.4)

61) Remove spark plugs to help in turning the engine over (121.5)

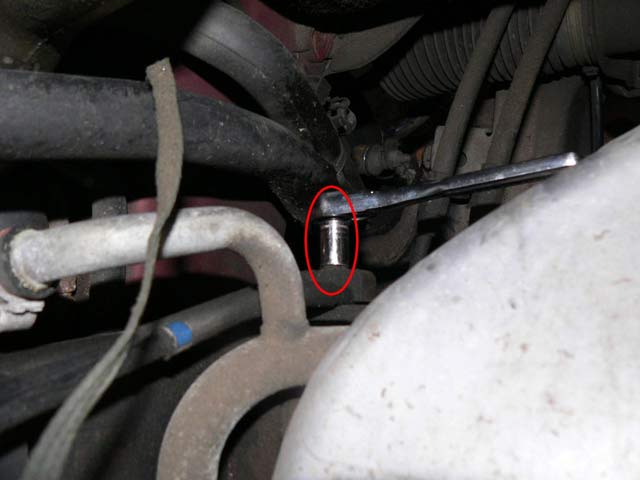
62) Put a 30 (?) mm socket on the crankshaft to turn the engine over (122)
63) Rotate the engine over till you see the SIX torque converter to flex plate torx bolts. You can remove them either thru the starter opening or the opening on the rear of the engine. (123, 123.5)


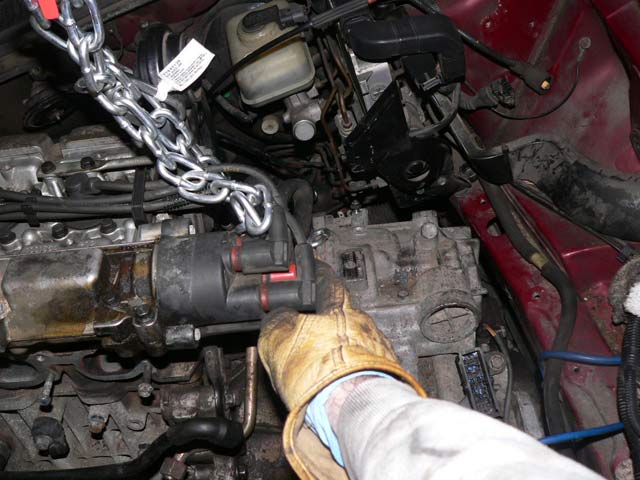
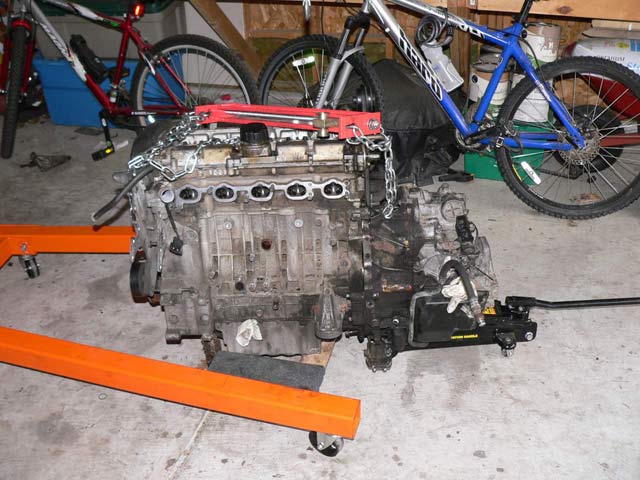
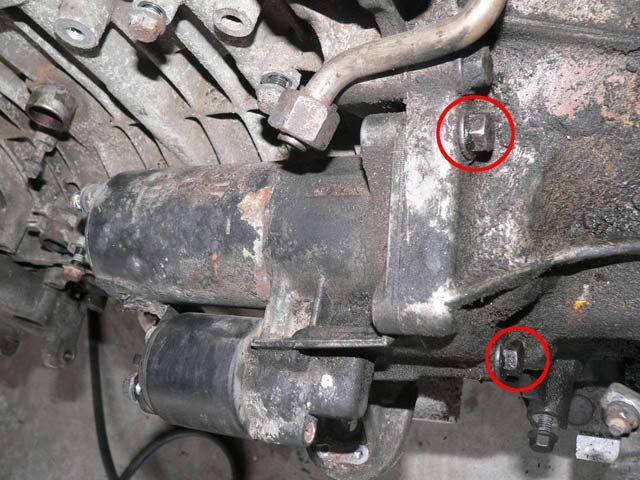
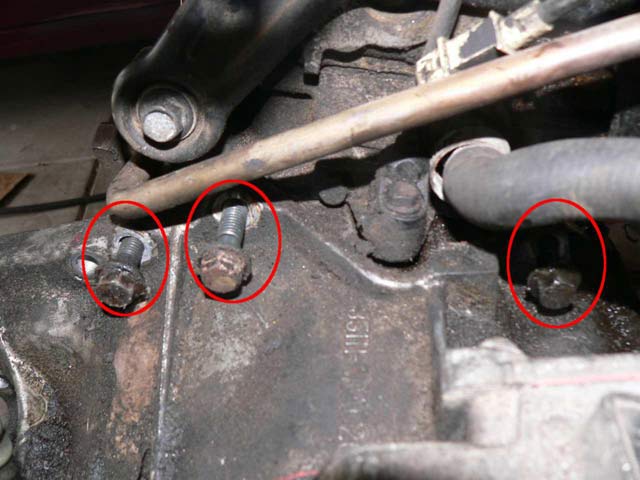
64) Separate the TEN transmission to engine bell housing bolts. (125, 126, 127)


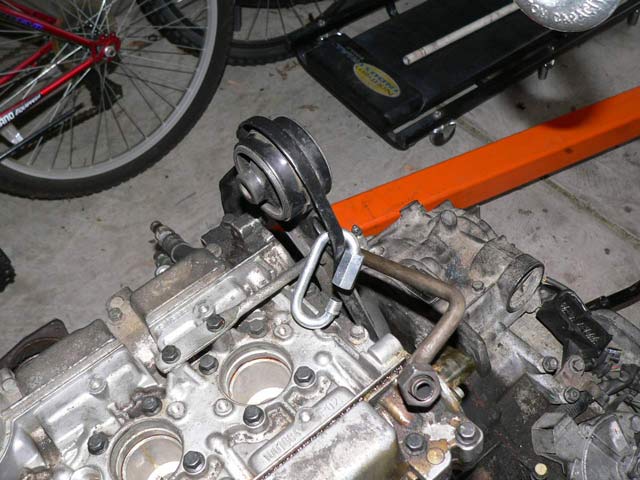
65) Lift and separate the transmission from the engine taking care to keep the torque converter on the transmission. (127.1, 127.2)

I have made a youtube video here:
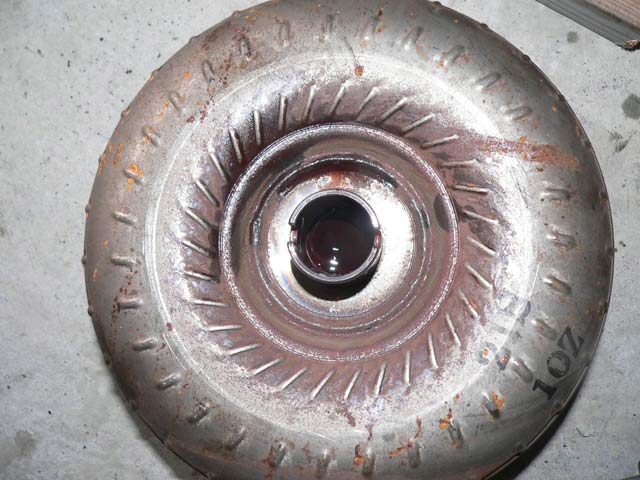
66) Lower the transmission down to the ground and pull the torque converter straight off. Tip the torque converter over a bucket to drain. (127.3, 128, 129)

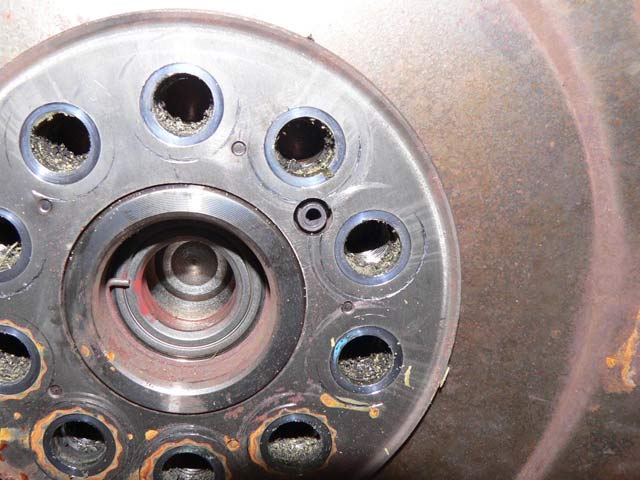
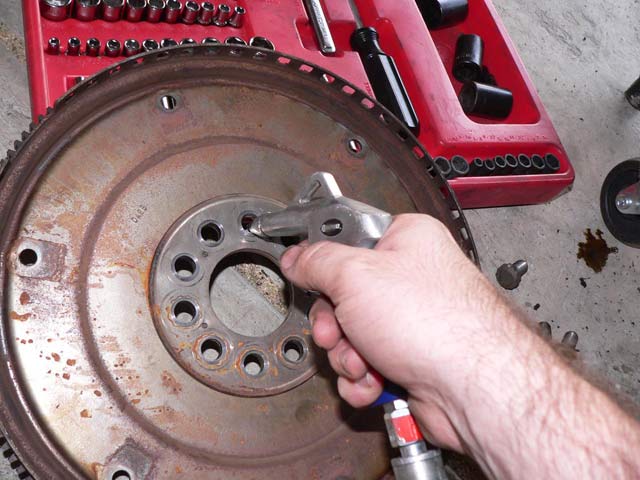
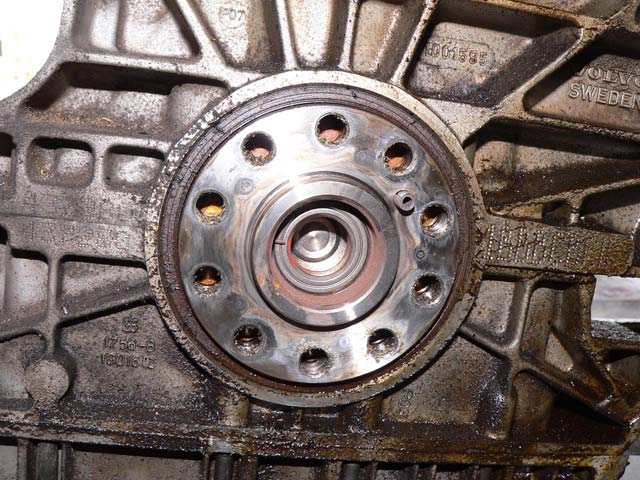
67) To get to the rear main seal (RMS), remove the TEN 12-point bolts. I used an impact wrench because the flywheel will move if you try to twist it off. You might have to stick something in it to prevent it from turning. (130)

68) Once removed use a shop vac to suck out the leftover sealant. Then blow air to clear it. I did the same with the flywheel holes. (131, 132, 133, 133.5)


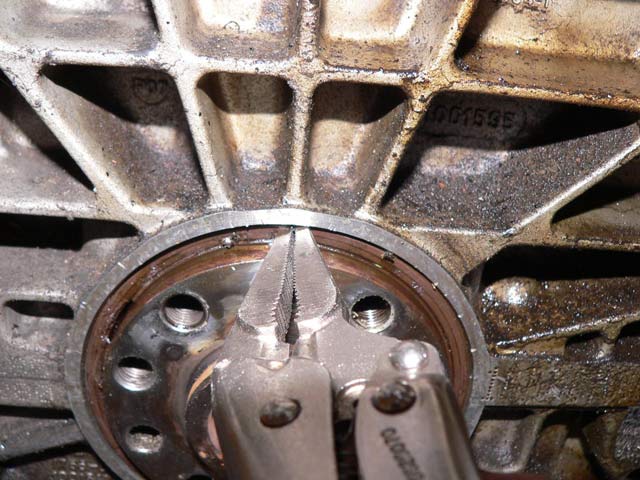
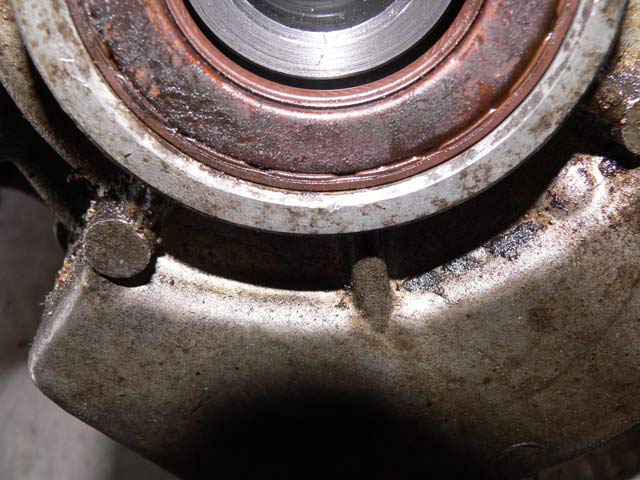
69) The rear main seal. To remove I used a screw, although there are probably better more elegant ways to get it out. To tap the new one back in I used a flat surface on my vice grips. (134, 134.5)
70) To remove the axle seals I used large pliers and leveraged against the case. They popped right out. (135, 136, 137, 138).
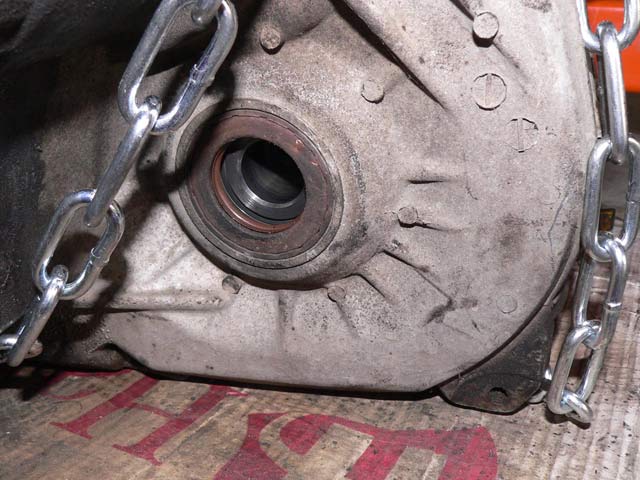
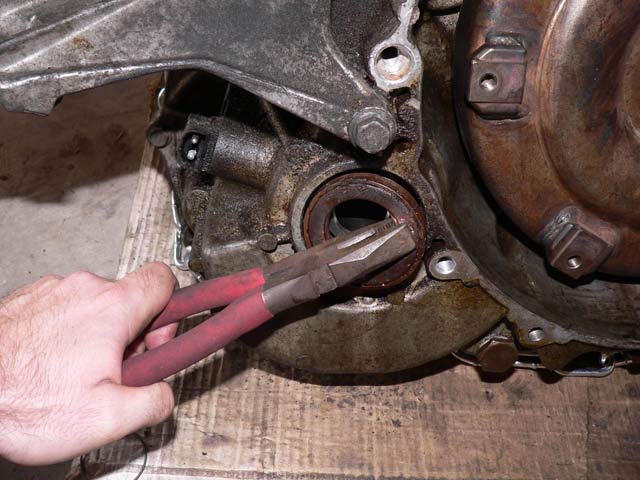

71) The pump seal was a little more difficult. I settled on a small pair of vice grips and grabbed the inside of it, being careful not to damage the sealing surface. (139, 140)

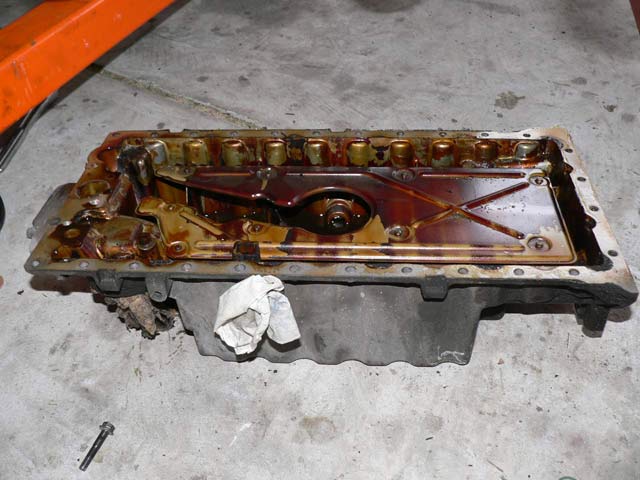
72) If you want to remove the oil pan and o-rings now is a good time as well. The ba-zillion bolts that hold the pan on come off, the pan drops, and you undo the two bolts holding the pickup tube on. There is an o-ring on the pickup tube, and two in on the mating surface of the block. Again vice grips came in handy. In addition, make sure the hole for the PCV system is open and as clear as it can be up to the outside front of the block (where the system connects via the oil separator box). To reinstall, another tutorial already takes your thru the process, start at step #11. viewtopic.php?p=20460#20460 (141, 142, 143, 144, 145, 146).


- • Starting with the engine/transmission in this position…having just pulled it out (120)
Re-installation:
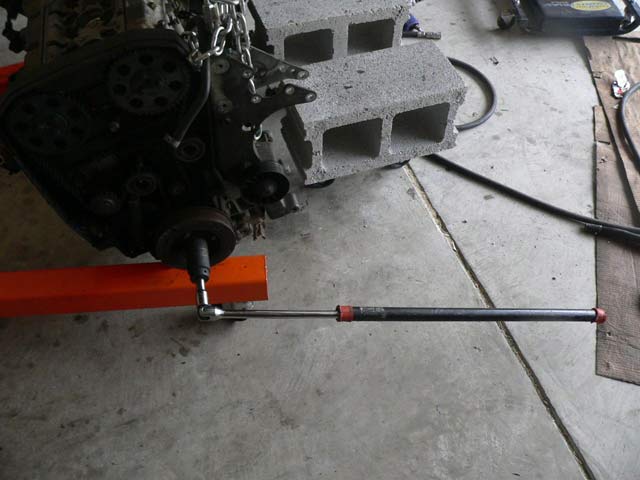
75) The Haynes has you attach the transmission in the opposite way it was removed, then pull the torque converter to the flexplate. To start, mount the flexplate with new bolts, and torque accordingly. I believe it was 33 ft-lbs then 50 degrees for manual tranny or 65 degrees for auto transmissions, check the Haynes or VADIS.
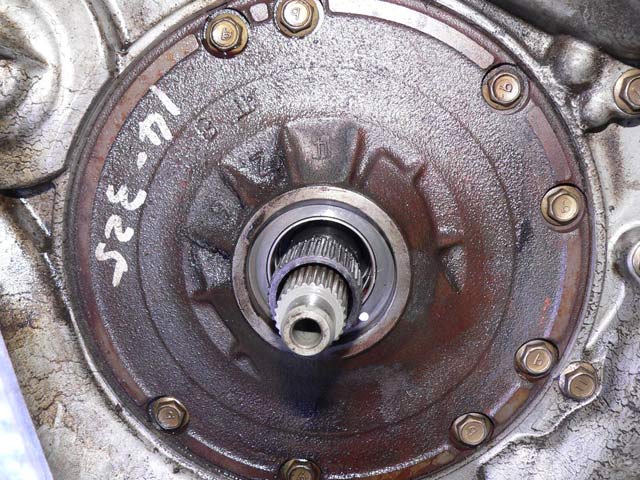
76) To reinstall the torque converter, you must put it on the transmission and measure the distance from the bolt mounts to the outside of the transmission bellhousing. This distance should be around ½”. If less the torque converter isn’t fully seated and will destroy your transmission when you crank the car over. To ensure it's seated you rotate as you put it on the splines that stick out and rotate the torque converter back and forth. It will clunk and move into the splines several times. (147)

Raise transmission with engine hoist or transmission jack. Try to orient one of the torque converter bolt flanges to hit the opening on back of engine so you don't have to turn torque converter. If unsuccessful don't fret. There is an opening on the back of the transmission housing where your finger can fit thru and push on the torque converter, or you also might be able to access the TQ from the starter hole.
There are several dowel type pins on the engine bellhousing that allow the transmission to slide into place. Secure bottom transmission bellhousing bolts (6 IIRC) to secure engine and transmission together.
Use a ratchet and 30mm socket on crank pulley to rotate flexplate bolts on opening on back of the engine/starter opening on front side. If the torque converter bolt does not line up, use your finger to push on torque converter and spin it around to line it up. Get it close and you can use an alignment punch or small screwdriver to position it the rest of the way.
Install torque converter to flexplate T50 bolts, remembering to use new or cleaned and freshly loctitied old bolts. Rotate around using the ratchet on crank pulley method. I hand tightened them at first then redid them with correct torque spec (22 ft-lbs).
Remember to install the 4 transmission bellhousing bolts on top as well.
77) Everything else is pretty much the reverse of installation. Remember you will need new seals as well:
O-rings for oil-cooler (transmission) lines
O-rings for heater-core lines
Oil-pan o-rings and gasket compound (if replacing the oil pan o-rings)
Axle nuts
Upper torque bar bolts
Good luck!


