


Yes this first rate individual designed the CBV bottom bolt to be virtually un-accessible due to the cooling pipe running off the back of the engine. He could have allowed at least 3mm more clearance on the pipe to make it easy as I see the pipe has plenty of clearance in the surrounding area for at least 1 addition inch of clearance in there.
Also to note the Forge valve has allen bolts rather than hex head that are longer then what is removed on the stock CBV making installation and down right heart to heart one on one with God praying for an end to the nightmare.
1.5hr later on just installing that bottom bolt with zero room or tolerance it was only after removing the heater hose that cross the trans and goes into the cylinder head which also requires the bracket that hold the vacuum lines for the TCV be removed that I could use an allen key for the Forge bolts. The sharp edges of the trans wiring hardness and other edge makes for a scene from the Van Damme movie Blood sport when he is punches a bowl of glass with his hands for training. You come out of the experience with raw and cut up hands and feeling like you narrowly escaped death. I have rebuild numerous cars from bare chassis on up in the last 17yrs and I have 3 tool boxes full of snap-on tools pro set-up so I am no spring chicken and nothing prepares you for this. No allen socket will fit due to the pipe clearance and a ball end allen key barely fits off angle that you must turn 1/8th at a time until it threads enough past the pipe where you can better turn it.There must be a special tool from Volvo that is bent in such a manner to remove that bottom screw on the stock set-up. With that I should have re-used the original bolts versus what came with the Forge valve and the installation would have been slightly easier. Understand that the IPD instructions are not much of a help neither was any google search even though I followed IPD instructions during the CBV replacement as Forge come with no instructions and just in bubble wrapped. Ahh to recap and as luck would have it the stock bottom bolt was one of those that are tight and doesn't spin then comes very loose then tightens up again. It just teases you with false hope and crushes your spirit. The uppers were very easy to remove and spun easily again lady luck strikes...
My heart goes out to you guys that are working on cars with more use and/or in area's were the cars are exposed to the elements as this job can be worst for you with rust and wear taken in consideration.
I can only serve to inspire you that eventually it can be done with perseverance and patience and offer this advise.
I say the easiest way is contrary to what is instructed on the IPD's CBV instructions online I say remove both top bolts and then push or tilt the CBV to the left so you have better access to the bolt to turn it. A mechanics knee cushion on the battery to rest on another over top of the engine since thats where your sitting working is easier then over the fenders and a another cushion to support your brow of your head against the cowl so that you may have both hands free and can support your body into position without use of your hands as braces. Easier yet save yourself the trouble and take it somewhere or remove your turbo. I would have gladly paid whatever the shop would have wanted to not experience this.
However I have solved the laziness problem on my 13k mile car. A combination of a lazy TCV ohm impedance test showed large variance with a new factory fresh TCV in hand along with a week spring on the CBV. The diaphragm was perfect and almost made me cry once I discovered that until I vacuum tested it and saw the weak spring. The forge CBV solves both the inherit design flaws of diaphragm and spring as its a piston spring design and the spring is shielded by more material than a rubber diaphragm . And as no internet search will ever show in detail the Forge CBV is actually a 2 pieces construction and you can unscrew it to change the spring inside and also have the ability to clock the vacuum nipple to facilitate easier installation of the clamp on the vacuum hose then swing it back and tighten collar back up.
CBV install on a Volvo XC70
This topic is in the MVS Volvo Repair Database »
CBV Install on AWD P80 Volvos DIY
-
precopster
- Posts: 7543
- Joined: 21 August 2010
- Year and Model: Lots
- Location: Melbourne Australia
- Has thanked: 8 times
- Been thanked: 128 times
Great work; pictures would have been great for the database.
Could you have cut allen keys down to a more easy to use size?
Wow somehow I miss the fact that the power under my right foot is less than turbo powered cars but with the B6304 in the 960 wagon I get some of that kick in the back and probably the easiest configuration to work on.
Once I get around to the heater core on the 960 I may feel differently
Current cars VW Transporter 2.5TDI, 2010 XC90 D5 R Design
Hey everyone.
Is there another write-up for this repair/replacement on MVS?? One with pics?
I did find one helpful thing, attached PDF. But thats a 2000 v70 i think.
Is there another write-up for this repair/replacement on MVS?? One with pics?
I did find one helpful thing, attached PDF. But thats a 2000 v70 i think.
 V70 2001- CBV replacement.pdf
- (3.39 MiB) Downloaded 63 times
-
FlyingVolvo
- Posts: 1822
- Joined: 8 March 2009
- Year and Model: 2000 V70XC
- Location: USA
- Has thanked: 51 times
- Been thanked: 73 times
I replaced my CBV, and all it took was 15 minutes on my 2000 V70 XC! ...that is, after I removed the bevel gear! 
2000 V70XC - 340,000 miles
Hilton Tune, 16T Turbo, Mototec 3" downpipe, Blue injectors, IPD Short Ram Filter, Snabb Intake Piping & RIP kit, do88 Intercooler, TME Dual Exhaust, HID Projectors, R Panels, do88 Silicone Hoses
2023 V60 T8 PE
Hilton Tune, 16T Turbo, Mototec 3" downpipe, Blue injectors, IPD Short Ram Filter, Snabb Intake Piping & RIP kit, do88 Intercooler, TME Dual Exhaust, HID Projectors, R Panels, do88 Silicone Hoses
2023 V60 T8 PE
-
MilehighV70XC
- Posts: 228
- Joined: 6 October 2009
- Year and Model: '99 V70XC, 143,000mi
- Location: Steamboat Springs, CO
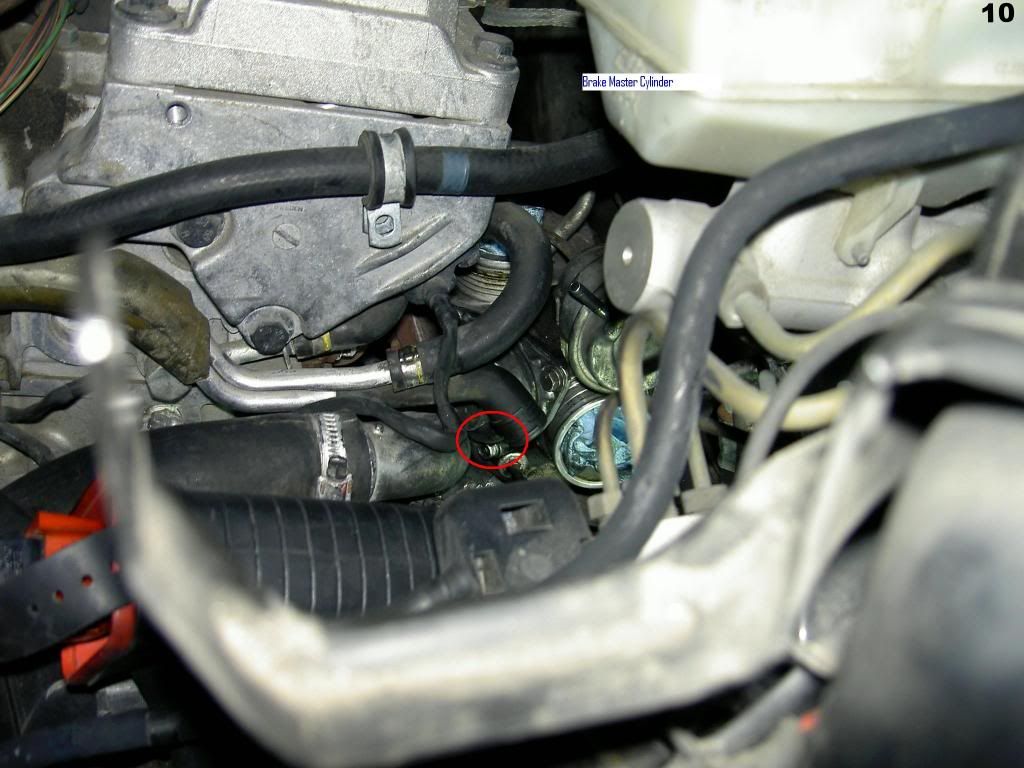
Hope these pictures help save others some time and agony when changing the CBV in there '99, 2000, and maybe '98 V70XC. The PCV hose is different on the '98. I am not sure how it attaches to the intake pipe.
You need one tool to help you do this, a custom 10mm wrench around 4 to 6 inches in length.
NOTE-- I did not have to remove the heater hose. It would have made it a little easier but a lot more work. I think the shaved 10mm saved me from having to do that.

I bought a really cheap set of 12 wrenches for under $20. You need to grind the rounded edges flat. Just keep grinding tell you get it to fit. It might take a couple test fits.


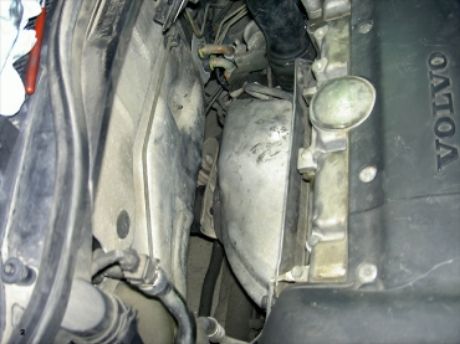
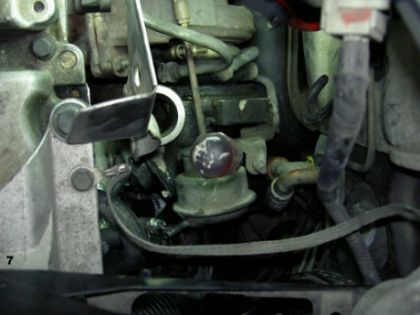
Remove both heat shields-- The one covering the turbo remove completely. The one attached to the block, rotate it up and out of the way.

Loosen one of the charge pipe worm clamps holding it to the turbo.

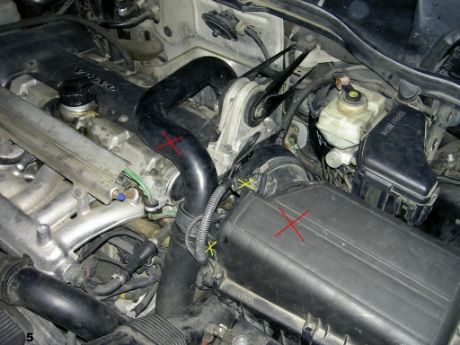
Remove the air filter box and turbo charge pipe (red X's). Disconnect MAF connector and TCV, the Yellow X's, frrm the airbox. Remove the filter box first. It will give you access to the worm clamp attached to the turbo charge pipe. Loosen the clamp, the hose clamp at the turbo should already be loose so you should be able to remove the pipe now.

Remove the bracket attached to the block that is holding various wires and vacuum hoses. Three red X's are the bolts. When reinstalling, make sure you have the hose marked with a yellow X in the bracket. If you install the upper bolt first, you wont be able to get the hose in the bracket.

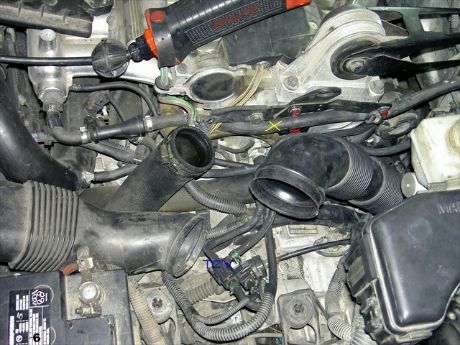
Remove intake pipe that runs between the airbox and the turbo. Using a flat head screw driver you can get to the clamp by placing the screw driver in the opening by the wastegate.

You need to loosen the clamp and unhook the PCV hose that attaches to the intake pipe PTC nipple. Just bend the hose to the side and you should have access to the clamp.

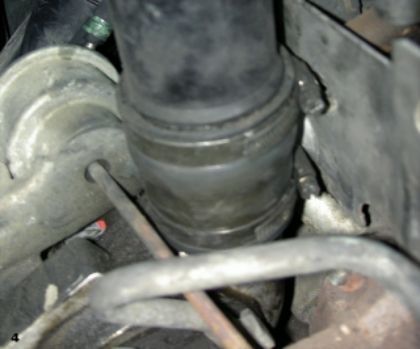
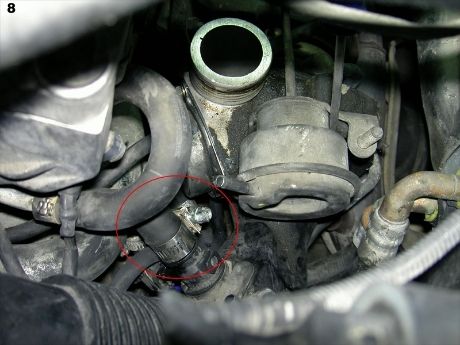
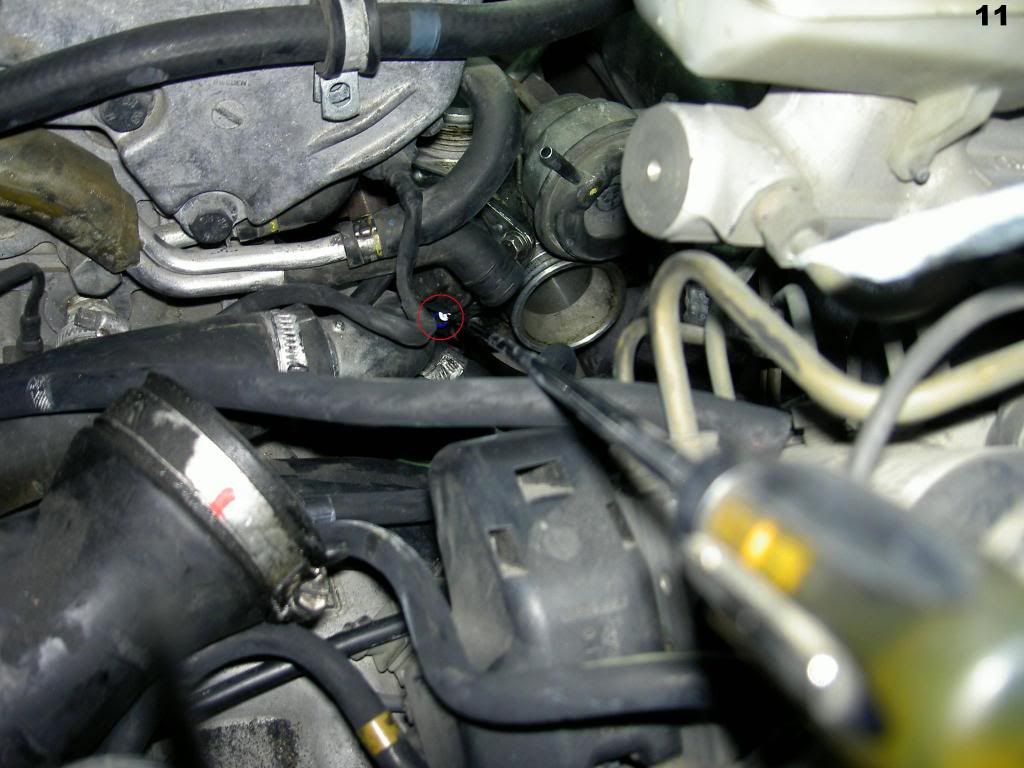
You now have access to the bolt

Magnified view
Now you get your custom 10mm wrench. You can barely get it on the bolt head, but, it will fit. You can only turn it a thread or two at a time, but once it is broken loose you can use your thumb and middle finger and get it all the way out. It took me a at least a good 45min to get it out.

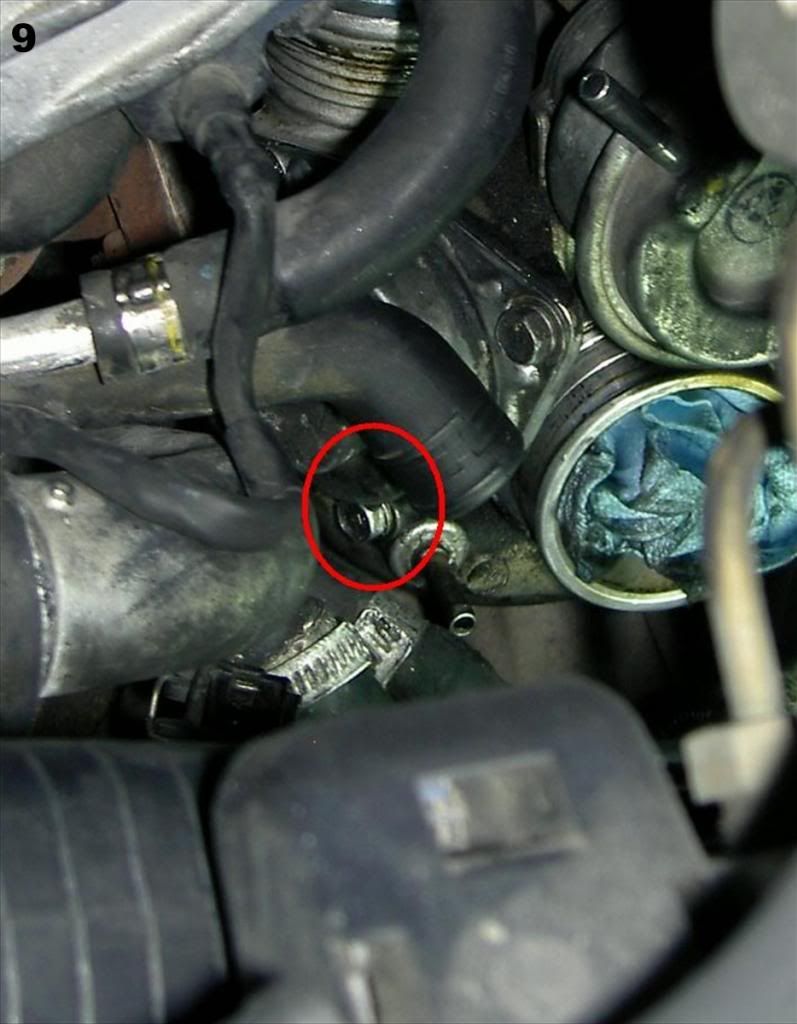
Now it is time for the fun part, getting the bolt back in. First I started the other two bolts and got them kind of finger tight. Do this to hold the cover on since it will be spring loaded from the spring in the CBV. I could not hold the bolt in my fingers and get the bolt started. I ended using a telescoping magnet and was able to finagle it in to place. Once is was in the hole, I was able to get the bolt started with my fingers and then finished with the wrench. The bolts don't have to be super tight so just snug them up. Getting the bolt in took me around and hour.
This is the first write up I have done. I did the fix a while ago so some of the details are a little fuzzy. If anyone has anything they would like to add or see anything I should add or edit, please let me know.
You need one tool to help you do this, a custom 10mm wrench around 4 to 6 inches in length.
NOTE-- I did not have to remove the heater hose. It would have made it a little easier but a lot more work. I think the shaved 10mm saved me from having to do that.
I bought a really cheap set of 12 wrenches for under $20. You need to grind the rounded edges flat. Just keep grinding tell you get it to fit. It might take a couple test fits.
Remove both heat shields-- The one covering the turbo remove completely. The one attached to the block, rotate it up and out of the way.
Loosen one of the charge pipe worm clamps holding it to the turbo.
Remove the air filter box and turbo charge pipe (red X's). Disconnect MAF connector and TCV, the Yellow X's, frrm the airbox. Remove the filter box first. It will give you access to the worm clamp attached to the turbo charge pipe. Loosen the clamp, the hose clamp at the turbo should already be loose so you should be able to remove the pipe now.
Remove the bracket attached to the block that is holding various wires and vacuum hoses. Three red X's are the bolts. When reinstalling, make sure you have the hose marked with a yellow X in the bracket. If you install the upper bolt first, you wont be able to get the hose in the bracket.
Remove intake pipe that runs between the airbox and the turbo. Using a flat head screw driver you can get to the clamp by placing the screw driver in the opening by the wastegate.
You need to loosen the clamp and unhook the PCV hose that attaches to the intake pipe PTC nipple. Just bend the hose to the side and you should have access to the clamp.
You now have access to the bolt
Magnified view
Now you get your custom 10mm wrench. You can barely get it on the bolt head, but, it will fit. You can only turn it a thread or two at a time, but once it is broken loose you can use your thumb and middle finger and get it all the way out. It took me a at least a good 45min to get it out.
Now it is time for the fun part, getting the bolt back in. First I started the other two bolts and got them kind of finger tight. Do this to hold the cover on since it will be spring loaded from the spring in the CBV. I could not hold the bolt in my fingers and get the bolt started. I ended using a telescoping magnet and was able to finagle it in to place. Once is was in the hole, I was able to get the bolt started with my fingers and then finished with the wrench. The bolts don't have to be super tight so just snug them up. Getting the bolt in took me around and hour.
This is the first write up I have done. I did the fix a while ago so some of the details are a little fuzzy. If anyone has anything they would like to add or see anything I should add or edit, please let me know.
-
MilehighV70XC
- Posts: 228
- Joined: 6 October 2009
- Year and Model: '99 V70XC, 143,000mi
- Location: Steamboat Springs, CO


-
matthew1

- Site Admin
- Posts: 14463
- Joined: 14 September 2002
- Year and Model: 850 T5, 1997
- Location: Denver, Colorado, US
- Has thanked: 2652 times
- Been thanked: 1240 times
- Contact:
MileHi - thanks for these pics. Sorry about the editing post trouble. I'll transplant these within the next few days and clean up.
Help keep MVS on the web -> click sponsors' links here on MVS when you buy from them.
Also -> Amazon link. Click that when you go to buy something on Amazon and MVS gets a cut!
1998 V70, no dash lights on
1997 850 T5 [gone] w/ MSD ignition coil, Hallman manual boost controller, injectors, R bumper, OMP strut brace
2004 V70 R [gone]
How to Thank someone for their post

Also -> Amazon link. Click that when you go to buy something on Amazon and MVS gets a cut!
1998 V70, no dash lights on
1997 850 T5 [gone] w/ MSD ignition coil, Hallman manual boost controller, injectors, R bumper, OMP strut brace
2004 V70 R [gone]
How to Thank someone for their post
-
- Similar Topics
- Replies
- Views
- Last post
-
- 0 Replies
- 666 Views
-
Last post by Sveedy
-
- 4 Replies
- 462 Views
-
Last post by awizarddresden