Hello all,
I recently installed a "wing" on my 05' V70 and since I had trouble finding good instructions online I thought I take some notes and share what I learned from doing this job.
There is a mounting kit available from Volvo for about $58 which includes all the hardware needed, plus the templates for drilling the holes from the outside. There are also holes to be drilled from the inside, but they are clearly marked.
Part number for the Kit: 30664143
Unfortunately, the instructions that come with this kit are a bit confusing and in parts even incorrect. More on that later.
Also, the screws supplied with this kit are the wrong length. Volvo's one size fits all does not work in this case, but again, I will explain at the appropriate step in the process.
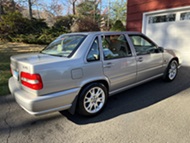
This is the spoiler I installed, a good used OEM volvo part off ebay, even in the correct color for my car:
Tools needed:
- 1/8" drill bit
- 3/8" drill bit
- 5/8" hole saw
- 10mm wrench of some kind, anything will work
- power drill (I use a cordless drill for almost everything I do)
- torx 25 driver
I found that the 5/8" hole saws are hard to find in stores. After wasting some time looking at the local hardware store, Home Depot and Lowes, I resorted to using a wood drill. This was VERY tricky and I would strongly advise against doing that.
After the fact I found them on Amazon for around $10. Do yourself a favor and order one.
First step is removing the tailgate panel and window surround trim, which is easy. The panel is held in place with four (4) t25 screws. Remove those and then pop the panel off.
Once that's off you can pop off the window trim. It slides down and out.
Next step is to apply the templates to the car and securing them with some tape. I then highlighted the hole locations with a marker, otherwise they are kind of hard to see.
Next step is pre- drilling the mounting holes with a 1/8" drill bit.
There are two (2) layers of material, so I will call the outside layer "top" and the inside layer "bottom". The following image shows the design of the tailgate with the layers:
Drill top holes in the locations shown above, then remove templates.
I am showing only the driver side, but the passenger side is the same.
Bottom holes. Note that these are marked already from the factory. I would advise against drilling the center hole. This is the hole location for the harness pass through, but it is in the wrong place. The instructions give dimensions for this to be drilled from the top, but they are also incorrect. Found out the hard way.
Next step is drilling the 3/8" holes from the bottom.
Now it's time to open up the hole close to the edge of the tailgate with the 5/8" hole saw. This is what the end result should look like:
The last hole to drill is the pass through for the brake light harness. As mentioned earlier, none of the instructions from Volvo worked for this. I went with the pre- marked location and ended up with a much too large hole, because it wouldn't match the opening in the double sided tape pads.
What I would do next time is to transfer the holes from the pads by laying them on the outside of the tailgate after lining them up with the mounting holes. I don't have a photo for this, but maybe this image helps:
Next is drilling the hole for the pass through. Use the 1/8" bit to pre- drill. Then drill with the 3/8" bit all the way through. This hole could also be a little smaller, it's just the cable going through there.
Now its time to prep the spoiler for installation. The connector needs to be undone, and the pins need to be pulled out. It should look like this:
After that, you can apply the double sided tape pads. Sorry, I don't have a photo for this.
Now comes the big moment. Line up the spoiler with the holes and stick it on. As this is done, the brake light harness needs to be fed through the clearance hole.
After that the hardware can be installed. Like I said earlier, the provided hardware did not work out for this, see the following photo for the correct sizes. You will want to be careful here and not overtighten.
Next is feeding the harness through the grommet and into the upper tailgate area. There is a little nipple right next to the hinge that needs to be cut off. Sorry, I didn't take a photo of that, but it's pretty obvious.
The last step is to re- install the connector on the harness and to plug it back in. I used some cable ties to make it look neat again.
Also, I choose to remove the old brake light. You don't have to do this, but if you want to, there is a little pin in the center that has to be removed and then it can be slid sideways and out.
The kit comes with a black decal to cover up the old brake light. Mine was all crumpled and therefore I did not install it. Honestly, this doesn't bother me. You can't really see it anyway behind the spoiler.
And here is the finished result:
I hope this helps someone who is thinking of installing one of these.
If you have done this and have suggestions for improvements, please post them here.
Dirk
P2 V70 rear spoiler installation instructions with photos
- 850 LPT
- Posts: 1961
- Joined: 27 May 2011
- Year and Model: 96' 850
- Location: CT
- Has thanked: 331 times
- Been thanked: 242 times
P2 V70 rear spoiler installation instructions with photos
98' S70, base, 5-speed manual, pewter/ tan, 145k miles
99' S70, base, 5-speed manual, nautic blue/ tan, 225k miles, currently inop
06' V70, auto, willow green/ charcoal, 147k miles
79' Ford Capri S, Euro Spec 2.8 V6, T9 5-speed manual, owned since 1986
58' Porsche Diesel Junior
13' Honda Odyssey
84' Mercedes 300 D, gold/ tan, 420k miles (retirement project
)
99' S70, base, 5-speed manual, nautic blue/ tan, 225k miles, currently inop
06' V70, auto, willow green/ charcoal, 147k miles
79' Ford Capri S, Euro Spec 2.8 V6, T9 5-speed manual, owned since 1986
58' Porsche Diesel Junior
13' Honda Odyssey
84' Mercedes 300 D, gold/ tan, 420k miles (retirement project
- oragex
- Posts: 5347
- Joined: 24 May 2013
- Year and Model: S60 2003
- Location: Canada
- Has thanked: 102 times
- Been thanked: 352 times
- Contact:
Useful. I think the one on the V70 looks much better. The S60 also had a tiny one on the S60R
Several Volvo Repair Videos https://www.youtube.com/playlist?list=P ... s0FSVSOT_c
- abscate
- MVS Moderator
- Posts: 35267
- Joined: 17 February 2013
- Year and Model: 99: V70s S70s,05 V70
- Location: Port Jefferson Long Island NY
- Has thanked: 1497 times
- Been thanked: 3810 times
I hate people who can put their car(s) in their garage
Empty Nester
A Captain in a Sea of Estrogen
1999-V70-T5M56 2005-V70-M56 1999-S70 VW T4 XC90-in-Red
Link to Maintenance record thread
A Captain in a Sea of Estrogen
1999-V70-T5M56 2005-V70-M56 1999-S70 VW T4 XC90-in-Red
Link to Maintenance record thread
- 850 LPT
- Posts: 1961
- Joined: 27 May 2011
- Year and Model: 96' 850
- Location: CT
- Has thanked: 331 times
- Been thanked: 242 times
You should see what's in the other bay.
98' S70, base, 5-speed manual, pewter/ tan, 145k miles
99' S70, base, 5-speed manual, nautic blue/ tan, 225k miles, currently inop
06' V70, auto, willow green/ charcoal, 147k miles
79' Ford Capri S, Euro Spec 2.8 V6, T9 5-speed manual, owned since 1986
58' Porsche Diesel Junior
13' Honda Odyssey
84' Mercedes 300 D, gold/ tan, 420k miles (retirement project
)
99' S70, base, 5-speed manual, nautic blue/ tan, 225k miles, currently inop
06' V70, auto, willow green/ charcoal, 147k miles
79' Ford Capri S, Euro Spec 2.8 V6, T9 5-speed manual, owned since 1986
58' Porsche Diesel Junior
13' Honda Odyssey
84' Mercedes 300 D, gold/ tan, 420k miles (retirement project
-
Bolle
- Posts: 2
- Joined: 29 December 2021
- Year and Model: 2005 V70
- Location: Sweden
- Has thanked: 1 time
Really great instructions, well done! I'm about to do the same as you and I'm also having problems to get my head around the instruction.
One question though: how did you remove the pins from the connector?!
I can't just pull them out. The pins are stuck and I don't want to destroy the connector...
- 850 LPT
- Posts: 1961
- Joined: 27 May 2011
- Year and Model: 96' 850
- Location: CT
- Has thanked: 331 times
- Been thanked: 242 times
Hello Bolle, thanks.Bolle wrote: ↑29 Dec 2021, 11:55 Really great instructions, well done! I'm about to do the same as you and I'm also having problems to get my head around the instruction.One question though: how did you remove the pins from the connector?!
I can't just pull them out. The pins are stuck and I don't want to destroy the connector...
It has been a while since I did this, but if memory serves me right, there should be a little flap on the side of the connector where the pins go into it. And I think you have to flip this up, and then the pins slide out. I hope this helps a little.
Dirk...
98' S70, base, 5-speed manual, pewter/ tan, 145k miles
99' S70, base, 5-speed manual, nautic blue/ tan, 225k miles, currently inop
06' V70, auto, willow green/ charcoal, 147k miles
79' Ford Capri S, Euro Spec 2.8 V6, T9 5-speed manual, owned since 1986
58' Porsche Diesel Junior
13' Honda Odyssey
84' Mercedes 300 D, gold/ tan, 420k miles (retirement project
)
99' S70, base, 5-speed manual, nautic blue/ tan, 225k miles, currently inop
06' V70, auto, willow green/ charcoal, 147k miles
79' Ford Capri S, Euro Spec 2.8 V6, T9 5-speed manual, owned since 1986
58' Porsche Diesel Junior
13' Honda Odyssey
84' Mercedes 300 D, gold/ tan, 420k miles (retirement project
-
Bolle
- Posts: 2
- Joined: 29 December 2021
- Year and Model: 2005 V70
- Location: Sweden
- Has thanked: 1 time
It was not as easy as that. The pins are stuck anyway, but you can wiggle them a little. Thanks anyway!
850 LPT wrote: ↑29 Dec 2021, 12:05Hello Bolle, thanks.Bolle wrote: ↑29 Dec 2021, 11:55 Really great instructions, well done! I'm about to do the same as you and I'm also having problems to get my head around the instruction.One question though: how did you remove the pins from the connector?!
I can't just pull them out. The pins are stuck and I don't want to destroy the connector...
It has been a while since I did this, but if memory serves me right, there should be a little flap on the side of the connector where the pins go into it. And I think you have to flip this up, and then the pins slide out. I hope this helps a little.
Dirk...
-
- Similar Topics
- Replies
- Views
- Last post
-
- 1 Replies
- 334 Views
-
Last post by admiralsenn
-
- 9 Replies
- 2395 Views
-
Last post by h20ham


