


Just checking, but...
You do know about the adapters for
coming in through the changer input?
Created an mp3 input for SC-816......
This topic is in the MVS Volvo Repair Database »
Adding an MP3 plug-in to your Radio
-
MadeInJapan
- MVS Moderator
- Posts: 13434
- Joined: 31 March 2005
- Year and Model: '98 S70 T5 '07S40T5
- Location: Knoxville, TN American but born in Japan
- Has thanked: 17 times
- Been thanked: 35 times
I too would like to see pictures and know what resistors/capacitors you had to use to keep the board from becoming overloaded with the MP3 input.
'98 S70 T5 Emrld Grn Met/Beige Tons of Upgrades Mobil-1
'04 V70 2.5T Red/Taupe Some Upgrades Mobil-1
'07 S40 T5 AWD 6 speed manual! Silver/Black Stage1 Heico & Elevate
'07 S60 2.5T Blue/Taupe- my kid's Volvo
'04 V70 2.5T Red/Taupe Some Upgrades Mobil-1
'07 S40 T5 AWD 6 speed manual! Silver/Black Stage1 Heico & Elevate
'07 S60 2.5T Blue/Taupe- my kid's Volvo
Add mp3 input to Volvo SC-816 radio:
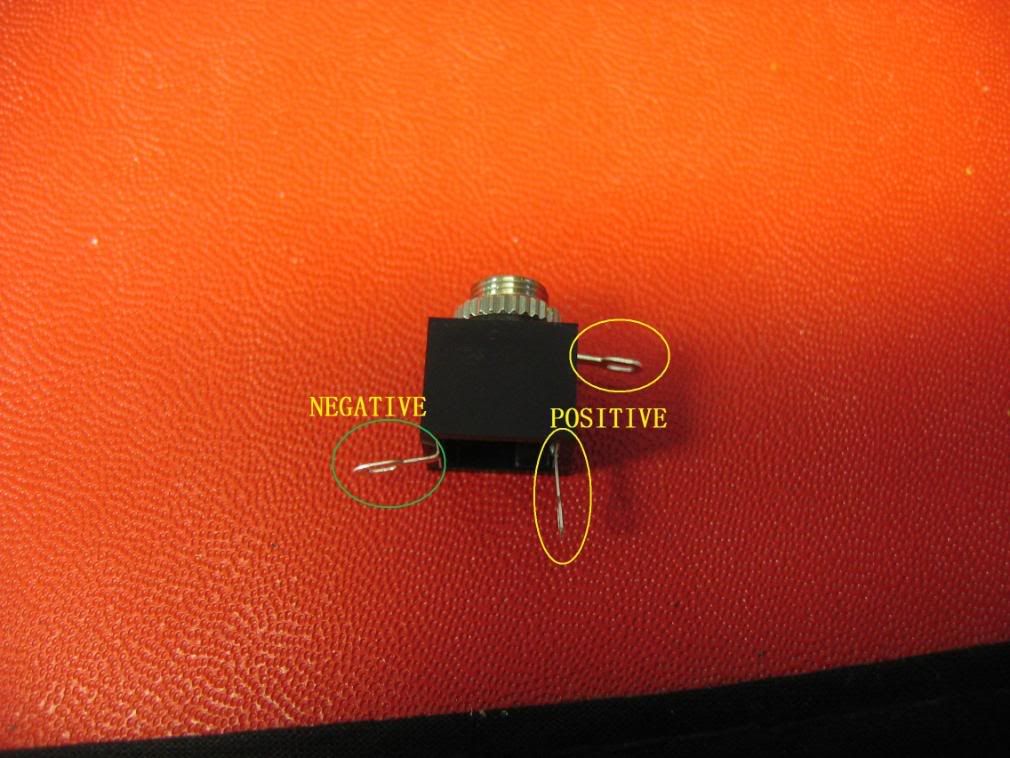
To start, make a run by Radio Shack and pick up a 3 pin 3.5mm panel mount phone jack. I'm not exactly sure of the part number because I happened to have a few already. I guess you can use the pictures as a reference as to what to look for. It needs to be either a 1/8 or 3.5mm jack. You will also need to purchase two 5.1Kohm resistors and two 1Kohm resistors, and some breadboard from radio shack. Next, make sure you have your radio code handy. I hope your hands are steady and you're good with a soldering iron!!
This picture shows the jack you will need. Note the negative and positive leads. The stereo shares one contact for the negative right and left.
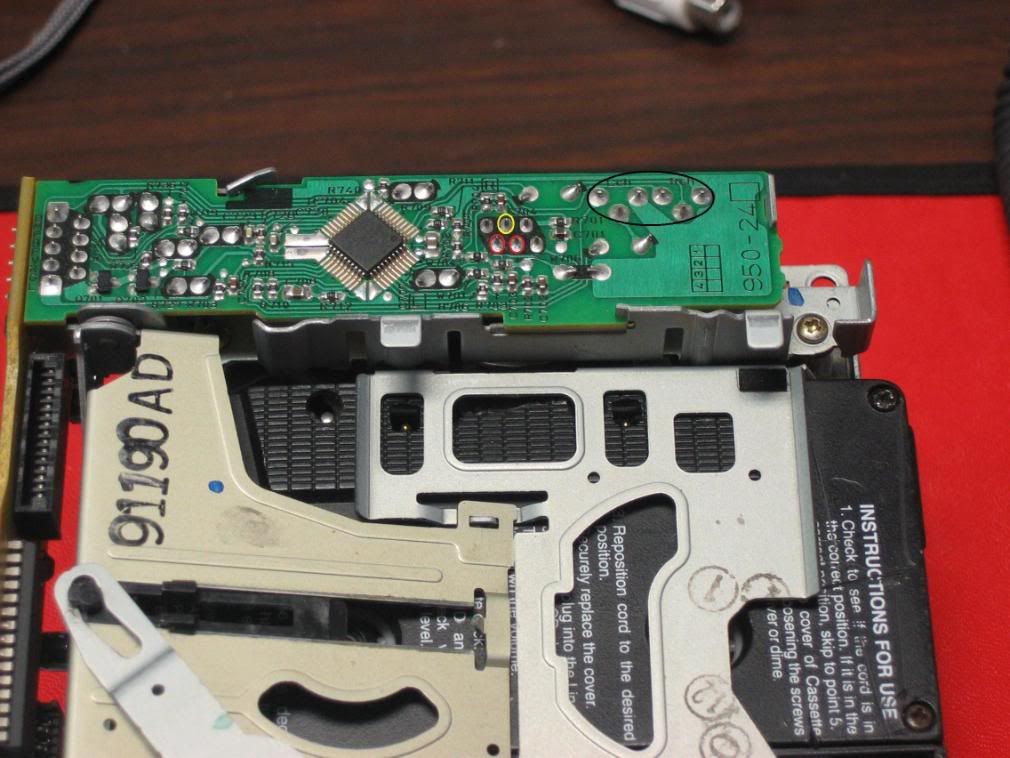
Remove your radio from the dash and disconnect all of the wiring. Carry it to your workbench and remove the top cover, cd player, the bracing bar, and finally the tape deck. The top cover is held in place by two Phillips head screws near the back edge of the stereo. The cd player is held in place by 4 phillips head screws, one at each corner of the cd player. Be careful not to drop the screws if you don't have a magnetic screwdriver. The cd player is connected to the rest of the radio by one of the flat cables. If you pull the cable out of the cd player end, you can get it back in. The tape deck is held in place by four phillips head screws, one on each corner. It is connected to the radio by the same kind of flat cable as the cd player. It's easily removed from the tape deck end and is easily re-inserted as well. Once you have it removed, you will see a board on the right top side of the tape deck if you are looking from the front. The pins you are interested in are circled in red and yellow. The pins circled in black will come later.
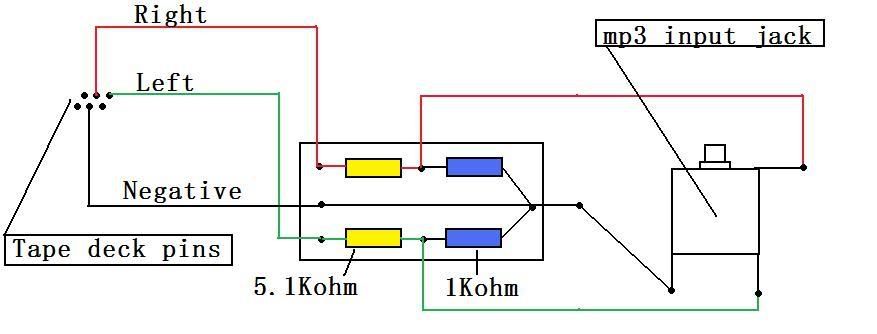
Next is the circuit board that you will need to construct. You will use the resistors and the circuit board you purchased earlier. (or you can just rob the completed board out of your tape adapter as I did!) The reason for the resistors is that your mp3 player will put out too strong of a signal to send it directly into the tape deck board. If you do not use the resistors, your music WILL be distorted period point blank. Each side (left and right) must run through the 5.1Kohm and the 1Kohm resistors. Here is a picture of the board I robbed from the tape adapter.

I have drawn the entire circuit in paint. I'm sorry, but I'm no electronics design professional, but I think you can get the jest.
Once you tap into the joints on the tape deck, you will need to run the wires out through the passenger
To start, make a run by Radio Shack and pick up a 3 pin 3.5mm panel mount phone jack. I'm not exactly sure of the part number because I happened to have a few already. I guess you can use the pictures as a reference as to what to look for. It needs to be either a 1/8 or 3.5mm jack. You will also need to purchase two 5.1Kohm resistors and two 1Kohm resistors, and some breadboard from radio shack. Next, make sure you have your radio code handy. I hope your hands are steady and you're good with a soldering iron!!
This picture shows the jack you will need. Note the negative and positive leads. The stereo shares one contact for the negative right and left.
Remove your radio from the dash and disconnect all of the wiring. Carry it to your workbench and remove the top cover, cd player, the bracing bar, and finally the tape deck. The top cover is held in place by two Phillips head screws near the back edge of the stereo. The cd player is held in place by 4 phillips head screws, one at each corner of the cd player. Be careful not to drop the screws if you don't have a magnetic screwdriver. The cd player is connected to the rest of the radio by one of the flat cables. If you pull the cable out of the cd player end, you can get it back in. The tape deck is held in place by four phillips head screws, one on each corner. It is connected to the radio by the same kind of flat cable as the cd player. It's easily removed from the tape deck end and is easily re-inserted as well. Once you have it removed, you will see a board on the right top side of the tape deck if you are looking from the front. The pins you are interested in are circled in red and yellow. The pins circled in black will come later.
Next is the circuit board that you will need to construct. You will use the resistors and the circuit board you purchased earlier. (or you can just rob the completed board out of your tape adapter as I did!) The reason for the resistors is that your mp3 player will put out too strong of a signal to send it directly into the tape deck board. If you do not use the resistors, your music WILL be distorted period point blank. Each side (left and right) must run through the 5.1Kohm and the 1Kohm resistors. Here is a picture of the board I robbed from the tape adapter.
I have drawn the entire circuit in paint. I'm sorry, but I'm no electronics design professional, but I think you can get the jest.
Once you tap into the joints on the tape deck, you will need to run the wires out through the passenger
Last edited by lewismug on 24 Feb 2008, 17:59, edited 2 times in total.
'99 S70 270k miles--Stock
'00 Audi A4 Quattro 172k miles--Stock
'00 Audi A4 Quattro 172k miles--Stock
-
MadeInJapan
- MVS Moderator
- Posts: 13434
- Joined: 31 March 2005
- Year and Model: '98 S70 T5 '07S40T5
- Location: Knoxville, TN American but born in Japan
- Has thanked: 17 times
- Been thanked: 35 times
Great work, lewismug!
Pinned!
Pinned!
'98 S70 T5 Emrld Grn Met/Beige Tons of Upgrades Mobil-1
'04 V70 2.5T Red/Taupe Some Upgrades Mobil-1
'07 S40 T5 AWD 6 speed manual! Silver/Black Stage1 Heico & Elevate
'07 S60 2.5T Blue/Taupe- my kid's Volvo
'04 V70 2.5T Red/Taupe Some Upgrades Mobil-1
'07 S40 T5 AWD 6 speed manual! Silver/Black Stage1 Heico & Elevate
'07 S60 2.5T Blue/Taupe- my kid's Volvo
Or, if like me, you drive a Volvo made at a time when cassette players were still part of the stereo, you could do this.
Get a Cassette Adaptor for MP3 players made by Belkin (available at most computer/IT/software centres, I should think).
It features a magnetic head 'transmitter' that contacts the magnetic head in the player and the whole contraption looks exactly like a cassette. There's a cable to hook up to your MP3 player and voila, the sound is exactly like what your MP3 can pump out although there might be a drop in sound volume depending on how 'worn' the magnetic head of your player is.
It works great in my SC806 stereo with Ipod Nano set up.

162,000km on the clock
Get a Cassette Adaptor for MP3 players made by Belkin (available at most computer/IT/software centres, I should think).
It features a magnetic head 'transmitter' that contacts the magnetic head in the player and the whole contraption looks exactly like a cassette. There's a cable to hook up to your MP3 player and voila, the sound is exactly like what your MP3 can pump out although there might be a drop in sound volume depending on how 'worn' the magnetic head of your player is.
It works great in my SC806 stereo with Ipod Nano set up.
162,000km on the clock
98 V70 T5
-
- Similar Topics
- Replies
- Views
- Last post