


However, I still couldn't find PICTURES of how to get at all the tricky hoses. There a few obvious one like the upper radiator hose to the thermostat, but what about the engine side of the heater hoses? Where does the lower radiator hose connect to the block? So this is my contribution since I was lucky enough to receive good karma. There are lots of pictures so wait for it to load.
The first tip is to open your hood way up almost to 90 degrees. This really helps with access and also light to the part of the engine we are after.

I didn't know my car could do this. If you flip down the tabs at the hood hinge, you can lift your hood up to the 90 degree position in the previous picture. Cool huh?

You'll want to remove your air cleaner box and also the duct pointing to the front part of the car. The air cleaner is set in with some tabs into a rubber retainer. Just pull up and to the passenger side to get it out. There were a few connections that need to be removed as well. Finally, tie the accordion air duct out of the way so that you'll have a clear view

Standing on the driver side, you can look are clearly see the large hose (lower radiator hose) where it connects to the neck into the engine block. You can also see where the heater hoses go into the firewall. The Lower radiator hose is not too hard to access at this point. Loosen the clamp (above the yellow arrow in the picture) and pull it off. The other end is on the bottom of the radiator on the driver side. You'll have to remove the lower engine cover plastic to get access to that.

After you remove the lower radiator hose, you'll reveal where the upper heater hose connects to the block. Note that the clamp for the heater hose is tricky to loosen because the clamp screw is well hidden.

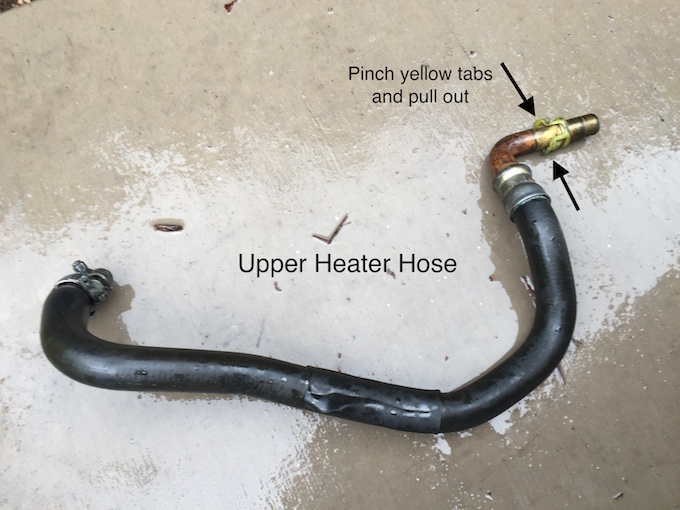
Here's a closer shot of the Upper Heater Hose. You can clearly see the clamp and also the bulge in the hose. Ultimately, the hole was on the underside of this hose near the clamp. It was impossible to see with the hose installed.

So to get the clamp off, I used a 7mm socket to loosen it. There is NO slot on this screw so a screwdriver will not work if you have the same clamp. I tried the trick some described using a long screwdriver to rotate the clamp, but that didn't work at all for me. I was able to slowly loosen in tiny rotations.

After pulling off the hose, you can see the hose nipple attached to the engine block. In this picture, you can also get an idea of the bulge in the hose. It felt like a rubber band in the bulge area.

Here's picture of the clamp that was on the hose. I hadn't seen one like this anywhere else. I wonder what is special about it?

After disconnecting the heater hose at the firewall, I pulled it out of the car. There's a video about how to remove the connection at the firewall on YouTube, but in reality it's pretty simple. Squeeze the yellow tabs and pull it put. Be sure and get the o-rings and plastic separators that are probably sill in the connector in the firewall. Replace these o-rings.
Now with the hose off the car, I checked around the clamp area and finally spotted the culprit of the leak! Here's the small split in my hose. It was in the very soft bulge area. I can imagine that under pressure the hose balloons up and the hole is much bigger.

However, my journey didn't end there. I wanted to locate the other 2 mysterious hoses. Where does the Lower Heater Hose connect and also the Turbo Coolant hose? Well, with so much stuff removed, they are still buried in there and tough to see! I stuck my phone camera down past the large coolant neck (this was the lower Radiator hose we removed at the beginning) and snapped a picture. I finally spotted them! In the picture below, the blurry top portion is the neck where the large Lower Radiator hose connects. Below this are the 2 hoses we are after.
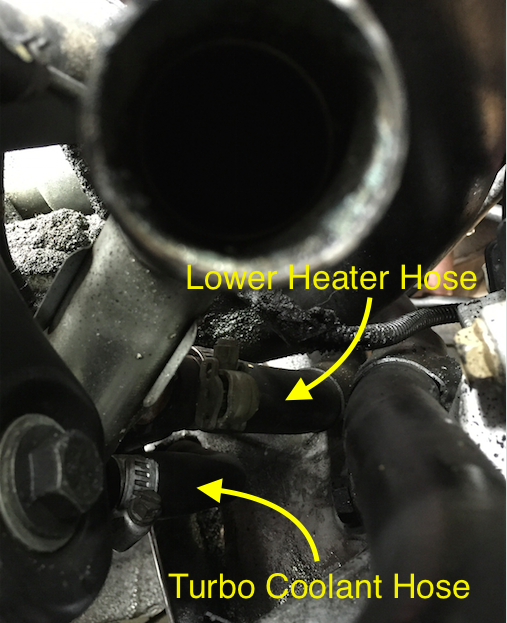
As you can see, it's a tight squeeze but I think I can get the socket into there and loosen them up. At this point, it was raining again and I decided to call it a day. Besides, my replacement hoses had not arrived yet so there was nothing to put back.
In summary, I hope that this post provides some clarity for those who are wondering about replacing all their hoses. Here's a quick description of where they all are. Along with the pictures I posted, you should understand where they are now. (Along with their cost $-$$$)
1. Upper Radiator hose - passenger side from top of radiator to the thermostat neck. Easy to see. $
2. Lower Radiator hose - Driver side at bottom of radiator to engine (see my pictures). $$
3. Turbo Return hose - back side of engine on passenger side. It's only about 3 inches long. $
4. Turbo feed coolant hose - See my last picture in this post. It's down in there. $
5. Upper Heater Hose - firewall into nipple at engine block (See last pic in this post) $$$
6. Lower Heater Hose - firewall into metal coolant line (See last pic in this post) $$
So there you have it. All the hoses to replace in your car. I got my hoses from a combination of IPDUSA and PartsGeek. My car made it 228K miles before it blew the hose. I'll change out all the hoses this weekend and then hope it'll last a few hundred thousand more miles. I hope this post was helpful. It's what I wish I had found before jumping into all of this. Good luck!