Login Register

DIY USB charger + cell phone mount

Help, Advice and DIY Tutorials on Volvo's P80 platform cars -- Volvo's 1990s "bread and butter" cars -- powered by the ubiquitous and durable Volvo inline 5-cylinder engine.

1992 - 1997 850, including 850 R, 850 T-5R, 850 T-5, 850 GLT
1997 - 2000 S70, S70 AWD
1997 - 2000 V70, V70 AWD
1997 - 2000 V70-XC
1997 - 2004 C70

This topic is in the MVS Volvo Repair Database » USB Charger + Cell Phone Mount
Post Reply
j-dawg
Posts: 1154
Joined: 20 April 2013
Year and Model: 1999 V70 T5
Location: Los Angeles, CA
Has thanked: 4 times
Been thanked: 33 times

Volvo Repair Database DIY USB charger + cell phone mount

Post by j-dawg »

I think one of the best things about newer cars is the interior electronics. I want to be able to talk handsfree, navigate via satellite, and play music off a USB drive instead of a CD. For longer trips, I want the phone charging. But I'm a lazy child of the future, and I don't like plugging things in, swapping things around, etc. I want to have my phone Just Work with the car, with minimal fussing about.

Modern car stereos enable most of this, and various accessories do the rest. But I am a neat freak about car interiors. I hate wires running around the cockpit, giant plasticky mounts on suction cups, things that can get lost, things that look out of place, and so on. When necessary, I've been charging the phone with a cigarette lighter to USB adapter and a cable. Seeing all that sticking out of my 12V port drives me into a murderous rage, and there's nowhere in the cabin to put the phone where I can briefly and safely glance at it. So I decided to put together an in-dash USB power cable and phone mount.

- Major components -

Image
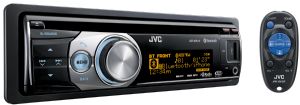
- JVC KD-R810 stereo, Volvo wiring harness adapter, Metra single-DIN installation kit, or any other head unit that performs the same functions
Key features are: Bluetooth, rear USB port, single-DIN. I wanted rear USB because I really did not want a USB drive sticking out of the faceplate. A single-DIN unit lets me use the pocket underneath to hide things.
I bought this in 2011, and it's no longer produced. I can't seem to link to it, but Crutchfield's website lets you sort head units by features, and there are several that tick the boxes I've listed. The particular model is not important.

Image
- Cheap USB car charger
This came from Walgreens, where I paid ~$5 for it many moons ago. It's chintzy lowest-bidder garbage, but it charges the phone just fine. The blue LED on this is useful for troubleshooting, and it should be sorta hidden in the final installation.

Image
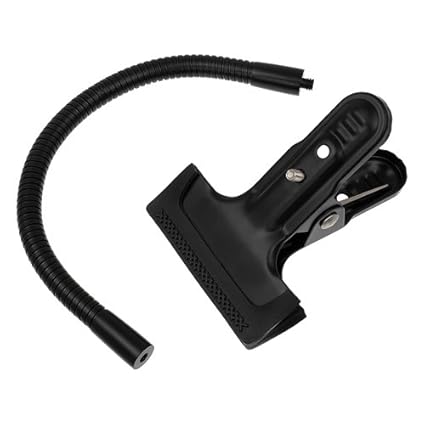
- Gooseneck flex arm with a 1/4-20 screw mount
Another victim of my sick obsession with hiding things is the phone mount. I cannot abide suction cup mounts, vent mounts, cig lighter mounts, cupholder mounts, and all the other easily-detached tributes to injection molding. I wanted something whose connection to the car would be hidden, and something I could mount near where my charging cord would come out, to minimize exposed cord length. I went with this stiff gooseneck arm, which has a 1/4-20 screw like a tripod, and one of the many adapters for cell phones, listed below. The clamp is not used.

Image
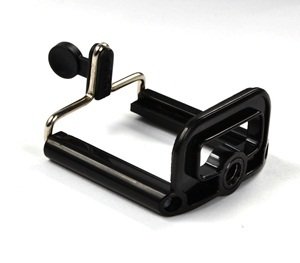
- Cell phone tripod mount
With cell phone cameras being good enough for most uses these days, there are many mounts, of all degrees of complexity and cost, to attach cell phones to tripods. This one can be operated one-handed and is aesthetically inoffensive even with no phone mounted. It hangs onto the phone even through bumpity-bump in-town driving, but it is not a high-quality product. I don't know how it will hold up long-term, but it's replaced easily enough. The baby tripod with which this comes is junk; it should be discarded with great vigor, and perhaps pleasure. Don't hold back.

As the most important point of interaction with this setup is this mount, maybe I shouldn't have cheaped out on it. There were some other mounts that were quite pretty - "Reticam" and "i.Trek Super Mount" appealed - but the latter wouldn't work with my phone, and the former was too expensive to justify for something I was just throwing together. Since all of them use a 1/4-20 screw, maybe I can upgrade the mount later.

Other components, tools, and supplies include:
- a soldering iron, solder, and electrical tape
- some wire that you might solder to a PCB - I used some scrap wire from an S-video cable
- wire stripper
- zip ties
- rotary cutting tool (Dremel or similar)
- a short USB cable, so you don't have to deal with a giant, clumsy loop of a longer cable
- (optional) heat shrink tubing, zip ties, wiring loom, and anything else you'd like to use to beautify your cables

- Construction -
I'm assuming you already have an aftermarket radio installed, or ready to install. If not, I won't go into the details here, as there are plenty of guides out there. I highly recommend replacing your Volvo deck with something modern if you haven't already - the advantages I mentioned earlier are super convenient.

The basic idea behind the USB charging cable is to tap into ignition-switched 12V from the radio wiring harness and hook it up to a circuit that someone already made for you, from which you can charge your phone. Take apart the USB car adapter and you'll find a small circuit board that's hooked up to the leads from the cigarette lighter plug. The spring-loaded "ribs" are the ground terminals, and the spring-loaded "button" is +12V. The board doesn't care how it gets 12V, so we're going to power it from the radio harness instead of the cigarette lighter.
Circuit board from inside USB car charger. Green is +12V, black is ground.
Follow these contacts to the circuit board, and solder on your leads. In this adapter (which I failed to photograph before taking apart), the central "button" contact was electrically connected to the board by its spring, which was easily clipped off with a pair of wire cutters. I soldered V+ (green wire here - I cut red too short) and ground (black) to their appropriate locations, which will probably be similar to the picture in any adapter you use. (Another hint: the outer box of a USB plug or receptacle is ground, so you can find ground by following how the receptacle is mounted to the circuit board.) Make sure your joints are strong, and that you don't have a lot of extra wire sticking out. You'll wrap this in tape later and it'll be crappy if you break a wire, like I did.

--------------------
Board power hooked up to radio wiring harness
Expose the switched +12V and ground wire joints in your wiring harness adapter. These wires are red and black, respectively. (Your phone will only charge when the ignition is "On".) Solder in your power wires as appropriate (in my case, green to red and black to black). Use electrical tape to protect the joints. Now test: in your dashboard, plug in the harness and switch the ignition to "On". If the LED on the charger illuminates, plug in a USB cable and try charging a phone with it. Good? Good! Wrap your circuit board with electrical tape to protect it. Test it again: if you, like me, are not good at soldering, you may have broken a solder joint or wire while wrapping.

--------------------
Wiring harness, loomed up with Techflex. Note the branch on the top right, which now goes to a powered USB port.
Secure the wiring so that your wires and joints aren't stressed as you stuff them into the dash. I've always thought radio harnesses were ugly, so I hit mine with some Techflex loom. It's pretty stiff now, but it looks 1000x nicer.

--------------------
I did a very good job cutting within the lines. The radio rear USB port and the new USB charge port will go through this hole.
Using your rotary cutter and a cutting wheel, cut out an unbelievably clean and precise window in the back of the pocket, as shown above. Make sure it's big enough to allow your charger cable through.

--------------------
This is basically how it's supposed to work in the car.
I was still waiting for the gooseneck arm to arrive, so I mocked up the setup with that repugnant little tripod and an old cell phone. Looks good! The phone is right where I want it, and the charging cable isn't flopping all over the place. I put the stereo's rear USB port in the pocket, so I can change the flash drive easily.

--------------------
Get the position and angle correct before you start cutting. You can adjust it later, but it may mean cutting or drilling more holes.
Mock up the position of your gooseneck arm and phone mount in the pocket. You want enough sticking out so you can adjust the angle, but little enough that it isn't floating way out from the dashboard. Get the tilt angle of the mount close to right now - it becomes very hard to rotate the gooseneck axially once it's attached.

--------------------
not so clean....I wish I'd had a drill for this, so I could drill holes for the zip ties instead of cutting them. I did melt some holes with a grinding stone, but it's not really a nice way to do it.
All zipped in. Get 'em tight - you don't want this thing rattling. I did add one more at the end of the gooseneck after taking this photo, which made it more resistant to rotation and made adjusting the phone's position easier.
Drill holes and zip-tie the gooseneck in place. Get it tight - if it's loose, it won't be easy to adjust the position of the phone mount when it's installed. Don't place your final zip tie too close to the mouth of the pocket or you won't have enough flexibility to adjust the mount. I used a Dremel to drill holes and cut slots for zip ties, because I don't have a (working) drill right now. I'm not happy with how it turned out. Too messy. At least nobody can see this when the pocket is installed.

--------------------
All done! Note that I plugged a 6" micro-USB cable into the USB charge port, so it's not too long and the blue LED is deep within the pocket.
And you're done! Install the pocket in the dashboard, then carefully feed the stereo rear USB and USB charge cables through the hole in the back of the pocket. Install the stereo above and you're ready to roll.

--------------------

Obviously the exact setup I've described here isn't the only way to do this, but the total cost (excluding the radio and tools) was probably on the order of $25. Since I'm going to do at least 24-30 hours of road-tripping in the next few weeks, it's worth that just to have the phone secured and juiced up. The only problem I've encountered is reflections off the screen on a sunny day, but that is going to be true of any mount placed down low. It's way better than having to find and pick up the phone, and I'd rather die in a fiery crash than have to look at that charger plugged into my 12V port, so I'm happy with the results.
1999 V70 T5 5-SPD | ~277k mi | sold

User avatar
FLXC90
Posts: 1132
Joined: 18 August 2014
Year and Model: 98 V70 T5
Location: Florida Panhandle
Has thanked: 16 times
Been thanked: 45 times

Post by FLXC90 »

Nice work, well thought out, and totally removable/reversible if need be.
Current Volvos:
1998 V70 T5, 112k sat 5 years, still in mechanical coma (finally at the top of the pile )
2004 XC90 T6 AWD: 186k, 60 on transaxle ( traded in )
1998 POS70 N/A: DD/training aid, 236k but really about 240k, I think...ABS module( passed on to son who sold it)

User avatar
jreed
Posts: 1619
Joined: 8 March 2009
Year and Model: '97 Volvo 855 GLT
Location: RTP, North Carolina
Has thanked: 352 times
Been thanked: 192 times

Post by jreed »

Ingenious idea and gorgeous execution! :)
1997 855 GLT (Light Pressure Turbo) still going strong. Previous: 1986 240 GL rusted out in '06, 1985 Saab 900T rusted out in '95, 1975 Saab 99 rusted out in '95, 1973 Saab 99 rusted out in '94

wrybread
Posts: 241
Joined: 20 April 2019
Year and Model: 1998 S70 GLT
Location: California
Has thanked: 15 times
Been thanked: 15 times

Post by wrybread »

This is awesome. One thing that struck me is that those cheap usb chargers don't charge your phone well. I've been using these (see pic) when I need to power 5v devices from 12v, they work great. I keep meaning to measure their real amperage, which I haven't done yet, but they're rated at 15 watts, instead of the 5 watts that most cheapie chargers are. Incidentally they work great up to 22 volts input... It's a long story how I know, but I do, ha.

You can also easily strip the wires if you don't want the USB jacks.

See attached pic, you can find them by searching eBay for "12 volt to 5 volt USB" as cheap as $4 shipped.
Attachments
Screenshot_20190428-224448_eBay.jpg
Carlo the Nautic Blue 1998 S70 GLT
Previously Diego the 2000 S70, now has a blown head gasket and is awaiting the coroner

j-dawg
Posts: 1154
Joined: 20 April 2013
Year and Model: 1999 V70 T5
Location: Los Angeles, CA
Has thanked: 4 times
Been thanked: 33 times

Post by j-dawg »

And it comes with leads that'll solder nicely, and it'll be easier to mount to the hidden side of the dash pocket. Ordered one, that'll be a good rainy-day upgrade. Thanks for the tip!
1999 V70 T5 5-SPD | ~277k mi | sold

Post Reply
  • Similar Topics
    Replies
    Views
    Last post