


Although it is not necessary, I bought this tool for my car at IPD:
http://www.ipdusa.com/Volvo-S70V70-1998 ... -730-1191/
It was hard to put in (I put mine in with the writting upside down, the only way it would fit), but once it was in I was assured it stayed where it belonged.
Some people purchase it and don't even use it because they can't install it. Personally I liked it and in hindsight probably would buy it again for the job.
There is also a serpentine belt tool http://www.ipdusa.com/Volvo-S70V70-1998 ... -494-1352/ that people like when they are removing the serpintine belt (I just used a great big pipe wrench).
Instructions w/pics when Changing Timing belt/waterpump/tens
This topic is in the MVS Volvo Repair Database »
Instructions w/pics: Changing Timing Belt/Water Pump/Tensioner
Merry Christmas everyone,
While I was off the last few days, took on the task of changing the water pump on the wife's 850. While at it, I also replaced the timing belt and all the tensioners, even though they only had approx. 40k miles since last change. I figured while I'm here and got it all apart, may as well to avoid having to do them in the next year or two. Also changed all plugs and plug wires, and changed out the rear intake cam seal since I had a leak at the distributor base. The work took me about a day and a half to complete start to finish and the car had no issues on the initial start up. Thanks to all the info on this site, I felt confident with all that was done. Took some pics during removal and installation process to help with remembering how everything is routed/installed. Will post some after the holidays are over. Next task at hand is tackling the PCV system, since I noticed slight puffs of white smoke coming from around the oil dipstick.
Thanks again for all the great info here. Merry Christmas.
Eddie
Here are a couple pics of the water pump removal and replacement process
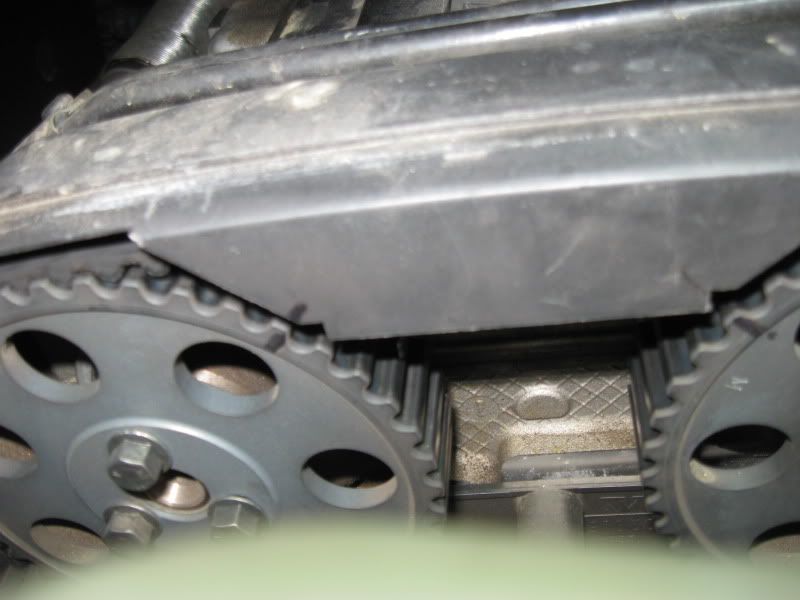
Picture of timing marks aligned before belt removal
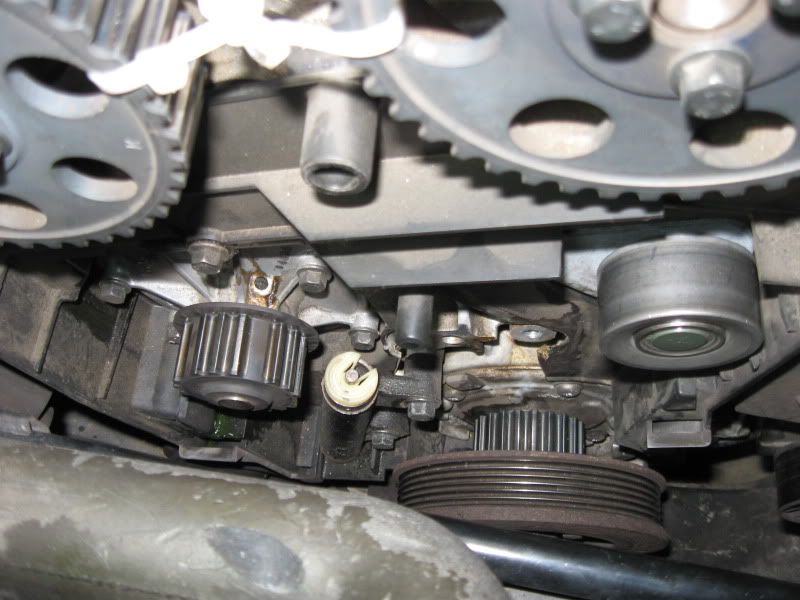
Picture of old belt removed and old water pump showing signs of leaking out the weep hole. At the top of the picture, you can see my home-made tool to keep the camshafts from rotating.
Eddie
Picture of timing marks aligned before belt removal
Picture of old belt removed and old water pump showing signs of leaking out the weep hole. At the top of the picture, you can see my home-made tool to keep the camshafts from rotating.
Eddie
Hello, i am looking for crankshaft timing marks in relationship to the water pump markings ?
I noticed your photos ( 3 , 4 ) do not have visible markings on the crank ? there are 2 marks on the crank.
One set on the crank goes across the crank ( in the direction of rotation ) these marks are ahead of the other mark
which is trailing, and this mark is only on the back half of the crank pulley not across the width of the crank. This mark
lines up the mark ( line ) on the water pump..........my question is, " at this setting am i set to install my T belt ?
thanks for reading and any help or directions you may have...
Sid
Sid,Zeff wrote:Hello, i am looking for crankshaft timing marks in relationship to the water pump markings ?
I noticed your photos ( 3 , 4 ) do not have visible markings on the crank ? there are 2 marks on the crank.
One set on the crank goes across the crank ( in the direction of rotation ) these marks are ahead of the other mark
which is trailing, and this mark is only on the back half of the crank pulley not across the width of the crank. This mark
lines up the mark ( line ) on the water pump..........my question is, " at this setting am i set to install my T belt ?
thanks for reading and any help or directions you may have...
Sid
When I changed my timing belt, the only marks that I could see were on the cam shafts. Those were the ones that I focused on making sure they were aligned with the notches on the cover. Before, removing the belt, I rotated everything through by turning the crankshaft with a socket (30mm,if I remember correctly). Once the notches on the camshafts were aligned, I took a couple of zip ties and tied the two camshafts together to keep them from turning. After I was done with the installation, I rotated everything through by turning the crankshaft to make sure there was no binding. I had no issues on start up. I know there should be a mark on the crankshaft, but I did not spend a lot of time looking for it. As for the markings on the water pump, not sure what you mean by that. Hope this helps you out. Good Luck. Sorry for taking so long to reply.
Eddoe
-
Ozark Lee
- MVS Moderator
- Posts: 14798
- Joined: 7 September 2006
- Year and Model: Many Volvos
- Location: USA Midwest
- Has thanked: 4 times
- Been thanked: 75 times
There really are no timing marks on the water pump, it doesn't care. I don't know why the OEM pumps have the missing teeth. My tired old eyes can never see the timing mark(s) on the crankshaft but my digital camera can. I snap a picture and then go look at it on my computer.
...Lee
...Lee
'94 850 N/A 5 speed
'96 Platinum Edition Turbo
Previous:
1999 V70XC - Nautic Blue - Totaled while parked.
1999 V70XC - RIP - Wrecked Parts Car.
1998 S70 T5
1996 850 N/A
1989 740 GLT
1986 740 GLT
1972 142 Grand Luxe
'96 Platinum Edition Turbo
Previous:
1999 V70XC - Nautic Blue - Totaled while parked.
1999 V70XC - RIP - Wrecked Parts Car.
1998 S70 T5
1996 850 N/A
1989 740 GLT
1986 740 GLT
1972 142 Grand Luxe
-
RaymanSean
- Posts: 246
- Joined: 26 September 2010
- Year and Model: V70 XC, 2001
- Location: columbia, sc
I know that this will go mostly unnoticed but, I just did my timming belt and discovered a trick. When reinstalling the belt leave the bolt for the tensioning pulley extremely loose so that it can slide on the bolt and disengage from the keeper for the tensioner part, doing so will make it a lot easier to get the belt on. Once you have the belt on all the pulleys then you can rotate the tensioner pulley to reengage it and then set the tension.
-
umpernickelnoi
- Posts: 4
- Joined: 3 February 2011
- Year and Model: S80 T6 1999
- Location: Venezuela
Hi everyone,
Don't know if this thought is of any use for this particular engine, but here goes, many years ago I changed cam belt on a Ford Cortina Mk5, I realize that there was much more room around that engine but the official instructions regarding timing were a little daunting to my (then rather young) self.
As I remember, I backed off the tensioner a little, pushed the existing belt as far back on the pulleys as I could, and slid the new belt into place, pushing it hard up against the existing belt. there were now two cambelts on the pulleys. I then cut the back (old) belt with a pair of shears. bushed the new belt fully onto the pulleys, retensioned and Bob's your uncle, new belt fitted in a few minutes without changing the timing.
Obviously, there are more items to remove on a more complex engine to access the belt, but I am sure that this system is still relevant. Hope it is of use to someone.
-
lext

- Posts: 68
- Joined: 25 January 2005
- Year and Model: 1994 854
- Location: Northern California
- Has thanked: 1 time
I just did this (changed belt, pump, pulleys, tensioner) over the weekend. All was relatively smooth except two. First, the T45 was a b*tch! I went to the part store 3 times in hope of finding something that worked, but none did. I even tried an impact T45 socket (big mistake! never use impact tool with your arm  ). In the end I solved the problem by trying really hard to squeeze in my regular T45 socket and 3/8 wrench. There may be a very slight dent on the wheel wall but I can't care less.
Secondly cleaning the old gasket of the water pump was hard. How did people do it? I tried using some fine grade sand paper but still it was very slow and didn't seem to take a lot of stuff out. (The old stuff does cling on). After I had enough I just gave up (still with some green old stuff on) and put the pump in, fastened it and nervously put everything together. The car did start but I was still nervous about the pump. However 4 days later and still there's no sign of leak and I'm heavenly relieved
I have a question though: I notice there's a hole on the water pump (weep hole?) What is it for? It looks like a recipe for leak to me (although I do know it is not )
All in all I'm really ecstatic at the result. Did you ever notice your car always seems to run better after a big job done successfully? I love my car!
Secondly cleaning the old gasket of the water pump was hard. How did people do it? I tried using some fine grade sand paper but still it was very slow and didn't seem to take a lot of stuff out. (The old stuff does cling on). After I had enough I just gave up (still with some green old stuff on) and put the pump in, fastened it and nervously put everything together. The car did start but I was still nervous about the pump. However 4 days later and still there's no sign of leak and I'm heavenly relieved
I have a question though: I notice there's a hole on the water pump (weep hole?) What is it for? It looks like a recipe for leak to me (although I do know it is not
All in all I'm really ecstatic at the result. Did you ever notice your car always seems to run better after a big job done successfully? I love my car!
94 850 non-turbo
2011 S40 T5
2011 S40 T5
-
Ozark Lee
- MVS Moderator
- Posts: 14798
- Joined: 7 September 2006
- Year and Model: Many Volvos
- Location: USA Midwest
- Has thanked: 4 times
- Been thanked: 75 times
It is there intentionally and it is there to leak. When the seals start to fail it will leak very slowly through the weep hole and give you an opportunity to notice it. Without the weep hole the situation can deteriorate to the point where you have a sudden massive failure - that normally occurs at least 400 miles from a shop that has ever even seen a Volvo before on the way to Wally World with the whole family in the car.I have a question though: I notice there's a hole on the water pump (weep hole?) What is it for? It looks like a recipe for leak to me (although I do know it is not
...Lee
'94 850 N/A 5 speed
'96 Platinum Edition Turbo
Previous:
1999 V70XC - Nautic Blue - Totaled while parked.
1999 V70XC - RIP - Wrecked Parts Car.
1998 S70 T5
1996 850 N/A
1989 740 GLT
1986 740 GLT
1972 142 Grand Luxe
'96 Platinum Edition Turbo
Previous:
1999 V70XC - Nautic Blue - Totaled while parked.
1999 V70XC - RIP - Wrecked Parts Car.
1998 S70 T5
1996 850 N/A
1989 740 GLT
1986 740 GLT
1972 142 Grand Luxe
-
- Similar Topics
- Replies
- Views
- Last post