


Hi All
Been working on the '97 850 GLT Turbo Wagon (150K miles) - have owned the car for 3 weeks and replaced the PCV bits and pieces, timing belt, water pump and accessory belt. Whilst poking around under the hood I noticed that the turbo (?) oil cooler line coming into the top of the radiator (on the right side) seems to have a leak where the oil line inserts into the fitting. I see that fcp groton sells the part, so assume this is a common problem ? The leak is fairly small right now, but am wondering if I should plan on replacing soon, or is just another oil leak to add to the list...
Thanks
Ceri
Engine Oil Cooler Lines Replacement - '97 850 GLT
Engine Oil Cooler Lines Replacement - '97 850 GLT
Last edited by csteer on 20 May 2007, 12:01, edited 1 time in total.
-
MadeInAmerica
- Posts: 142
- Joined: 16 January 2006
- Year and Model:
- Location: Southern California, USA
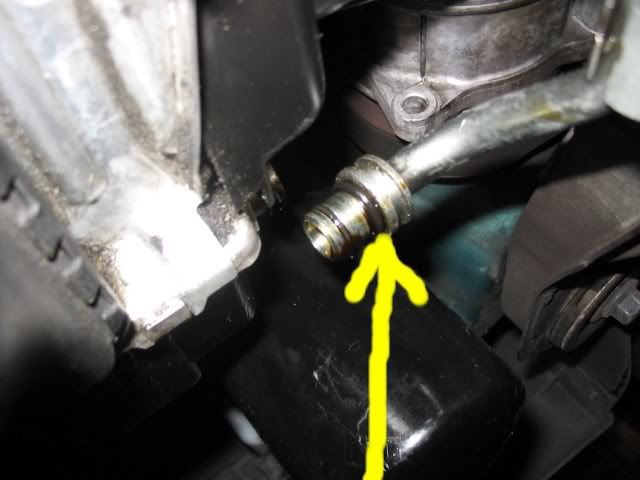
I bought an o-ring kit from Harbor Freight for about $7. I put an o-ring where the yellow arrow is and got mine to stop. Only cost pennies to fix. This is what I bought. 397pc metric o-ring assortment, item 91512
'94 850 Turbo 160K Automatic
[Autometer Sport/Comp Boost Gauge][Silicone Vacuum Hoses][Walbro Fuel Pump][New OEM Torque Mount][Yokohama YK520][New PCV system+Air Intake Hose][Magnaflow Cat at 160K][Borla Pro XS Muffler 162K]
[Autometer Sport/Comp Boost Gauge][Silicone Vacuum Hoses][Walbro Fuel Pump][New OEM Torque Mount][Yokohama YK520][New PCV system+Air Intake Hose][Magnaflow Cat at 160K][Borla Pro XS Muffler 162K]
After a closer look it seems that both hoses need replacement. I'll order them from FCP Groton next week. Does anyone have any tips on this replacement ? Should I remove the thermostat housing while I am doing the job - i.e. should I order a replacement seal for this item ?
Ceri
Ceri
Replaced the oil lines this morning. Here are some notes on what I experienced:
1. drained the oil and removed the oil filter
2. removed the retainer clips from the existing oil hoses with a screwdriver (not reuseable). Oil lines slid off
3. removed the bolt holding the oil lines to the block/oil pan - from underneath - used a 1/4" drive socket with various extensions and universal joints.
4. to access where the hoses connected to the thermostat housing I needed to remove the right front wheel and bend back the wheel well liner (as per replacing the timing belt)
5. the retaining plate which holds the lines into the thermostat housing is held to the housing by a single torx bolt, but I couldn't undo the bolt because the incoming lines interferred with the tool access.
6. removed the accessories belt from the crankshaft and alternator pulley to gain better access to the thermostat housing
7. removed the thermostat housing and then pulled the hoses and the housing away from the car. I found that removing the housing was best achieved by pulling it down and out, rather than into the wheel well.
8. undid the retaining plate and removed the hoses
9. since I (mistakenly) didn't order the o-rings (item 7 on the FCP Groton diagram) I cleaned up the old o-rings, lubricated and reinstalled
10. i installed the new hoses into the thermostat housing and installed the retaining plate
11. then the fun began...
12. threaded the new hoses and housing back into the appropriate area, bring the housing up into place, rather than through the wheel well
13. removed the protective caps from the oil lines and plugged them into the oil cooler radiator
14. installed the new thermostat housing gasket using some perma-gasket goop to hold it in place and installed the thermostat housing to the block and tightened appropriately
15. and finally, the best part - installing the bolt which holds the oil cooler lines to the block/oil pan. What a pain - the alternator bolt makes getting the bolt lined up a real pain, and there is hardly any room to get fingers into the area to start the bolt... 1 hour later and using a combination of 1/4" socket set with a wobbler extension I got it tightened - <sigh>
16. reinstalled drive belt, wheel well liner and wheel
17. installed the new oil filter and oil and was all done
Hope this helps the next person to attempt the task
Ceri
-
MatDesign84
- Posts: 239
- Joined: 29 April 2007
- Year and Model: 1997,855 T5
- Location: Johnson City, TN
- Contact:
Thank you. I will be using this today. Anyone working on this problem and needing to save some money. This guy Orlando does great work at remanufacturing these lines. I purchased mine from him and they look very well put together and he didnt take any cheap short cuts. Plus he will even buy your old ones back from you that would otherwise go in the trash. auctions.volvospeed.com/DISCOUNT-9498-850VSC70-Turbo-Cooler-Lines--3-Money-Saving-Options,name,100046,item_id,0,ad_type,ad_details
Last edited by MatDesign84 on 28 Feb 2012, 19:08, edited 1 time in total.
Currently: 1997, 855 T5 | 1998 Subaru Legacy GT 2.5
Previous: 1997, 850 GLT | 1993, 850 GLT | 1988, BMW 325i, 1990 Volvo 240 DL
"That's good to know though in case they let loose again, but I swear if they do, I'll punch something." -jblackburn
Previous: 1997, 850 GLT | 1993, 850 GLT | 1988, BMW 325i, 1990 Volvo 240 DL
"That's good to know though in case they let loose again, but I swear if they do, I'll punch something." -jblackburn
-
MatDesign84
- Posts: 239
- Joined: 29 April 2007
- Year and Model: 1997,855 T5
- Location: Johnson City, TN
- Contact:
Okay I just finished this job and have a tip that will save a lot of time and effort for everyone. I too was having a touch time getting the torx head bolt off at the thermostat and tried everything. I got to thinking of some old advice from dad for a similar situation and voila it worked. I managed to use a 4mm (may have been 6mm) allen wrench to get it off. I also used this method to get it back on again. Also, the remanufactured ones went on perfectly and they seem better built the way Orlando did it.
Currently: 1997, 855 T5 | 1998 Subaru Legacy GT 2.5
Previous: 1997, 850 GLT | 1993, 850 GLT | 1988, BMW 325i, 1990 Volvo 240 DL
"That's good to know though in case they let loose again, but I swear if they do, I'll punch something." -jblackburn
Previous: 1997, 850 GLT | 1993, 850 GLT | 1988, BMW 325i, 1990 Volvo 240 DL
"That's good to know though in case they let loose again, but I swear if they do, I'll punch something." -jblackburn
-
rspi

- Posts: 7303
- Joined: 5 November 2011
- Year and Model: 850 T-5R Wagon
- Location: Cincinnati OH
- Has thanked: 34 times
- Been thanked: 72 times
-
Contact:
Contact rspi..
Here are my instructions. http://www.atthetipwebs.com/technologyi ... l_line.htm
'95 855 T-5R M, Panther - 22/28 mpg, 546,000 miles
'95 955 T-5R Yellow Wagon, Lemonade, 180,000 miles
--------------------
Volvo's of past: '87 740 GLE, '79 262C Bertone, '78 264, 960's, '98 S70 GLT, '95 850 T-5R YellowVolvo Repair Videos
'95 955 T-5R Yellow Wagon, Lemonade, 180,000 miles
--------------------
Volvo's of past: '87 740 GLE, '79 262C Bertone, '78 264, 960's, '98 S70 GLT, '95 850 T-5R YellowVolvo Repair Videos
-
- Similar Topics
- Replies
- Views
- Last post
-
- 5 Replies
- 1444 Views
-
Last post by fitz548
-
- 3 Replies
- 1259 Views
-
Last post by SuperHerman