


2007-2011 S80/V70/XC70: blower motor replacement
This topic is in the MVS Volvo Repair Database »
2007-2011 S80/V70/XC70: blower motor replacement
-
pierremcalpine

- Posts: 73
- Joined: 18 June 2013
- Year and Model: V40 2003, V70 2010
- Location: Toronto, Canada
- Has thanked: 2 times
- Been thanked: 5 times
Re: 2007-2011 S80/V70/XC70: blower motor replacement
Wow, well give me your VIn if you are still having trouble and I will look up hoe VIDA says to do it.
-
LTP
- Posts: 10
- Joined: 22 September 2018
- Year and Model: V70 D5 '08
- Location: UK Midlands
- Has thanked: 1 time
- Been thanked: 2 times
Big "thanks" shout out to Pierre for sending me the RHD VIDA files. Just for everyone's info at first sight there doesn't appear to be any different instructions or steps in the RHD instructions from the LHD.
Pierre, you're a star.
Pierre, you're a star.
-
precopster
- Posts: 7543
- Joined: 21 August 2010
- Year and Model: Lots
- Location: Melbourne Australia
- Has thanked: 8 times
- Been thanked: 128 times
Look at post by VCA » 12 Feb 2016, 08:48 in this thread. He attached the PDF with instructions
Current cars VW Transporter 2.5TDI, 2010 XC90 D5 R Design
-
LTP
- Posts: 10
- Joined: 22 September 2018
- Year and Model: V70 D5 '08
- Location: UK Midlands
- Has thanked: 1 time
- Been thanked: 2 times
Variations for RHD cars
I have just completed this job on my RHD P3 2007 V70 D5 (it's one of the earliest of the Gen III V70s) and this thread was invaluable - kudos to VCA.
However, there were some differences so I thought I'd outline them here for anyone in the UK or other RHD markets who wants to replace the blower motor. All the comments refer to my car - there may be differences with other models/years. I did this job single-handed; it took me about 1.5 days, working steadily and taking tea breaks. The process follows VCA's first post except where detailed here. I accept no responsibility...yada yada.
For most of the disassembly I was lying diagonally on my back in the passenger footwell with my legs out of the passenger door and my head under the dash, looking up. I put thick blankets over the sill and in the footwell to make it as comfortable as possible - you're going to be there for a while!
For some reason the image host I used displays images as clickable thumbnails, so if you click on them it'll take you to a full-sized image. No idea why - on another board they display sized to suit the thread width. Sorry for the inconvenience.
1. The passenger's seat. There is no module under the RHD passenger seat so, to give more room, I undid all the seat fixings then got behind the seat and, lifting by the base, moved it backwards so it was on top of the crossmember and against the rear seat. You need to unbolt the seat to take out the front carpet anyway.
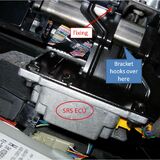
2. SRS Control module removal. I found that there were a couple of items not detailed by VCA that I had to remove to allow the recirc housing to slide sideways then be removed. The first was the SRS control module, which is high up behind the glovebox, close to the top of the CEM and just under the passenger airbag. This module is held in place by a couple of easily-accessed bolts as highlighted below:
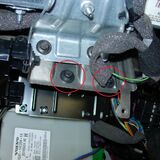
The bracket of the module hooks over the square-section tube and it had a single orangey-yellow cam-lock connector on top. Once you have the bolts out then push the top of the module gently up and back and it'll rotate around the steel tube and unhook, allowing you to lower it and gain access to the connector. DO NOT DISCONNECT THIS BEFORE YOU'VE DISCONNECTED THE BATTERY.
The view below is looking up and forward - you can see the CEM at the bottom of the picture.
I removed the CEM before I took the SRS ECU out as I was following VCA's procedure and I hadn't found the problem yet; with hindsight it might give more room to take out the CEM if you remove the SRS ECU first - I didn't try this but logically it should be possible in case the SRS module needs to be serviced. I'll leave it to you which way you tackle this. Similarly, I reinstalled the SRS ECU before the CEM as I just retraced my steps.
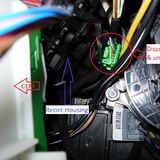
3. Detaching a green electrical connector. On my car there was a green electrical connector (no idea what it does) that was mounted onto the heater main moulding and this also stopped me sliding the recirc housing out. I just disconnected this by depressing the catch and unplugging, then the body half could be slid off the heater housing - it's on a T-shaped mount. The arrow points to where it is located (viewed in an inspection mirror):

and this is what it looks like
4. Removing the recirc housing. As VCA said, this part is memorable. The three fixings are all T25 Torx. You can easily see the lowest. I found by lifting my head with it deep in the footwell and close to the heater I could see the top one, which made removing it easy. The third fixing can only be seen in a mirror and I couldn't even get a hand in to feel it either. I used an inspection mirror and a magnetic inspection lamp and bought a 200 mm-long T25 bit off the internet specifically for this job (£10 well spent, as I think it would be impossible without one). By propping the mirror so I had two free hands I was able to guide the tip of the long bit to the screw's recess, then carefully align the bit so it was in line with the screw and the Torx bit dropped into the recess. Holding the bit carefully to keep it engaged I could then put a small ratchet onto the end and loosen the screw. I undid the screw so far that it actually dropped out, but once the recirc housing was out it was easily seen in the mirror sitting on top of the heater body and retrieved.
The recirc housing is actually on rails, so it slides sideways before you can lower and remove it. This makes it a doddle refitting it as, once you locate it on the rails, you can slide it sideways and it'll just sit there, waiting for the three screws to be tightened with no need to hold it up. The screw holes in the housing are actually a cruciform shape, so that they will hold the three screws while you offer up the housing, then you can tighten the screws. I did the two I could see loosely, leaving a gap between the housing and the heater so I didn't dislodge the hard-to-see one. I used the same mirror and long bit procedure above to be able to tighten this one fully, then went back and finished tightening the two I could see.
5. Removing the blower motor without an assistant. I found I could reach in through the speedo aperture and wedge a long, flat-tipped screwdriver between the tab and the motor to hold the motor tab depressed and the latch disengaged. I then went into the passenger footwell and used the Volvo tool to rotate the motor slightly to disengage it from the latch, then back up to the driver's seat to remove the screwdriver, then down into the footwell again to finish removing the fan. Refitting is a one-man job as you rotate the fan and it latches into place. It's worth visually checking that the latch has clicked home, as I found it didn't first time. The Torx screw referred to in the official Volvo instructions is a fix in case the tab gets broken - mine didn't have a screw present and I'm guessing that, unless your fan has been removed before, yours won't have one either. Which is lucky, as it looks like a swine to get to.
6. Avoiding an SRS fault light. This was just a personal piece of stupidity. I decided to test the fan before I refitted all of the trim in case I'd missed something so as soon as I'd fitted and connected the new fan, refitted the CEM, the SRS module and the green connector, I placed the speedometer pack loosely in place and connected it, then reconnected the battery. I wasn't worried about the glovebox and footwell light connections but I forgot about reconnecting the end-cap with the passenger airbag isolator switch. This earned me an SRS warning light that disconnecting the battery again did not fix so, as I don't have VIDA DICE I had to pay my local Volvo dealer 0.5 hours labour to reset the warning light.
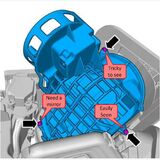
7. So why do we have to do this? Below is a picture of my old blower fan - note how rusty the fan shaft is and dirty the fan cage. The fan sits right under the plenum so pulls in damp and dirty air before it gets to the main pollen filter. Mine lasted about 9 years and 100k miles before it started making a noise, so hopefully this fix will see my car out.

Hope this helps. I'll be selling an official Volvo tool on a popular auction site soon (only used once!), as I don't ever want to do this job again.
I have just completed this job on my RHD P3 2007 V70 D5 (it's one of the earliest of the Gen III V70s) and this thread was invaluable - kudos to VCA.
However, there were some differences so I thought I'd outline them here for anyone in the UK or other RHD markets who wants to replace the blower motor. All the comments refer to my car - there may be differences with other models/years. I did this job single-handed; it took me about 1.5 days, working steadily and taking tea breaks. The process follows VCA's first post except where detailed here. I accept no responsibility...yada yada.
For most of the disassembly I was lying diagonally on my back in the passenger footwell with my legs out of the passenger door and my head under the dash, looking up. I put thick blankets over the sill and in the footwell to make it as comfortable as possible - you're going to be there for a while!
For some reason the image host I used displays images as clickable thumbnails, so if you click on them it'll take you to a full-sized image. No idea why - on another board they display sized to suit the thread width. Sorry for the inconvenience.
1. The passenger's seat. There is no module under the RHD passenger seat so, to give more room, I undid all the seat fixings then got behind the seat and, lifting by the base, moved it backwards so it was on top of the crossmember and against the rear seat. You need to unbolt the seat to take out the front carpet anyway.
2. SRS Control module removal. I found that there were a couple of items not detailed by VCA that I had to remove to allow the recirc housing to slide sideways then be removed. The first was the SRS control module, which is high up behind the glovebox, close to the top of the CEM and just under the passenger airbag. This module is held in place by a couple of easily-accessed bolts as highlighted below:
The bracket of the module hooks over the square-section tube and it had a single orangey-yellow cam-lock connector on top. Once you have the bolts out then push the top of the module gently up and back and it'll rotate around the steel tube and unhook, allowing you to lower it and gain access to the connector. DO NOT DISCONNECT THIS BEFORE YOU'VE DISCONNECTED THE BATTERY.
The view below is looking up and forward - you can see the CEM at the bottom of the picture.
I removed the CEM before I took the SRS ECU out as I was following VCA's procedure and I hadn't found the problem yet; with hindsight it might give more room to take out the CEM if you remove the SRS ECU first - I didn't try this but logically it should be possible in case the SRS module needs to be serviced. I'll leave it to you which way you tackle this. Similarly, I reinstalled the SRS ECU before the CEM as I just retraced my steps.
3. Detaching a green electrical connector. On my car there was a green electrical connector (no idea what it does) that was mounted onto the heater main moulding and this also stopped me sliding the recirc housing out. I just disconnected this by depressing the catch and unplugging, then the body half could be slid off the heater housing - it's on a T-shaped mount. The arrow points to where it is located (viewed in an inspection mirror):
and this is what it looks like
4. Removing the recirc housing. As VCA said, this part is memorable. The three fixings are all T25 Torx. You can easily see the lowest. I found by lifting my head with it deep in the footwell and close to the heater I could see the top one, which made removing it easy. The third fixing can only be seen in a mirror and I couldn't even get a hand in to feel it either. I used an inspection mirror and a magnetic inspection lamp and bought a 200 mm-long T25 bit off the internet specifically for this job (£10 well spent, as I think it would be impossible without one). By propping the mirror so I had two free hands I was able to guide the tip of the long bit to the screw's recess, then carefully align the bit so it was in line with the screw and the Torx bit dropped into the recess. Holding the bit carefully to keep it engaged I could then put a small ratchet onto the end and loosen the screw. I undid the screw so far that it actually dropped out, but once the recirc housing was out it was easily seen in the mirror sitting on top of the heater body and retrieved.
The recirc housing is actually on rails, so it slides sideways before you can lower and remove it. This makes it a doddle refitting it as, once you locate it on the rails, you can slide it sideways and it'll just sit there, waiting for the three screws to be tightened with no need to hold it up. The screw holes in the housing are actually a cruciform shape, so that they will hold the three screws while you offer up the housing, then you can tighten the screws. I did the two I could see loosely, leaving a gap between the housing and the heater so I didn't dislodge the hard-to-see one. I used the same mirror and long bit procedure above to be able to tighten this one fully, then went back and finished tightening the two I could see.
5. Removing the blower motor without an assistant. I found I could reach in through the speedo aperture and wedge a long, flat-tipped screwdriver between the tab and the motor to hold the motor tab depressed and the latch disengaged. I then went into the passenger footwell and used the Volvo tool to rotate the motor slightly to disengage it from the latch, then back up to the driver's seat to remove the screwdriver, then down into the footwell again to finish removing the fan. Refitting is a one-man job as you rotate the fan and it latches into place. It's worth visually checking that the latch has clicked home, as I found it didn't first time. The Torx screw referred to in the official Volvo instructions is a fix in case the tab gets broken - mine didn't have a screw present and I'm guessing that, unless your fan has been removed before, yours won't have one either. Which is lucky, as it looks like a swine to get to.
6. Avoiding an SRS fault light. This was just a personal piece of stupidity.
7. So why do we have to do this? Below is a picture of my old blower fan - note how rusty the fan shaft is and dirty the fan cage. The fan sits right under the plenum so pulls in damp and dirty air before it gets to the main pollen filter. Mine lasted about 9 years and 100k miles before it started making a noise, so hopefully this fix will see my car out.
Hope this helps. I'll be selling an official Volvo tool on a popular auction site soon (only used once!), as I don't ever want to do this job again.
How do you get the upper portion out of the fuse tray holder underhood so that you can check fuse 11 for the climate blower system? My blower works okay when car is cold, but on and off over bumps when warm outside. No noise from blower, etc. thanks,

-
staves
- Posts: 3
- Joined: 12 January 2012
- Year and Model: 2009 XC70 T6
- Location: Chicago, IL United States
- Has thanked: 1 time
Can anyone confirm the size of the three Torx screws holding the recirc housing? Thsi is for a U.S. 2009 XC70. I've seen them listed as both T20 and T25. I'd like to get a holding T-handle driver for the job but need the correct size. Thanks!
-
LTP
- Posts: 10
- Joined: 22 September 2018
- Year and Model: V70 D5 '08
- Location: UK Midlands
- Has thanked: 1 time
- Been thanked: 2 times
I can absolutely confirm that they are T25; as said in my piece above I actually bought a 200mm long T25 bit to facilitate the task.
I think the confusion arises because a T20 bit will fit in the recess of a T25 screw and still engage and turn it, but would probably strip the recess if you tried to apply a decent torque. Get T25.
I think the confusion arises because a T20 bit will fit in the recess of a T25 screw and still engage and turn it, but would probably strip the recess if you tried to apply a decent torque. Get T25.
-
- Similar Topics
- Replies
- Views
- Last post