


Oil Anti Drain Valve for the P3 -- 3.0T and 3.2 Topic is solved
This topic is in the MVS Volvo Repair Database »
Oil Anti Drain Valve for Volvo P3 Cars -- 3.0T and 3.2
-
richiefky
- Posts: 5
- Joined: 6 January 2020
- Year and Model: 2008 S80
- Location: KY
- Has thanked: 1 time
- Been thanked: 1 time
Re: Oil Anti Drain Valve for the P3 -- 3.0T and 3.2
I am unclear, what is the fix? Does this require a whole new filter housing? Or can the spring and rubber seal/valve be purchased seperately? Part #’s?
-
pgill

- Posts: 798
- Joined: 27 August 2018
- Year and Model: 2010 S80, 2008 LR2
- Location: California
- Has thanked: 115 times
- Been thanked: 185 times
Thanks for the question.
That is a great question.
I had to buy a whole new housing. (In fact I bought 2, one for each of my 3.2's)
I couldn't find a source for the spring with the rubber disc.
Note: there are two different housing one with an external oil line and one without (the oil is only routed internally)
What I don't know is if the New (oil routed internally) assembly can be used in place of the Old (external oil line)
My 2010 S80 3.2 has the New style and I just replaced the entire assembly
My 2008 LR2 3.2 has the Old style and I bought a New style housing and only swapped the spring with rubber disc.
Swapping the spring an rubber disc only is a bit difficult but it can be done.
Take care
Paul
-
richiefky
- Posts: 5
- Joined: 6 January 2020
- Year and Model: 2008 S80
- Location: KY
- Has thanked: 1 time
- Been thanked: 1 time
Thanks Paul,
I was hoping a new spring valve could be obtained. Things like this, replacing a whole casting with machining, seem so wastefull for the want of a gram of formed rubber. I am thinking the rubber in a small syringe i have for vitamin B shots can be adapted by slicing to same thickness, if i can get the cut straight and perpendicular enough. I am not even sure mine is bad, but because of cold starts if this is bad, I will definitely check it out with the graduated container as shown, on my next oil change.
Thanks very much for calling attention to this
Rich
-
pgill
- Posts: 798
- Joined: 27 August 2018
- Year and Model: 2010 S80, 2008 LR2
- Location: California
- Has thanked: 115 times
- Been thanked: 185 times
I completely agree with everything you wrote.richiefky wrote: ↑07 Jan 2020, 12:20 Thanks Paul,
I was hoping a new spring valve could be obtained. Things like this, replacing a whole casting with machining, seem so wastefull for the want of a gram of formed rubber. I am thinking the rubber in a small syringe i have for vitamin B shots can be adapted by slicing to same thickness, if i can get the cut perpendicular enough, and a teet is the method of fastening to spring, if not a small hole drilled to accept the teet on plunger should work. I am not even sure mine is bad, but because of cold starts if this is bad, I will definitely check it out with the graduated container as shown, on my next oil change.
Thanks very much for calling attention to this
Rich
If you come up with a solution please share it here.
However I should point out the one advantage of replacing the entire housing, included in the assembly is a new heat exchanger.
The Heat Exchanger as far as I can tell is stacked plates of aluminum that are brazed together.
The engine oil and coolant are both going thru the stacked plates but on alternating levels.
If the Thin Aluminum that separates the Oil and coolant corrodes then the oil and coolant will mix.
I saw a picture on the Land Rover forum where the coolant over flowed because it was contaminated by oil.
If I find the link I'll post it here
Thanks
Paul
-
pbierre
- Posts: 60
- Joined: 24 March 2019
- Year and Model: T6 XC70s: '13 & '15
- Location: Pleasanton CA
- Been thanked: 12 times
Paul - I have the Volvo B6304 T6 (Volvo-Ford) engine. I'm hearing engine friction noise for about 3 seconds at cold start-up, but no similar noise if I shut down and restart. I'm suspecting the oil filter anti-drain-back valve is leaky/broken. Is there a way to test the filter housing, cap removed, with the filter depressed?....or with it removed? Is the failure always obvious visually? (thanks for the photos).
I'm thinking to syringe-in some oil, and see if it holds its liquid level over 15 minutes?
I'm thinking to syringe-in some oil, and see if it holds its liquid level over 15 minutes?
-
pgill
- Posts: 798
- Joined: 27 August 2018
- Year and Model: 2010 S80, 2008 LR2
- Location: California
- Has thanked: 115 times
- Been thanked: 185 times
This is where the oil goes to return to the pan when the filter is removed (Note: I removed the spring / rubber disc from this assembly)
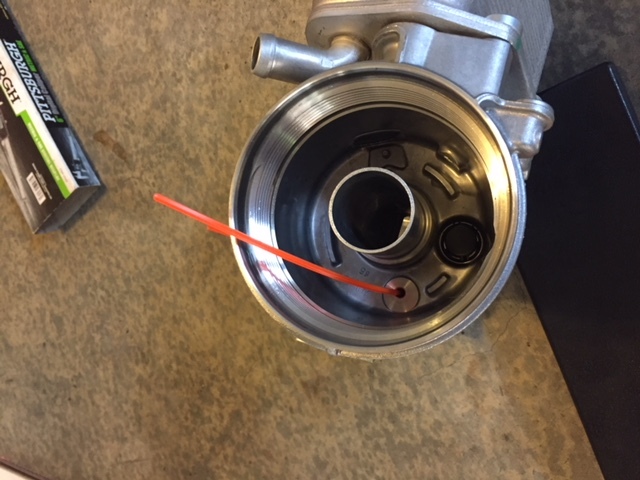
This one has a missing rubber disc (its broken)

This is the new part before adding oil. Note: it can be difficult to see the rubber disc unless you soak up the oil from the bottom of the housing. Park on a hill, nose down and inspect the disc after removing the cap and filter and the oil has settled.

This one has a missing rubber disc (its broken)
This is the new part before adding oil. Note: it can be difficult to see the rubber disc unless you soak up the oil from the bottom of the housing. Park on a hill, nose down and inspect the disc after removing the cap and filter and the oil has settled.
-
pgill
- Posts: 798
- Joined: 27 August 2018
- Year and Model: 2010 S80, 2008 LR2
- Location: California
- Has thanked: 115 times
- Been thanked: 185 times
I would do the following.pbierre wrote: ↑23 Jan 2021, 17:02 I'm suspecting the oil filter anti-drain-back valve is leaky/broken.
Is there a way to test the filter housing, cap removed, with the filter depressed?....or with it removed?
Is the failure always obvious visually?
I'm thinking to syringe-in some oil, and see if it holds its liquid level over 15 minutes?
1. Raise up the back of the XC70 (on a hill or using ramps, the slope of my driveway is enough for this)
2. let it sit for a few hours to get cold
3. Remove the cap and oil filter
4. Use a syringe to remove as much oil as possible from the housing (allow time for the oil to flow, see above park on a hill)
5. Use an ounce or two of fresh clean oil to make it easier to see the disc (pour the clear clean oil on top of the disc)
6. post some pictures
Good luck
Paul
-
pbierre
- Posts: 60
- Joined: 24 March 2019
- Year and Model: T6 XC70s: '13 & '15
- Location: Pleasanton CA
- Been thanked: 12 times
Functional Test of Oil Anti-Drain Valve
If you have any doubts about whether your B6304 (T6) or B6324 (3.2) engine is retaining oil in the filter housing while the car is off:
Here is a Function Test which assesses the plugging action of the anti-drain valve. You can do it as a routine part of the oil change, or sooner if your engine is noisy on cold startup.
Tools used:
36mm socket wrench (12" shaft)
100cc syringe with 12" extender hose
CLEAN PROCEDURE : Take care not to introduce any dirt onto the exposed oil system parts.
Prep:
1) Remove engine cover
2) Lift Power Steering Fluid Reservoir up and move to left for working room
3) Pack drip rag around filter housing (below cap level)
4) Unscrew oil filter cap using 36mm socket wrench
5) Pull filter element down, separating it from the cap. Move cap off to the left,
taking care to keep exposed "core" clean.
Press filter element firmly down to base of housing (it will click into place) -- if
the anti-drain plug is intact, this will close the drain orifice and it will pass the test.
6) Using fresh, clean oil, fill syringe half-way (50cc)
7) Dispense oil into the gap between housing and outer edge of filter element.
Repeat - add 2nd squirt of 50cc.
 Cut two identical wood depth measuring sticks
9) Take the 1st depth measurement by dipping the stick into the reservoir periphery to bottom.
Cut two identical wood depth measuring sticks
9) Take the 1st depth measurement by dipping the stick into the reservoir periphery to bottom.
Mark meniscus line with pencil.
WAIT 10-15 MINUTES - A WELL-FUNCTIONING ANTI-DRAIN VALVE WILL HOLD THE OIL LEVEL
- A DEFECTIVE VALVE WILL NOT HOLD THE OIL LEVEL -- IT WILL DRAIN DOWN
10) Using 2nd stick, take 2nd depth measurement. Compare oil depths recorded on sticks:
NOTE: My valve tests FUNCTIONALLY GOOD
If doing an oil change, swap in the new filter element.
11) Place the cap back on filter element, and screw back down until snug. Don't over-torque!
Thanks, pgill for posting on this important engine topic.
If you have any doubts about whether your B6304 (T6) or B6324 (3.2) engine is retaining oil in the filter housing while the car is off:
Here is a Function Test which assesses the plugging action of the anti-drain valve. You can do it as a routine part of the oil change, or sooner if your engine is noisy on cold startup.
Tools used:
36mm socket wrench (12" shaft)
- IMG_2921.JPG (189.25 KiB) Viewed 3671 times
- IMG_2924.JPG (201.37 KiB) Viewed 3671 times
Prep:
1) Remove engine cover
2) Lift Power Steering Fluid Reservoir up and move to left for working room
3) Pack drip rag around filter housing (below cap level)
- IMG_2923.JPG (134.76 KiB) Viewed 3671 times
- IMG_2922.JPG (99.77 KiB) Viewed 3671 times
taking care to keep exposed "core" clean.
Press filter element firmly down to base of housing (it will click into place) -- if
the anti-drain plug is intact, this will close the drain orifice and it will pass the test.
- IMG_2925.JPG (138.85 KiB) Viewed 3671 times
7) Dispense oil into the gap between housing and outer edge of filter element.
Repeat - add 2nd squirt of 50cc.
- IMG_2929.JPG (112.42 KiB) Viewed 3671 times
- IMG_2926.JPG (114.04 KiB) Viewed 3671 times
Mark meniscus line with pencil.
WAIT 10-15 MINUTES - A WELL-FUNCTIONING ANTI-DRAIN VALVE WILL HOLD THE OIL LEVEL
- A DEFECTIVE VALVE WILL NOT HOLD THE OIL LEVEL -- IT WILL DRAIN DOWN
10) Using 2nd stick, take 2nd depth measurement. Compare oil depths recorded on sticks:
NOTE: My valve tests FUNCTIONALLY GOOD
- IMG_2930.JPG (162.38 KiB) Viewed 3671 times
11) Place the cap back on filter element, and screw back down until snug. Don't over-torque!
Thanks, pgill for posting on this important engine topic.
-
pgill
- Posts: 798
- Joined: 27 August 2018
- Year and Model: 2010 S80, 2008 LR2
- Location: California
- Has thanked: 115 times
- Been thanked: 185 times
Very well done.
I like your test.
I do recommend that you confirm your result by testing the valve function the way that I outlined in this thread.
And I will find a way to include your test in my maintenance routine.
But that still leaves open the question of the noise that got you here in the first place.
Some possibilities
* Power steering pump (the filter screen in the bottom of the reservoir gets clogged and will need to be replaced if you haven't already)
* Aux belt - idler pulley and tensioner pulley (I replace mine every 10 years or 100,000 miles)
* PCV valve - the noise from a failed PCV is very strange, a mechanical sound like what you described
* READ - it is possible that the READ is worn and making noise (Fixing the READ is expensive and complicated)
There are other possibilities but I would look at those first.
Note: in 2011 (I think) Volvo made changes to the READ and it is my understanding that the newer design is more robust and I believe that you have a newer T6.
Thanks for the input
Take care
Paul
-
pgill
- Posts: 798
- Joined: 27 August 2018
- Year and Model: 2010 S80, 2008 LR2
- Location: California
- Has thanked: 115 times
- Been thanked: 185 times
pbierre
I just created a new thread
Strange noise on startup in cold weather
It for a 3.0T like yours
reply to that thread if your noise isn't like the video or if it is
Thanks
Paul
I just created a new thread
Strange noise on startup in cold weather
It for a 3.0T like yours
reply to that thread if your noise isn't like the video or if it is
Thanks
Paul
-
- Similar Topics
- Replies
- Views
- Last post