


As long as you keep enjoying the process and accept it is an old car with challenges, it can become very satisfying!
Neil.
Unfortunate new Volvo owner! (98 V70 AWD)
-
scot850
- Posts: 14864
- Joined: 5 April 2010
- Year and Model: 2000 V70 R
- Location: Calgary, Alberta, Canada
- Has thanked: 1836 times
- Been thanked: 1709 times
Re: Unfortunate new Volvo owner! (98 V70 AWD)
2006 V70 2.5T AWD Polestar tune
2000 V70 R - still being an endless PITA
2006 XC70 - Our son now has this and still parked in our garage
2003 Toyota 4Runner V8 Limited
2015 Kia Sportage EX-L - Sold
1993 850 GLT -Sold
1998 V70 XC - Sold
1997 Volvo 850 SE NA - Went to niece in California - Sold
2000 V70 SE NA - Sold
2000 V70 R - still being an endless PITA
2006 XC70 - Our son now has this and still parked in our garage
2003 Toyota 4Runner V8 Limited
2015 Kia Sportage EX-L - Sold
1993 850 GLT -Sold
1998 V70 XC - Sold
1997 Volvo 850 SE NA - Went to niece in California - Sold
2000 V70 SE NA - Sold
-
V50M66
- Posts: 278
- Joined: 21 May 2023
- Year and Model: 1998 V70 AWD
- Location: New England
- Has thanked: 26 times
- Been thanked: 89 times
I'm curious to see if your Nivos will still try to adjust themselves occasionally and mess with the ride height. Mine did, and it drove me nuts (and meant I couldn't get it aligned properly).
1998 V70 AWD - Emerald Green/Tan - M56/Delta link swap, VAST tuned, lots of fun
1998 V70 NA - Nautic Blue/Charcoal - Factory M56/slicktop track car
2006 XC70 Ocean Race - workhorse
2002 S40 1.9T - daily
2004 XC70 - Mystic Silver/Black - former workhorse, parted
2005 V50 T5 M66 FWD - Black Stone/Black leather - former garage queen, sold
1998 V70 NA - Nautic Blue/Charcoal - Factory M56/slicktop track car
2006 XC70 Ocean Race - workhorse
2002 S40 1.9T - daily
2004 XC70 - Mystic Silver/Black - former workhorse, parted
2005 V50 T5 M66 FWD - Black Stone/Black leather - former garage queen, sold
-
V50M66
- Posts: 278
- Joined: 21 May 2023
- Year and Model: 1998 V70 AWD
- Location: New England
- Has thanked: 26 times
- Been thanked: 89 times
That's what I did to mine initially, but as it got driven, the back started to do its own thing. Some days it would match the front, other days it would be at stock height. And it was inconsistent across sides. Drove me nuts, and that combined with the harsh ride made me redo the entire suspension system on all 4 corners.
1998 V70 AWD - Emerald Green/Tan - M56/Delta link swap, VAST tuned, lots of fun
1998 V70 NA - Nautic Blue/Charcoal - Factory M56/slicktop track car
2006 XC70 Ocean Race - workhorse
2002 S40 1.9T - daily
2004 XC70 - Mystic Silver/Black - former workhorse, parted
2005 V50 T5 M66 FWD - Black Stone/Black leather - former garage queen, sold
1998 V70 NA - Nautic Blue/Charcoal - Factory M56/slicktop track car
2006 XC70 Ocean Race - workhorse
2002 S40 1.9T - daily
2004 XC70 - Mystic Silver/Black - former workhorse, parted
2005 V50 T5 M66 FWD - Black Stone/Black leather - former garage queen, sold
-
Culito
- Posts: 55
- Joined: 16 June 2023
- Year and Model: 1998 V70
- Location: Columbia, MO
- Has thanked: 4 times
- Been thanked: 7 times
HOW TO REMOVE / REPLACE REAR COIL SPRINGS ON A 1998 VOLVO V70 AWD w/NIVOMATS
I was searching for this across the web, and couldn't find any real guide, so maybe this will save someone from futzing about for hours like I did (on the left side - the right side took like 1/2hr.)
Things to make the job easier:
-Nice floor jack
-Large and small pry bars
-small jack stand or nice chunk of 6x6 (about 8-10" tall)
Lets get to it!
-Chock your front wheels!
-In the rear cargo area, remove the forward cargo floor. There's two bolts on each side.
-Remove the shock mount covers
-Using penetrant, break the shock bolt loose. If the shock spins, use an impact. If that doesn't work, I don't know what to tell you. Mine broke loose easily. Remove the nut and washer.
-Break the lug bolts loose on the side you're working on.
-Jack up the car using the rear jack point until the wheel is off the ground.
-Slide your block of wood or jack stand under the lower control arm in a stable spot. Spray the lower sway bar link in the control arm with penetrant.
-Slowly let the jack down so that the wheel is off the ground, but all vehicle weight is on the suspension.
-Remove the sway bar link on the lower control arm. This will allow the suspension to droop. That's the only thing we have to do under the car.
-Reposition the jack just forward of the jack point / trailing arm mount. Your nice floor jack should spread out the load so no denting will occur (at least in my case)
-Remove the jack point bolt, and the three bolts for the trailing arm.
-Carefully jack up the car until the weight is off the suspension. Note that the jack point and trailing arm mount will drop - be mindful of the brake lines.
-Remove the wheel.
-Remove the stand / block under the control arm.
-Using the large pry bar, slide the end under the lower shock mount, and pry the arm downwards. At the same time, use the small pry bar to pull the top of the spring towards you. Be careful! It will still have some tension on it.
-Once the spring is clear, you can now remove it.
RE-INSTALLATION
-Clean any debris / dirt out of the lower spring cup.
-Place bottom of spring in cup, making sure the end of the spring coil lines up with the slot.
-Place the plastic top piece on the spring (again note orientation), and pry the control arm downwards to slide the spring into place.
-Place the washer over the top shock stud.
-Place your block / stand under the control arm again.
-Slowly let the jack down, once again placing the vehicle weight on the lower control arm. This will compress the spring, and the jack point and trailing arm mount will move back towards the car. Check the sway bar link and top shock stud & washer as the suspension moves upward - make sure everything lines back up (watch your fingers!)
-Use a large punch to line up the jack point and trailing arm holes.
-Start the large jack point bolt, tighten it to snug, and check the alignment of the other holes with the punch. Start those bolts and pull everything up snug. Torque 'er down.
-Reposition the jack under the jack point (for safety)
-Re-connect the sway bar link.
-Mount the wheel, snug lug bolts.
-Jack the car up, remove the jack stand / wood block from under the control arm
-Let the car down, torque wheel studs and top shock nut. I just tightened the top shock nut until the shaft spun. Seemed tight enough.
-Replace shock tower covers, cargo cover etc.
-Cruise local trailer park.
I did this to trim the rear coils after lowering the front:
I was searching for this across the web, and couldn't find any real guide, so maybe this will save someone from futzing about for hours like I did (on the left side - the right side took like 1/2hr.)
Things to make the job easier:
-Nice floor jack
-Large and small pry bars
-small jack stand or nice chunk of 6x6 (about 8-10" tall)
Lets get to it!
-Chock your front wheels!
-In the rear cargo area, remove the forward cargo floor. There's two bolts on each side.
-Remove the shock mount covers
- IMG_20230818_155411[1].jpg (483.78 KiB) Viewed 436 times
-Break the lug bolts loose on the side you're working on.
-Jack up the car using the rear jack point until the wheel is off the ground.
-Slide your block of wood or jack stand under the lower control arm in a stable spot. Spray the lower sway bar link in the control arm with penetrant.
-Slowly let the jack down so that the wheel is off the ground, but all vehicle weight is on the suspension.
-Remove the sway bar link on the lower control arm. This will allow the suspension to droop. That's the only thing we have to do under the car.
-Reposition the jack just forward of the jack point / trailing arm mount. Your nice floor jack should spread out the load so no denting will occur (at least in my case)
- IMG_20230818_153753[1].jpg (276.27 KiB) Viewed 436 times
-Carefully jack up the car until the weight is off the suspension. Note that the jack point and trailing arm mount will drop - be mindful of the brake lines.
-Remove the wheel.
-Remove the stand / block under the control arm.
-Using the large pry bar, slide the end under the lower shock mount, and pry the arm downwards. At the same time, use the small pry bar to pull the top of the spring towards you. Be careful! It will still have some tension on it.
- IMG_20230818_151911[1].jpg (407.69 KiB) Viewed 436 times
- IMG_20230818_152014[1].jpg (427.2 KiB) Viewed 436 times
- IMG_20230818_135259[1].jpg (509.04 KiB) Viewed 436 times
-Clean any debris / dirt out of the lower spring cup.
-Place bottom of spring in cup, making sure the end of the spring coil lines up with the slot.
-Place the plastic top piece on the spring (again note orientation), and pry the control arm downwards to slide the spring into place.
-Place the washer over the top shock stud.
-Place your block / stand under the control arm again.
-Slowly let the jack down, once again placing the vehicle weight on the lower control arm. This will compress the spring, and the jack point and trailing arm mount will move back towards the car. Check the sway bar link and top shock stud & washer as the suspension moves upward - make sure everything lines back up (watch your fingers!)
-Use a large punch to line up the jack point and trailing arm holes.
-Start the large jack point bolt, tighten it to snug, and check the alignment of the other holes with the punch. Start those bolts and pull everything up snug. Torque 'er down.
-Reposition the jack under the jack point (for safety)
-Re-connect the sway bar link.
-Mount the wheel, snug lug bolts.
-Jack the car up, remove the jack stand / wood block from under the control arm
-Let the car down, torque wheel studs and top shock nut. I just tightened the top shock nut until the shaft spun. Seemed tight enough.
-Replace shock tower covers, cargo cover etc.
-Cruise local trailer park.
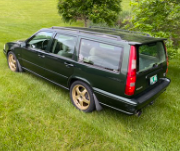
I did this to trim the rear coils after lowering the front:
- IMG_20230818_135819[1].jpg (317.12 KiB) Viewed 436 times
- IMG_20230818_161800[1].jpg (402.67 KiB) Viewed 436 times
-
V50M66
- Posts: 278
- Joined: 21 May 2023
- Year and Model: 1998 V70 AWD
- Location: New England
- Has thanked: 26 times
- Been thanked: 89 times
Nice work and good writeup, but trimming the coils likely won't help much unless your Nivomats are completely shot without any remaining self-leveling functionality, since the Nivos are the source of your ride height issues, not the springs, and it will likely try to pump it up with some driving. Time will tell I suppose.
1998 V70 AWD - Emerald Green/Tan - M56/Delta link swap, VAST tuned, lots of fun
1998 V70 NA - Nautic Blue/Charcoal - Factory M56/slicktop track car
2006 XC70 Ocean Race - workhorse
2002 S40 1.9T - daily
2004 XC70 - Mystic Silver/Black - former workhorse, parted
2005 V50 T5 M66 FWD - Black Stone/Black leather - former garage queen, sold
1998 V70 NA - Nautic Blue/Charcoal - Factory M56/slicktop track car
2006 XC70 Ocean Race - workhorse
2002 S40 1.9T - daily
2004 XC70 - Mystic Silver/Black - former workhorse, parted
2005 V50 T5 M66 FWD - Black Stone/Black leather - former garage queen, sold
-
scot850
- Posts: 14864
- Joined: 5 April 2010
- Year and Model: 2000 V70 R
- Location: Calgary, Alberta, Canada
- Has thanked: 1836 times
- Been thanked: 1709 times
Nice job and it now looks more level. Only thing is did you leave the Nivomats in? I'm wondering how they will work as they are supposed to self-level, but if your car is no longer at the correct level how will they respond to that.
I noticed your Nivomat boots are trashed. You can replace them with a boot from a 240. They are hard to remove as you have to grip the shaft and loosen the lower mount which unthreads from the shaft at the bottom. I use a pair of aluminum bench vice grips that are designed for motor cycle forks to grip the shaft and then loosen the lower mount so as not to damage the shaft. I recall I think it was Foggydogg had a nightmare trying to remove the lower mount. I believe soaking in PB Blaster and then some heat will help the process.
I did a thread on this a few years ago. The boot was out of stock, but I was able to order them from a dealer in Canada but they took a few weeks as they are 'classic' parts and come from Sweden.
viewtopic.php?f=1&t=72387&p=381523&hili ... ot#p381523
A friend found a pair of OE rear shocks that were designed to replace a car that had Nivomats. He runs an 850 AWD
Neil.
2006 V70 2.5T AWD Polestar tune
2000 V70 R - still being an endless PITA
2006 XC70 - Our son now has this and still parked in our garage
2003 Toyota 4Runner V8 Limited
2015 Kia Sportage EX-L - Sold
1993 850 GLT -Sold
1998 V70 XC - Sold
1997 Volvo 850 SE NA - Went to niece in California - Sold
2000 V70 SE NA - Sold
2000 V70 R - still being an endless PITA
2006 XC70 - Our son now has this and still parked in our garage
2003 Toyota 4Runner V8 Limited
2015 Kia Sportage EX-L - Sold
1993 850 GLT -Sold
1998 V70 XC - Sold
1997 Volvo 850 SE NA - Went to niece in California - Sold
2000 V70 SE NA - Sold
-
Culito
- Posts: 55
- Joined: 16 June 2023
- Year and Model: 1998 V70
- Location: Columbia, MO
- Has thanked: 4 times
- Been thanked: 7 times
I've been driving it and i haven't noticed any pumping up of the Nivos. Maybe a tiny bit, 1/2-1/4" per side, that's it. So they aren't doing much.
It is sitting a bit lower and level now, which is what I wanted.
Eventually (maybe) I'll replace the Nivos with standard shocks, but it seems to ride fine as-is, so that is not a priority.
It is sitting a bit lower and level now, which is what I wanted.
Eventually (maybe) I'll replace the Nivos with standard shocks, but it seems to ride fine as-is, so that is not a priority.
-
Culito
- Posts: 55
- Joined: 16 June 2023
- Year and Model: 1998 V70
- Location: Columbia, MO
- Has thanked: 4 times
- Been thanked: 7 times
So for some reason I waited until now to see if the heat worked. It doesn't.
The blower works fine, and the flaps direct the air to all the proper places, but it's cold.
Engine temp is where it's supposed to be.
I guess the first step is to take it for a drive and see if the heater tubes through the firewall get hot?
The blower works fine, and the flaps direct the air to all the proper places, but it's cold.
Engine temp is where it's supposed to be.
I guess the first step is to take it for a drive and see if the heater tubes through the firewall get hot?
-
abscate

- MVS Moderator
- Posts: 35272
- Joined: 17 February 2013
- Year and Model: 99: V70s S70s,05 V70
- Location: Port Jefferson Long Island NY
- Has thanked: 1497 times
- Been thanked: 3810 times
P80 heater cores are full flow. Temperature is controlled by a blend door which mixes heated and ambient or cooled air. No heat means a bad blend door motor or signal, 99.3% if the time.
Empty Nester
A Captain in a Sea of Estrogen
1999-V70-T5M56 2005-V70-M56 1999-S70 VW T4 XC90-in-Red
Link to Maintenance record thread
A Captain in a Sea of Estrogen
1999-V70-T5M56 2005-V70-M56 1999-S70 VW T4 XC90-in-Red
Link to Maintenance record thread
-
- Similar Topics
- Replies
- Views
- Last post