If you're getting logged out, delete cookies, log in.

If you're having trouble with this or having trouble with a ban notification, the problem is on my end. Please shoot me an email funtent@gmail.com and I'll get it fixed.

Login Register

DIY: 1998 Volvo V70 Exhaust Manifold Replacement

Help, Advice and DIY Tutorials on Volvo's extremely popular car line -- Volvo's 1990s "bread and butter" cars -- powered by the ubiquitous and durable Volvo inline 5-cylinder engine.

1992 - 1997 850, including 850 R, 850 T-5R, 850 T-5, 850 GLT
1997 - 2000 S70, S70 AWD
1997 - 2000 V70, V70 AWD
1997 - 2000 V70-XC
1997 - 2004 C70

This topic is in the MVS Volvo Repair Database » DIY 1998 Volvo V70 Exhaust Manifold Replacement
Post Reply
cn90
Posts: 7505
Joined: 31 Mar 2010, 09:54
Year and Model: 2004 V70 2.5T
Location: Omaha NE
Has thanked: 1 time
Been thanked: 294 times

Volvo Repair Database DIY: 1998 Volvo V70 Exhaust Manifold Replacement

Post by cn90 »

DIY: 1998 Volvo V70 Exhaust Manifold Replacement

Alright, my exhaust leak has been chronic for a few years, as it turns out, it is a leak at the Flex Pipe, just in front of the Catalytic. It gets worse and noisy, so I decided to tackle it.

Some good references:

http://volvoforums.com/forum/volvo-v70- ... d-n-44523/

Volvo 5-cylinder: How to Replace the Head Gasket

Use http://www.eeuroparts.com for diagram and PNs.

- Search forum for “OBX Exhaust Manifold” brand, about $200 on ebay etc., many people seem OK with it. I could not find any long-term report (such as 5 years or more) of happiness with OBX, also from my research the Honda people have some issues with OBX. Since this is a job I don’t want to do again for another 10 years, I decided to go with Volvo OEM because the OEM held up for more than 10 years!

The good news is Waltrip Volvo offers a very competitive price!
I used OEM Gaskets as well; again, this is not a job I want to do again in 10 years!

These are what I ordered from Waltrip Volvo (Franklin TN):
* OEM Volvo Exhaust Manifold: PN 9471934....$365
* Gasket Set (at Manifold, sold as set of 5): PN 271735....$24.
* Gasket @ Catalytic (qty =1) PN 9135122....$10

I regret I did not order the 4 studs at the catalytic, so had to run to local autoparts store.
Volvo PN is 978342....$2.00/each; these are M8 x 1.25 x 35 mm long. So I strongly recommend that you order these 4 studs ahead to avoid aggravation!

I re-used all the nuts, they came out fine.


TOOL

- 10-mm, 12-mm, 13-mm sockets.
- Extension and swivel joint (this is a must).
- 2-foot section of 1” iron pipe (few dollars at Home Depot), this gives me a lot of torque to remove the stubborn nuts.
- Make-up mirror: a very useful tool! You can get this at Target, Walmart, Walgreen for a few dollars.
- I broke the Heated Air Hose (Aluminum) feeding the Air Filter. Dealer wanted $50 for this piece of junk! So I got it from OReilly Autoparts for $6.00, make sure the I.D. = 2” and length is 18 inches or so.
- I could not remove the 4 studs on the Exhaust Manifold-Catalytic side, even with this out of the car and lots of heat from the torch, I called Volvo dealer and they said it will take 2-3 days to get them, so I went to Advance Autoparts and got their "Water Pump Stud Kit” (PN 25735 on the package: 3 separate sizes and 4 of each type, so 12 studs and 12 nuts total for a cheap $5.00! I only used four (4) M8x1.25x35 studs from the kit). Or you can ask your local muffler shop if they have the studs.
- Propane Torch ($12 at hardware store): use only 2” of blue flame.
- WD-40 etc.
- “White-out” (liquid paper to label nuts). Make sure you label the nuts and bolts properly, it will make install a lot easier.
I just paint one dot or two dots etc on the nuts/bolts and make notes. Or you can group them together as a group in ziploc bags.

V70Exhaust01.JPG
V70Exhaust01.JPG (114.58 KiB) Viewed 19713 times

PROCEDURE

1. Get a box to store the nuts and bolts. Spray the nuts/bolts areas with WD-40 the night before, but don’t drive it because the WD-40 will be burned off!

2. Car up on wood ramps. Sorry don’t have a pic for Volvo, but here is my BMW on wood ramps (made from 2x10 lumber):

BMWwoodramps.JPG
BMWwoodramps.JPG (138.83 KiB) Viewed 19713 times

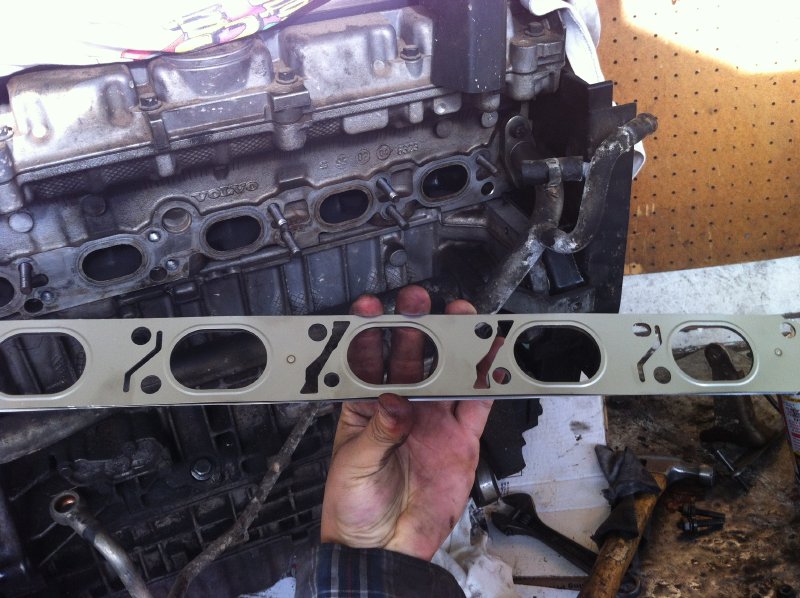
3. Study the new Exhaust Manifold so you are familiar with it. Note mounting holes for Air Valve, Heated Air Cover, and the ten (10) holes for the Manifold itself.

V70Exhaust02.JPG
V70Exhaust02.JPG (150.26 KiB) Viewed 19713 times

4. Remove ground straps x2 (10-mm socket). Save the bolts.

V70Exhaust03.JPG
V70Exhaust03.JPG (32.19 KiB) Viewed 19713 times

5. Remove the 5 bolts on the Heated Air Cover. In my case, the 3 upper bolts came out fine, the lower 2 bolts near the flex pipe were so rusted in and impossible to remove w/o heat. So I got in from the bottom, heated the welded nuts with propane torch for 1 minute each. Then they came out fine. Just be careful with the propane torch; only light it when you are down there and ready to go.

V70Exhaust04.JPG
V70Exhaust04.JPG (55.76 KiB) Viewed 19713 times

6. Once 5 bolts on the Heated Air Cover, do NOT remove the Heated Air Cover yet. It won’t come out until the Air Valve is moved out of the way. I learned this the hard way, so don’t ask LOL!

7. To remove the Air Valve piping, see the pic. Remove the 2 mounting bolts (12-mm).
It is a flared fitting with 22-mm nut. The reducer also has a 22-mm hex. Heat this area with Propane, taking care not to burn the car down LOL. The heater hoses are close by, just pay attention where you aim the torch. Once it is hot, you can now use the 8-inch adjustable wrenches to undo the large nut and remove the reducer from the bung. No need to disconnect the rubber hoses etc. just tie it up out of the way.

V70Exhaust05.JPG
V70Exhaust05.JPG (93 KiB) Viewed 19713 times

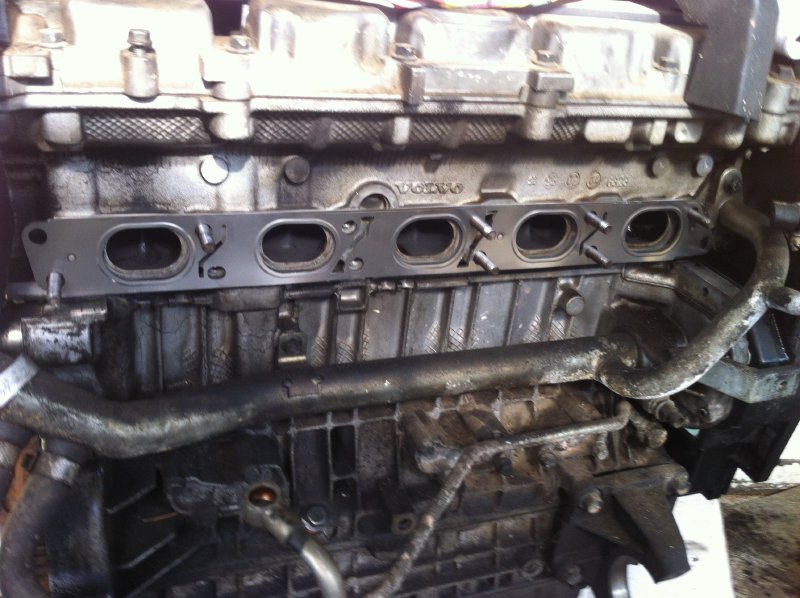
8. The Exhaust Manifold is held by 10 nuts (engine side) and 4 nuts (cat side). Guess what, the Volvo engineers decided that for the 4 nuts on the catalytic side, two (2) of them were 12-mm and two (2) of them were 13-mm, go figure! The Exhaust Manifold will be hard to get out, simply because the studs are stuck to the Exhaust Manifold, so you may have to pry with screwdriver to separate it from the Cat piping. You may need to lower the cat or push it back a bit. I barely got the Exhaust Manifold out with prying, so not much room to giggle!

INSTALL NOTE

Installation is the reverse of the removal but note these tricks:

1. I used anti-seize on all nuts and bolts during install to make it easier. I understand that heat will eventually burn it all but all I care is a smooth install.

2. You may need to support the catalytic with a floor jack to line up the holes.

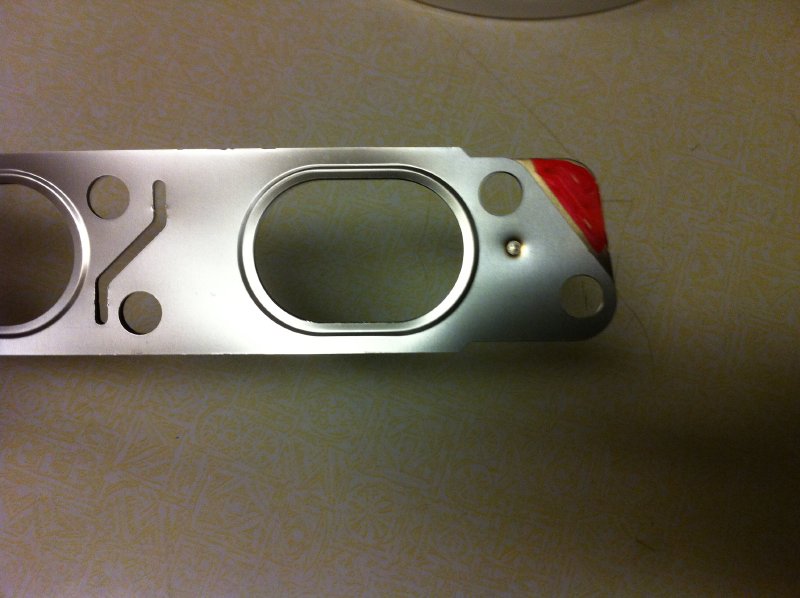
3. Install the 5 gaskets. There is only one way they can fit. Now install the Exhaust Manifold and let it hang loose.

4. Do NOT install the four (4) studs on the Exhaust Manifold during install yet because there is simply no room! Now install the Gasket on the Cat side with the 4 studs.

5. Here is the trick when installing the 4 studs: wet the short end (that goes into the flange) with oil, gently spin it in a few turns, then use a “right-angle pliers” to spin it in until about 1mm sticks out. The “right-angle pliers” works out perfect because they also “roughen up” the stud threads a bit, so when the nut is installed, the nut helps spins the stud further.
V70Exhaust06.JPG
V70Exhaust06.JPG (91.7 KiB) Viewed 19713 times
6. I tightened the 4 nuts from below using extension and swivel joint. Look up the torque, I just tightened by hand and snug it.

7. Double-check to be sure all 10 nuts are tightened on the Exhaust Manifold.

8. Slide the Heated Air Cover but don't install the 5 bolts until you are finished with the Air Valve Piping installation.

9. Don’t forget the Heated Air Hose and clamps.

10. Lastly install the engine ground straps.

11. Start the car and you will love the smooth sound as if it just comes from the show room!

V70Exhaust07.JPG
V70Exhaust07.JPG (115.17 KiB) Viewed 19713 times
Last edited by cn90 on 14 Jun 2011, 09:42, edited 5 times in total.
2004 V70 2.5T 100K+
2005 XC90 2.5T 110K+

FlyingVolvo
Posts: 1818
Joined: 08 Mar 2009, 15:43
Year and Model: 2000 V70XC
Location: USA
Has thanked: 49 times
Been thanked: 69 times

Post by FlyingVolvo »

Man if you keep doing all this, there won't be anything for the rest of us to write up. :D

Great job as always! Question though, how did you know you have an exhaust leak?
2000 V70XC - 340,000 miles
Hilton Tune, 16T Turbo, Mototec 3" downpipe, Blue injectors, IPD Short Ram Filter, Snabb Intake Piping & RIP kit, do88 Intercooler, TME Dual Exhaust, HID Projectors, R Panels, do88 Silicone Hoses

2023 V60 T8 PE - In the works...

cn90
Posts: 7505
Joined: 31 Mar 2010, 09:54
Year and Model: 2004 V70 2.5T
Location: Omaha NE
Has thanked: 1 time
Been thanked: 294 times

Post by cn90 »

ecbsykes wrote:...Great job as always! Question though, how did you know you have an exhaust leak?
Went to exhaust shop to weld a pipe at the rear of the cat.
Once done, the mechanic told me there was another leak at the flex pipe, very difficult to see from above, it can only be felt by hovering the hand around the flex pipe when engine is running.
Sure enough the flex pipe was leaking.

Google "Volvo Flex Pipe Repair", you will see that this is a common problem at 12yr/110K miles marking.
2004 V70 2.5T 100K+
2005 XC90 2.5T 110K+

cn90
Posts: 7505
Joined: 31 Mar 2010, 09:54
Year and Model: 2004 V70 2.5T
Location: Omaha NE
Has thanked: 1 time
Been thanked: 294 times

Post by cn90 »

I have been wondering re flex pipe (which is present in virtually all cars to allow the engine to flex a bit here and there)....

The CAT is basically supported by the Front junction (where the 4 studs are) and the REAR attachment to the muffler.

I don't know the weight of the CAT (maybe 10-15 lbs), is it possible that the weight of the CAT puts some stress on the flex pipe?

Is it a good idea to install a strap and somehow hang the CAT up a bit to take the weight off the flex pipe?

VolvoCAT.JPG
VolvoCAT.JPG (31.94 KiB) Viewed 19676 times
2004 V70 2.5T 100K+
2005 XC90 2.5T 110K+

cdm

Post by cdm »

Just did mine and this guide was very helpful. I didnt bend the air valve piping - yes you can get the heat shield without bending the piping! just takes some creativity after you've unbolted the retaining bolts on the air valve bracket.


Speaking of that, the egr connection was a nightmare (the 2 22mm fittings). took me half an hour of cursing trying to fit in 2 wrenches in there. only way i got it done is using a crows foot to loosen the manifold plug, then rotate the whole pipe backwards so you can then fit a wrench to hold that fitting in place while using another wrench to loosen the outside nut. i was able to rotate the pipe backwards enough after loosening the inner 22mm fitting so that 2 wrenches could be fit from top and then it took a finger of pressure to separate the two. i suspect people break this by either bending the pipe trying to get the heat shield off or going for it without having proper wrench grip/position.

there is no way you can fit a crows foot and a box wrench at the same time to do it in one move. hence why you need to do it in 2 steps. crows for the inner 22mm and that will allow you to rotate the pipe a bit so you can then apply proper wrenches from the top. once off clean it, paint it and lube it. it will make installation easier and prevent it from seizing down the road (you have to remove the manifold for other jobs so you never know).

The heat shield bolts - the 2 lower one above the flex coupling. Impact them off. Otherwise you will fail and have to dremel them off. Same for the lower 4 nuts onto the studs - impact. Else you will suffer. The 10 manufold nuts came off fine on mine except one that i almost stripped but caught it in time. I think the angle and lack of vision made me put the socket at an angle but i caught it in time. So before you crank each nut, verify socket angle and placement! If in doubt, recheck!

Studs - forget them. Just use bolts and nuts. Makes removal so much easier since you now have space.

I dont see a reason to bother with straps/brackets. If anything that will cause more stress on the joint since in stock form the whole exhaust is pushed back as needed. If you bolt that down, you will be forcing the flex coupling to take all the back and forth motion.

xHeart
Posts: 3120
Joined: 03 Dec 2011, 08:05
Year and Model: 2.0/2.4/3.2
Location: Great Lakes - USA
Has thanked: 70 times
Been thanked: 88 times

Post by xHeart »

cdm wrote: Speaking of that, the egr connection was a nightmare (the 2 22mm fittings). took me half an hour of cursing trying to fit in 2 wrenches in there. only way i got it done is using a crows foot to loosen the manifold plug, then rotate the whole pipe backwards so you can then fit a wrench to hold that fitting in place while using another wrench to loosen the outside nut. i was able to rotate the pipe backwards enough after loosening the inner 22mm fitting so that 2 wrenches could be fit from top and then it took a finger of pressure to separate the two. i suspect people break this by either bending the pipe trying to get the heat shield off or going for it without having proper wrench grip/position.
Back hurts after extension and reach. Valve fitting is indeed a two steps process. I couldn't find 22mm crowfoot, my set had 19mm, hence used 22mm flare-nut, and an adjustable wrenches.
Torque --
Exhaust manifold to heat shield - 5 bolts: 11 ft-lb
Exhaust manifold to cylinder head - 10 bolts: 18 ft-lb
Flexible flange joint - 4 nuts: 18 ft-lb
--
Golden-German Shepherd | 2014D VIDA DiCE | 2020 V60CC (Frska) | 2013A XC90 +160mi/257km (Electra) | 2001 V70XC +210mi/338km (Nautica)
Past: Golden Retriever | 1997 Volvo 854 | 1989 Volvo 740 GL | 1979 Volvo 240

User avatar
yamaboosh
Posts: 33
Joined: 07 Jan 2017, 15:16
Year and Model: 1995 850 GLT
Location: GA USA

Post by yamaboosh »

Great job! I'll be doing my '95 850 GLT soon, I assume the process is fairly similar?

User avatar
erikv11
Posts: 11122
Joined: 25 Jul 2009, 14:03
Year and Model: 850, V70, S60R, XC70
Location: Iowa
Has thanked: 200 times
Been thanked: 572 times

Post by erikv11 »

Yep, it's the same. Hopefully your 95 doesn't have the SAS valve, it just gets in the way. Get rid of the SAS if it does!
'95 854 T-5R, Motronic 4.4, 185k
'96 855 NA, 151k
'98 V70, T5 tune-injectors-turbo, LPT engine, 294k
'06 S60 R, 176k
'07 XC70, 198k
'99 Camry V6 :shock: 138k
gone: '96 NA 850 210k, '98 NA V70 182k, '98 S70 NA 225k

tryingbe
Posts: 1892
Joined: 18 Jun 2009, 12:43
Year and Model: None
Location: Mesa, AZ, USA
Been thanked: 25 times

Post by tryingbe »

I would suggest VICTOR REINZ MS19361, but Volvo 30777495, 8699467, 86994670 also works. For one thing, the gasket will stay in place when you bolt the exhaust manifold on, that can NOT be said about those stupid individual gaskets.

Cut the red part off before use.

Image

Image

Image
85 GLH, 367 whp
00 Insight, 72 mpg

User avatar
yamaboosh
Posts: 33
Joined: 07 Jan 2017, 15:16
Year and Model: 1995 850 GLT
Location: GA USA

Post by yamaboosh »


Post Reply
  • Similar Topics
    Replies
    Views
    Last post