Login Register

Timing Belt Removal/KTC Cam Locking Tool questions

Help, Advice and DIY Tutorials on Volvo's P80 platform cars -- Volvo's 1990s "bread and butter" cars -- powered by the ubiquitous and durable Volvo inline 5-cylinder engine.

1992 - 1997 850, including 850 R, 850 T-5R, 850 T-5, 850 GLT
1997 - 2000 S70, S70 AWD
1997 - 2000 V70, V70 AWD
1997 - 2000 V70-XC
1997 - 2004 C70

Post Reply
j_cd
Posts: 474
Joined: 24 April 2010
Year and Model: 1998 S70 GLT
Location: Los Angeles, CA

Timing Belt Removal/KTC Cam Locking Tool questions

Post by j_cd »

I'm getting ready to pull the cylinder head on my '98 S70 GLT. This will be my first time removing the timing belt. The oil pump mark is spot on, and the cam sprocket marks are lined up pretty well with the upper timing cover notches.

Image

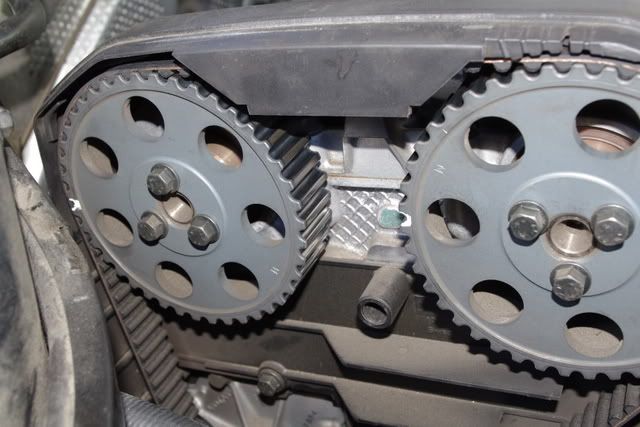
My indie volvo mechanic installed a new timing belt, tensioner and pulley just a few months ago. I'm sure those are his whiteout marks on the rear of the cam sprockets. He's not open today, so I'm asking here. Do you think the whiteout marks are just to designate the rear of the cam sprockets? Do I need to mark anything further before removing the tensioner and belt?

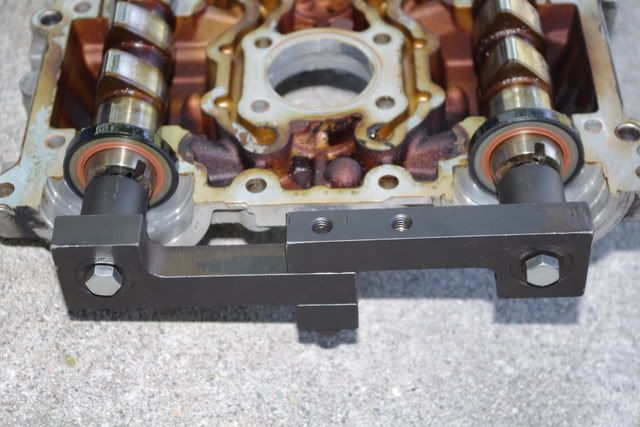
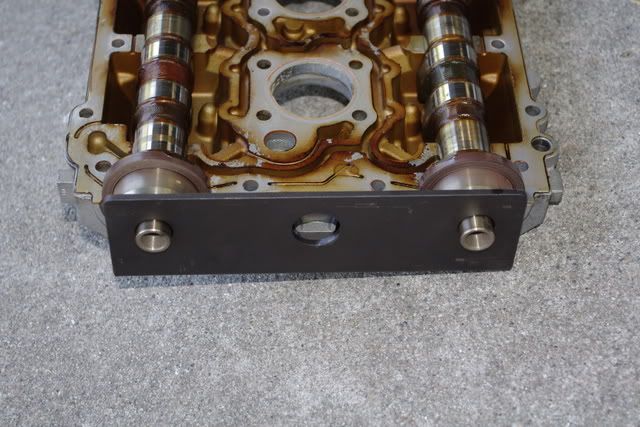
Also, I bought the KTC Tools Volvo Camshaft/Crankshaft Locking Tool, which comes with no instructions whatsoever.

Image

I'm following a few tutorials on cylinder head replacement, so the Cam Locking Tool is mostly self explanatory. I'm wondering though, is this small piece below what you're supposed to insert in the hole behind the starter to lock the crankshaft?

Image

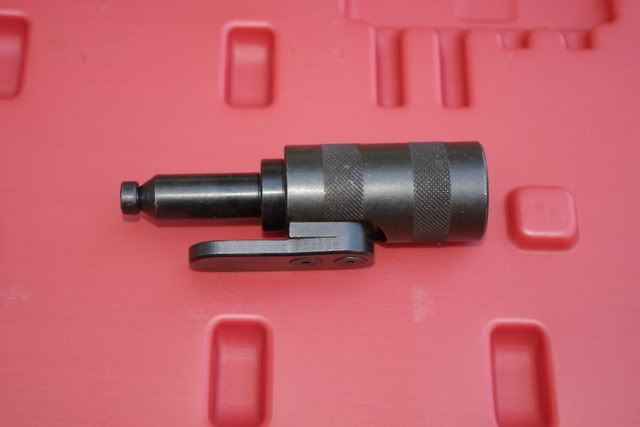
If anyone has used this tool kit, maybe you could clue me in. Thanks.
Last edited by j_cd on 06 Aug 2012, 19:55, edited 2 times in total.

jimmy57
Posts: 6694
Joined: 12 November 2010
Year and Model: 2004 V70R GT, et al
Location: Ponder Texas
Has thanked: 4 times
Been thanked: 320 times

Post by jimmy57 »

Ignore the paint. I often do cam belts with no mark alignment and only my paint marks. His marks won't mean anything to your head R&R task.

winged handle rigs are used for pulling top of head down to close the gap between the two parts when going together.
bent plate at top will hold front of cams into the upper head when removing and installing.
the tool on the left, 2 short bolts, 2 long bolts, and the two round tabbed extensions are for indexing (aligning) the cams. Your will not need the extensions and long bolts for your 98.
The last tool shown also in the other picture is inserted into the hole behind removed starter and the crank is rotated CCW to stop against the pin for 100% accurate crank alignment. This is optional, especially on non CVVT engines, if you are sure to look straight down and get the oil pump pointer and notches on crank gear aligned spot on.

j_cd
Posts: 474
Joined: 24 April 2010
Year and Model: 1998 S70 GLT
Location: Los Angeles, CA

Post by j_cd »

Fantastic jimmy57!

My friend said you don't want to lock the crank if you're going to be cleaning the piston crowns. That way you can turn the crank to get each piston at the top of it's cylinder before cleaning. And he said to put a little grease around the piston edges first, to keep debris from getting down in the cylinder sleeve.

The oil pump pointer is definitely spot on the line in the valley, between the two slotted teeth, so I think I'm good to go.
Last edited by j_cd on 05 Aug 2012, 19:19, edited 1 time in total.

jimmy57
Posts: 6694
Joined: 12 November 2010
Year and Model: 2004 V70R GT, et al
Location: Ponder Texas
Has thanked: 4 times
Been thanked: 320 times

Post by jimmy57 »

The alignment is critical only on assembly. The pin gets kicked out if you turn engine normal direction.
I always use air blower and blow out cylinders, bolts holes and all passages to get any gasket cleaning debris out. When the head comes off it is a good idea to blow out any coolant that gets in cylinder and to spray wd-40 or wipe motor oil on exposed cylinder wall.

byeboy
Posts: 391
Joined: 5 September 2011
Year and Model: 850R, 1997
Location: Texas

Post by byeboy »

Those thick spacer-looking things with the fins on them are for the distributor and camshaft sensor cam ends. The two ends are different in the way the slots in the cams relate to the seam between the upper cam holder part of the cylinder head assembly, . The cam slot will sit above one, and below the other. When you put the holder tool on, it only will fit the correct way, and locks the cams into perfect position. I used the extension with my 97 to avoid having to remove the upper engine mount bracket...the extension allowed me to straddle it.

Excellent write up on those slots, with pictures in:

j_cd
Posts: 474
Joined: 24 April 2010
Year and Model: 1998 S70 GLT
Location: Los Angeles, CA

Post by j_cd »

Cool byeboy, I've seen pictures of the slots, so I'm ready for that.

As for the upper engine mount bracket, we already removed it. The bushing was in pieces, so I just bought a whole new torque arm. My friend said I should get it chrome plated. I was thinking blue anodized maybe. Chrome wold match the RIP kit though, so there's an excuse to buy that (RIP kit). I'd go with the full Snabb FMIC kit, but you have to delete SAS, and I might put a transmission cooler there instead.

j_cd
Posts: 474
Joined: 24 April 2010
Year and Model: 1998 S70 GLT
Location: Los Angeles, CA

Post by j_cd »

Even if you mess up and the camshafts get out of whack, you can still use the tool to secure them. (rear cams)

Image

On the front cams, you use the upper timing cover bolts to secure the tool. The top is facing down here. I'll get a picture of that part during reassembly.

Image

Piston crowns definitely need a good cleaning.

Image

I'll have to get a water pump to siphon this coolant out of the block.

Image

And how does this cam follower look? Is that enough wear that they should be replaced? I did run with valve ticking a couple years back, before I got the oil pan seals replaced.

Image

Yeah so anyway, the diagnosis had been bent exhaust valve on cylinder 1. Those valves have oil cake all over them, while the rest are dry. So I think maybe the valve stem seals just blew out.

j_cd
Posts: 474
Joined: 24 April 2010
Year and Model: 1998 S70 GLT
Location: Los Angeles, CA

Post by j_cd »

Got all the cam followers out and flipped the head over. Looks like one burnt valve.

Image

The rest look great.

Image

The machine shop quoted me $200, plus $35 if it needs to be decked, and another $30 to pressure test. He may have said pressure testing is included in the $200. I'm gonna bring the upper head and see if he'll throw that in the tank too.

User avatar
erikv11
Posts: 11800
Joined: 25 July 2009
Year and Model: 850, V70, S60R, XC70
Location: Iowa
Has thanked: 292 times
Been thanked: 765 times

Post by erikv11 »

Classic burnt exhaust valve. Unfortunately!

Not clear from your posts so apologies if this is redundant, but be sure to get the shop to put in new valve stem seals. I argue against the cheapies and for Victor Reinz, you don't them going out again. I think jimmy57 recently posted about an aftermarket brand that does OK, but stay away from Elring.
'95 854 T-5R, Motronic 4.4, 185k
'98 V70, T5 tune-injectors-turbo, LPT engine, 304k, daily driver
'06 S60 R, 197k
'07 XC70, black, 205k
'07 XC70, willow green, 212k
'99 Camry V6 :shock: 153k
gone: '96 NA 850 210k, '98 NA V70 182k, '98 S70 NA 225k, '96 855 NA 169k

j_cd
Posts: 474
Joined: 24 April 2010
Year and Model: 1998 S70 GLT
Location: Los Angeles, CA

Post by j_cd »

Indeed, I brought 20 Victor Reinz valve stem seals with me. Also an aftermarket exhaust valve that I bought from IPD. He looked at the oil buildup around the cylinder edges and said a little oil is getting through the piston rings. That's how a valve burns, hot oil gets through and hits the valve like a torch.

So he said eventually this will happen again. He wasn't pushing me to do the piston rings, just pointing it out. Thing is, I was planning to replace all the engine mounts anyway. I'm about a steering rack and a transmission away from just dropping the whole subframe, lifting the engine and having a ring job done on it.

I still don't have a new head gasket that I'm happy with though. I already told part of the story in the Performance section. I'll probably just use a Victor Reinz.

Oh yeah, so I brought the upper cylinder head with the cams attached just like in the picture above. He's putting the whole thing in the tank tonight, cams and all.

Post Reply
  • Similar Topics
    Replies
    Views
    Last post