Login Register

Replacing 2003 V70 REAR UPPER control arms.

Help, Advice, Owners' Discussion and DIY Tutorials on Volvo's stylish, distinctive P2 platform cars sold as model years 2001-2007 (North American market year designations).

2001 - 2007 V70
2001 - 2004 V70 XC (Cross Country)
2004 - 2007 XC70 (Cross Country)
2001 - 2009 S60
2003 - 2007 S60 R
2004 - 2007 V70 R

Post Reply
Ryann
Posts: 11
Joined: 18 September 2015
Year and Model: 2003 V70 T5m
Location: North Carolina
Been thanked: 1 time

Replacing 2003 V70 REAR UPPER control arms.

Post by Ryann »

So while parked at a bank last week, my 2003 V70 T5M was whacked by an out-of-control granny. Most of the damage was to the right rear suspension. Fortunately, I found a junked donor car 30 minute away.

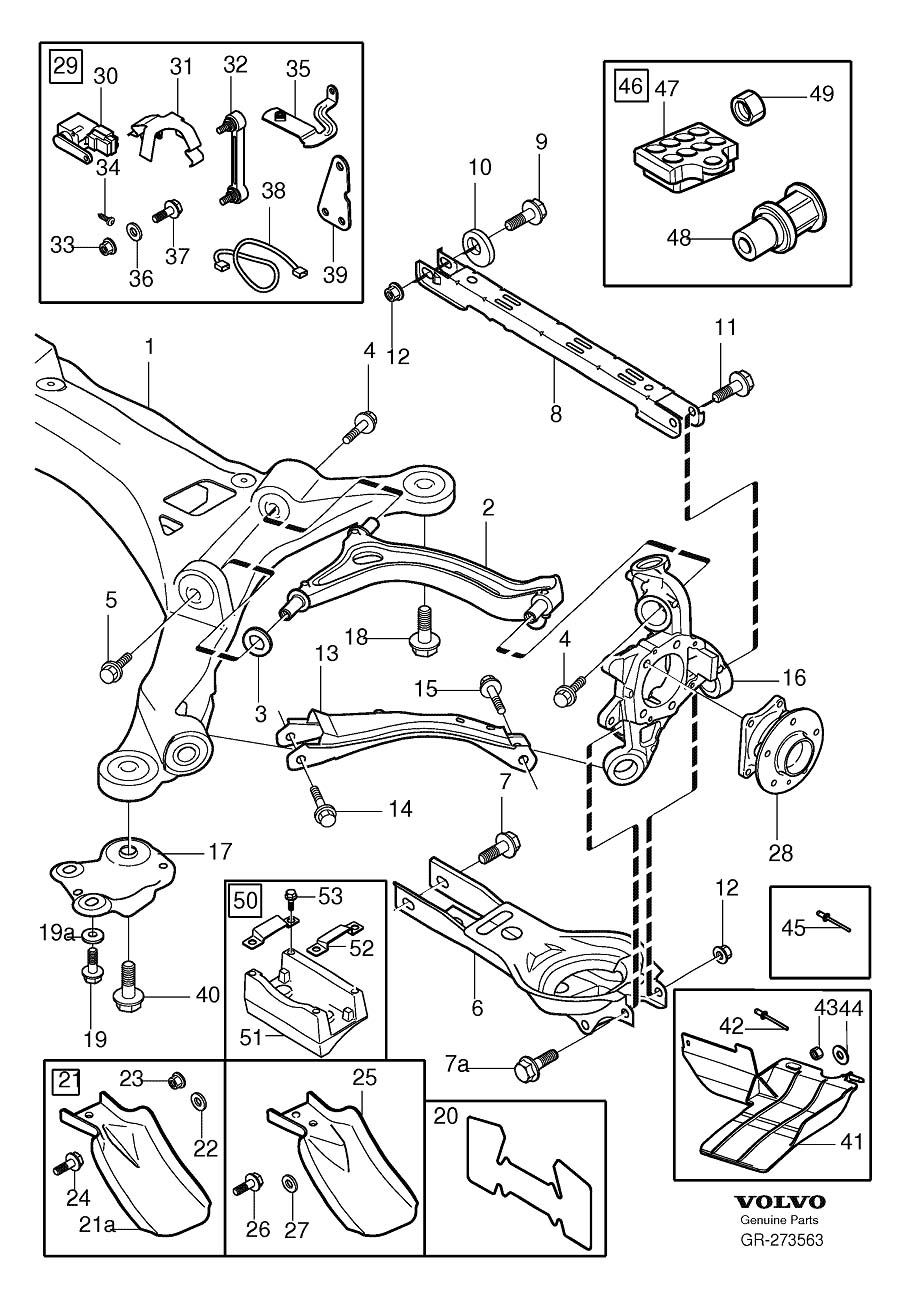
I've got almost everything apart on my car and it looks like all the suspension parts need to be be replaced. I can't figure out the upper control arm(#2 in the diagram below). Even if I can get the bolts (4&5) undone, which I haven't tried yet, the arm looks like it's captive to the sub-frame. Can anyone enlighten me?

Image
2003 V70 T5m
2010 V50 T5m

RicardoV
Posts: 2
Joined: 13 May 2023
Year and Model: 2000 S80
Location: USA

Post by RicardoV »

Did you replace it yet? I am trying to do the same job but i do not see too much information.

Ryann
Posts: 11
Joined: 18 September 2015
Year and Model: 2003 V70 T5m
Location: North Carolina
Been thanked: 1 time

Post by Ryann »

I replaced the entire rear subframe with both control arms with one I got from a junk yard. It wasn't that hard or expensive.
2003 V70 T5m
2010 V50 T5m

scot850  
Posts: 14864
Joined: 5 April 2010
Year and Model: 2000 V70 R
Location: Calgary, Alberta, Canada
Has thanked: 1836 times
Been thanked: 1709 times

Post by scot850 »

I would suggest the end at #5 has a bush that has to be removed which then allows you to remove the arm. Hopefully you don't have to remove both ends.

Neil.
2006 V70 2.5T AWD Polestar tune
2000 V70 R - still being an endless PITA
2006 XC70 - Our son now has this and still parked in our garage
2003 Toyota 4Runner V8 Limited
2015 Kia Sportage EX-L - Sold
1993 850 GLT -Sold
1998 V70 XC - Sold
1997 Volvo 850 SE NA - Went to niece in California - Sold
2000 V70 SE NA - Sold

THAI UNG
Posts: 36
Joined: 7 September 2013
Year and Model: 2007 V70 2.5T
Location: Los Angeles
Been thanked: 4 times

Post by THAI UNG »

Hello, almost 2years ago when my 07 v70 2.5t was hit by a drunk driver while parked at the curb, rear left door caved in and flat tire, toe in approximately10degrees
IMG_1700.jpeg
IMG_1700.jpeg (359.69 KiB) Viewed 2120 times
.installed the doughnut wheel on and eyeballing rear wheel alignment. Next day removed the wheel and inspected the suspension then found out the upper control arm was bent and cracked .
IMG_1743.jpeg
IMG_1743.jpeg (320.85 KiB) Viewed 2120 times
Got quote for $800.00 parts and labor on suspension only.After a few hours of figuring what to do,an idea popped up. Went to a junk yard found an 04 s60. After removed nuts &bolts (save #18 bolt in diagram for use it later) and parts , out of rear suspension except upper control arm. I used cordless saw (would be better if I have the cordless multi tool saw it’s more handy than regular saw)to cut the front bushing holder (subframe) then pried up and away then removed the arm out
IMG_1701.png
IMG_1701.png (3.59 MiB) Viewed 2120 times
IMG_1702.png
IMG_1702.png (2.09 MiB) Viewed 2120 times
I went to Lowe’s and bought 12” long 1/2”-13 unc threaded rod,2 pieces each of: 1/2”-13 coupling nuts,1/2” washers, 3/4” washers (actually I used only one)which had 2” Outside Diameter which matched perfectly to bushing OD. I enlarged one of 3/4” washers hole from 15/16” to 1”1/8 dia.with Harbor Freight steps drill bit.
IMG_1717.jpeg
IMG_1717.jpeg (721.28 KiB) Viewed 2120 times
IMG_1720.jpeg
IMG_1720.jpeg (628.72 KiB) Viewed 2120 times
Let’s rear end sit on jack stands then remove everything as like I did at the junkyard.
Then I cut the damaged upper control arm into 3 pieces using the shortest saw blade to avoid cutting into subframe,multi tool saw works best or just cut both ends off. I didn’t think of it at that time.
IMG_1721.jpeg
IMG_1721.jpeg (442.1 KiB) Viewed 2120 times
IMG_1722.jpeg
IMG_1722.jpeg (287.29 KiB) Viewed 2120 times
IMG_1723.jpeg
IMG_1723.jpeg (614.19 KiB) Viewed 2120 times
It’s easier to remove the arm, the 12”rod is too long, I cut 2”off making it easy to fit between those 2 bushings and press the front bushing about 3/4 lengths or all the way out of subframe I reusing old bushing
IMG_1724.jpeg
IMG_1724.jpeg (275.4 KiB) Viewed 2120 times
Insert front end arm into bushing holder ( subframe) and rear arm into rear bushing and screw the bolt a few turns into the arm, screw the ( saved #18)bolt with 1/2”washer in, because it’s longer length to reach front arm threaded hole, tightening both bolts at the same time til bottom out,loosening the rear bolt and remove front bolt (if can’t take the bolt out cut it into 2 pieces an remove the other ends out).
IMG_1725.jpeg
IMG_1725.jpeg (433.45 KiB) Viewed 2120 times
using 2x2x12 or longer pieces of wood put in front bushing gently hammer it in then screw the original bolt in but leave it loose. Screw the lower control arm to subframe not tight,upper spring seat to the frame,Shock with top nut in,spring in with the bottom push over the lower control arm bump , jack control arm up I have an electric scissor jack, very handy when no helper one hand press up button and the other hand push and hold the spring in place lucky it didn’t slip,high enough to connect the shock,sway bar linkage,install the knuckle to both arms,screw trailing arm to the knuckle the other end to subframe to get ends meet is to raise lower arm higher. Screw in the toe in &out control arm to the knuckle, raise up the lower arm til the car body starts to move then tighten up all the nuts & bolts.
It costs me about $200.00 on part & tooling and dents repairs tools, took me about 10hrs. from start to finish( first time job if I have to do again would be faster) that not including the junk yard and home made tools time, and another less than 8hrs.to work on the dents without replacing the door or repaint (quote more than $2,000.00 for body work and painting)turnouts okay but not perfect.
20230523_152159_Original.jpeg
20230523_152159_Original.jpeg (421.43 KiB) Viewed 2085 times
Yes got reimbursement from Insurance and bought 4new tires and 12v 100 amps lithium iron battery.
Hope this could help…
Last edited by THAI UNG on 20 Oct 2023, 00:33, edited 1 time in total.

Ryann
Posts: 11
Joined: 18 September 2015
Year and Model: 2003 V70 T5m
Location: North Carolina
Been thanked: 1 time

Post by Ryann »

Pretty clever. I think replacing the entire sub-frame might be slightly easier. No cutting or fabricating required at the cost of more dis-assembly and assembly. It was easier than I expected and the yard charged me $100 for the entire sub-frame.
2003 V70 T5m
2010 V50 T5m

User avatar
abscate
MVS Moderator
Posts: 35267
Joined: 17 February 2013
Year and Model: 99: V70s S70s,05 V70
Location: Port Jefferson Long Island NY
Has thanked: 1497 times
Been thanked: 3810 times

Post by abscate »

That is amazing work Thai.

Even at 20 hours in at $25 self DIY rate, you are way ahead and have $1200-1500 in your pocket extra.
Empty Nester
A Captain in a Sea of Estrogen
1999-V70-T5M56 2005-V70-M56 1999-S70 VW T4 XC90-in-Red
Link to Maintenance record thread

THAI UNG
Posts: 36
Joined: 7 September 2013
Year and Model: 2007 V70 2.5T
Location: Los Angeles
Been thanked: 4 times

Post by THAI UNG »

Thanks abscate and Ryann for complement , the junkyard near where I live was asking for $300.00 (subframe and 2 upper arms only, California everything more expensive )plus taxes 10.50%, $50.00 warranty, $30.00 core, end up more than $400.00 ,that why I choose to do it my self...thanks

Post Reply
  • Similar Topics
    Replies
    Views
    Last post