


Is there a spec for the Nm on the pinion nut?
First time I tightened it a little bit to hard and had to press everything apart again. Now I think I have it just right.
Is it time for a new automatic gearbox ?
-
firstv70volvo

- Posts: 574
- Joined: 6 March 2010
- Year and Model: V70 T5 2001
- Location: Sacramento, CA
- Has thanked: 52 times
- Been thanked: 123 times
I can't find a torque spec for the pinion nut.
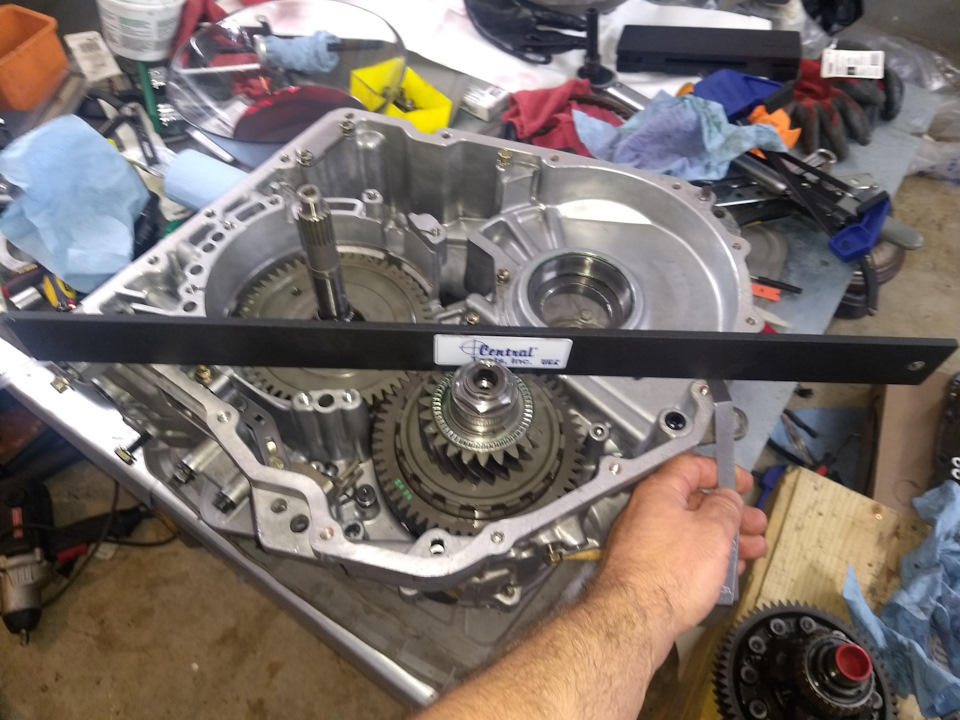
For the clearance spec, 1.3mm is within the spec range but from your photo I'm not sure how you measured it. The straight edge should be sitting flat across the thrust bearings and extending out past the mating surface of the case. The clearance to measure is between the case mating surface and the straight edge over the case surface, the same edge that's pressed flat on the thrust bearing. .
-
firstv70volvo
- Posts: 574
- Joined: 6 March 2010
- Year and Model: V70 T5 2001
- Location: Sacramento, CA
- Has thanked: 52 times
- Been thanked: 123 times
The straight edge should be vertical and the edge should be flat against the pinion gear thrust bearing rollers with the edge extending out beyond the case mating surface. The measured clearance is between the case mating surface and the straight edge extending over the mating surface. The thrust roller bearings should be slightly higher than the case mating surface and that the clearance to measure.
From your photo it looks like the big end shaft bearing is still in place, it needs to be removed so you get to the thrust bearings and rest the edge on the thrust bearings.
Set the straight edge on edge and across as many of the shaft thrust bearings as possible so it's flat and extends beyond the case mating surface.
-
greffel
- Posts: 126
- Joined: 10 January 2020
- Year and Model: 2003 S60
- Location: Sweden
- Has thanked: 11 times
- Been thanked: 7 times
First of all big thanks for your help 
Now you lost me a little bit... the way I measured is without the bearing in your picture.
The measurement shows that the gear is 1.3mm lower then the case surface.
Should i measure with this bearing installed and see how muck higher the bearing is over the case ?
Without this bearing I get 1.3mm
Now you lost me a little bit... the way I measured is without the bearing in your picture.
The measurement shows that the gear is 1.3mm lower then the case surface.
Should i measure with this bearing installed and see how muck higher the bearing is over the case ?
Without this bearing I get 1.3mm
- Capture6.JPG (90.99 KiB) Viewed 469 times
Polestar 2 - All electric daily driver 
S60 2.5T AWD with a little bit more power
S60 2.5T AWD with a little bit more power
-
firstv70volvo
- Posts: 574
- Joined: 6 March 2010
- Year and Model: V70 T5 2001
- Location: Sacramento, CA
- Has thanked: 52 times
- Been thanked: 123 times
According to the ATSG manual you put the straight edge on top the thrust roller bearings so this bearing does need to be installed. The top of these roller bearings should be slightly above mating surface of the case by the spec amount.greffel wrote: ↑24 Oct 2021, 15:03 First of all big thanks for your help
Now you lost me a little bit... the way I measured is without the bearing in your picture.
The measurement shows that the gear is 1.3mm lower then the case surface.
Should i measure with this bearing installed and see how muck higher the bearing is over the case ?
Without this bearing I get 1.3mm
Capture6.JPG
 measuring thrust bearing to case edge spec clearance.pdf
- (416.19 KiB) Downloaded 58 times
-
vtl
- Posts: 4728
- Joined: 16 August 2012
- Year and Model: 2005 XC70
- Location: Boston
- Has thanked: 114 times
- Been thanked: 606 times
I'm late to the party, spent 4 days in the woods...
The gap:
I think the simplest course was to swap both assemblies as is. It's always a good idea to recheck the differential bearing preload when the transmission is half apart like that one. Need to do it only for the differential, which has taper bearings on both ends. Correcting a tiny bit of preload is much easier that replacing the cog, like you did.
-
greffel
- Posts: 126
- Joined: 10 January 2020
- Year and Model: 2003 S60
- Location: Sweden
- Has thanked: 11 times
- Been thanked: 7 times
Now the box is back together. for the second time.
Reviewing my photos I noticed that I forgot to do the indentations on the pinion nut
Measuring the right way I have 1.4mm so right in the middle of the spec I guess.
Now a little bit more coaching wanted...
The B5 spring in the valve body seams to be present in my old valve body. Pressing on it you can feel its spring loaded.
Do I really need to take of the pan on this box to verify the same ?
I want to clean the radiator before assembly. Is it enough to just pure new oil thru it or should I clean it in another way?
Also planning so do a little mini flush of the R box just to be super safe.
Polestar 2 - All electric daily driver
S60 2.5T AWD with a little bit more power
S60 2.5T AWD with a little bit more power
-
firstv70volvo
- Posts: 574
- Joined: 6 March 2010
- Year and Model: V70 T5 2001
- Location: Sacramento, CA
- Has thanked: 52 times
- Been thanked: 123 times
Measurement value looks good. Good thing you went back and peened the nut.greffel wrote: ↑25 Oct 2021, 12:07 Now the box is back together. for the second time.
Reviewing my photos I noticed that I forgot to do the indentations on the pinion nut
Measuring the right way I have 1.4mm so right in the middle of the spec I guess.
Now a little bit more coaching wanted...
The B5 spring in the valve body seams to be present in my old valve body. Pressing on it you can feel its spring loaded.
Do I really need to take of the pan on this box to verify the same ?
I want to clean the radiator before assembly. Is it enough to just pure new oil thru it or should I clean it in another way?
Also planning so do a little mini flush of the R box just to be super safe.
For the B5 spring and according to Sonnax Volvo didn't have the B5 spring for 2001 - MY2004 cars. Was your old valve body a replacement? If so any chance you have the original VB still around to check for a spring?
https://www.sonnax.com/parts/4194-reman ... valve-body
-
vtl
- Posts: 4728
- Joined: 16 August 2012
- Year and Model: 2005 XC70
- Location: Boston
- Has thanked: 114 times
- Been thanked: 606 times
Also the whole transmission swap takes only twice longer than just the valve body swap. It is simply cheaper to remove the VB cover now and check that spring, while everything is freely accessible.
-
- Similar Topics
- Replies
- Views
- Last post