


No More Blue Smoke
Mark Crimmins » My main source for genuine Volvo parts was Darrell Waltrip Volvo. Since they are not shipping parts anymore, I suggest http://tascaparts.com. When I’m putting in way more hours than dollars, I will not cheap out on parts. I also use FCP Groton, IPD. They’re great.
All information sourced from Mark’s site.
Symptoms and Diagnosis
Dramatic blue smoke on rev after 10 minute hot idle, and oil consumption. Also, barely passed California smog test with borderline hydrocarbon level (51ppm; limit is 52) at 15mph, which improves somewhat (23; limit is 36) at 25mph.
Turbo shaft has no play. PCV system just replaced. Compression and power very good. Mileage fine: 22mpg in mixed driving (average mph of 30)
Diagnosis: worn valve stem seals.
Plan: replace them without removing the cylinder head. The timing belt was last replaced 90K miles ago, and it’s the original water pump, so I’ll be doing a lot of the job anyway to replace those items. The tricky part of doing this without removing the cylinder head is removing the valve springs without losing the valve in the engine. To do this, people normally use air from a compressor. Since I don’t have one, I will fill the piston with rope (from the spark plug hole), and crank the piston up to squeeze the rope against the valves.
For tools
- Schley universal valve spring compressor
- Cheap source for common tools
- I fabricated or improvised these (more details in the write-up):
- Serpentine belt tensioner insert/adaptor for 1/2″ ratchet
- Camshaft seal drivers (front/rear)
Parts Needed
- Valve stem seals (20, plus 4 extra; did not end up needing extras)
- Extra valve spring keepers (4) (did not end up needing any)
- Gasket compound (genuine Volvo)
- Cam seals (2 front, 2 rear)
- Since this was my 160K timing service as well: timing belt, tensioner, tensioner pulley, idler pulley, water pump w/gasket and new water-pump bolts.
- Spark plug O-rings
- Motor oil
- Coolant (might as well drain/flush/fill the cooling system)
- Assembly grease
Other Tools Needed (besides normal tools)
- Short nap paint roller for gasket
- Strap wrench or spanner for holding cam sprockets in place while loosening/tightening bolts
- Bin or bins with at least 20 compartments for valve lifters; or some other way to keep track of where they go
- Suitable rope for use in cylinders
- Valve stem seal removal pliers (ebay); you could probably figure out a way to pull the seals without this; they’re not all that hard to get to and it doesn’t take much force to pull them.
- 11mm deep metric socket for stem seal install
- White marker (for marking belts/sprockets)—used Sharpie “metallic” type.
Procedure, Condensed
I. Timing Belt Removal
- Remove spark plug cover
- Remove fuel line clips on top (Torx) and back (10mm) of engine
- Lift out expansion tank and place on top of engine.
- Remove top timing belt cover.
- Mark and remove serpentine belt, and tensioner (2 12mm bolts)
- Put car on jackstands high enough to remove wheel.
- Remove right front wheel.
- Release and fold wheel arch liner to gain access to vibration damper; it will help to remove a second plastic nut up and right from the obviously needed one.
- Turn crankshaft clockwise until all timing marks are aligned. With white marker, mark belt and sprockets (matching marks on belt, sprockets).
- Remove tensioner upper mounting bolt and loosen tensioner lower bolt. Twist tensioner to free pulley. Remove lower bolt and tensioner.
- Remove shield over right side of crank sprocket (two 10mm bolts; pulling a lot of the wheel well liner back helps immensely).
- Remove timing belt. Transfer marks to new belt.
- Remove tensioner (Torx, see write-up) and idler pulleys.
- Install new tensioner-pulley and idler pulley (30 ft-lb). (Optional)
II. Water Pump Replacement (Optional)
- Remove expansion tank cap.
- Drain coolant by removing splash-guard and then lower radiator hose at radiator.
- Check for leaks at water pump
- Remove water pump bolts, and remove pump and gasket
- Install new gasket and pump, and torque to 15 ft-lb.
III. Upper Cylinder Head Removal
- Disconnect negative battery cable
- Mark and remove camshaft sprockets, using a strap wrench or other device so as not to let the cam rotate…much!.
- Check for oil leaks at front cam shaft seals
- Remove air cleaner housing
- Remove turbo pipe (over engine)
- Remove distributor, rotor, and plate [NOTE ORIENTATION]
- Remove camshaft position sensor housing and shutter (plate), noting orientation
- Remove two ground leads from upper cylinder head
- Check for oil leaks at rear cam shaft seals
- Starting at outer edge and working inwards, gradually and evenly loosen bolts in top half of cylinder head; use good judgement with hammering and prying. Never pry on a mating surface.
- Mark intake cam (zip tie), be sure you know how to orient them on installation, marking them if necessary, and remove cams.
- Remove cam shaft seals from shafts, and inspect.
- Plug oil and coolant passages in lower half of cylinder head with paper towels
- Remove hydraulic lifters, and store them upside down, in oil if you’re going to take a while, well marked as to location.
- Clean gasket surfaces, using soft tools if possible, razor blade sparingly when you get frustrated, doing your best never to scratch, and gasket solvent if necessary (I couldn’t find any, so I made do with sort-of-clean).
IV. Valve Stem Seal Replacement
- For each cylinder:
- Remove spark plug
- Rotate crank clockwise to cylinder’s lowest position (use some tall, soft object like a big cable tie or drinking straw as indicator—nothing so short as to be lost in the cylinder!).
- Feed rope in up to knot (knot determined by trial and error on first cylinder).
- Plug spark plug hole to keep stuff from falling in.
- Rotate crank clockwise to TDC; you have put in enough rope that this is just barely possible.
- Using Schley 91400A valve spring compressort, compress each valve in turn, putting a wood block under the handle to allow two hands for removing the keepers; use a magnet and some small tool to pull the keepers off the valve stem to safety.
- Undo the valve spring compressor; remove plate and spring; clean them.
- Using long valve stem seal pliers, remove old seals
- Check for play between stems and guides.
- Grease new seal, put protector on top of valve stem, slip seal onto stem and press it onto guide using 11mm deep socket. Surprisingly little force is necessary; you can hardly feel it.
- For each valve, return spring and plate, compress and prop with your block. Grease the slotted side of the keepers before fiddling them into their place on the stem. Uncompress spring and check that keepers are properly seated.
- Return piston to bottom of cylinder and remove rope. If it’s stuck on a valve, compress them in turn until you find the right one.
- Reinstall spark plug.
V. Upper Cylinder Head Installation
- Return engine to TDC for cylinder 1 (timing mark on crank sprocket).
- Using roller, apply anaerobic gasket compound to upper half mating surfaces.
- Put assembly grease on all camshaft bearing surfaces, the valve cylinders (where the lifters will be) and the cam lobes themselves.
- Install new spark plug o-rings.
- Reinstall all pneumatic lifters.
- Install camshafts onto lower cylinder head, in the correct rotation.
- Put upper cylinder head in place and hand-start all bolts.
- Keeping an eye on the crank and cam shaft positions, gradually and evenly tighten the bolts as the valve springs compress.
- Torque to 13 ft-lb from inside out.
VI. Timing Belt Installation
- Grease and install front cam shaft seals.
- Install camshaft sprockets, putting bolts where they were before (the marks are easily visible); 15 ft-lbs.
- Install tensioner (2 bolts, 18 ft-lbs)
- Place timing belt over camshaft pulleys, around water pump, and press over tensioner pulley.
- Check marks
- Remove tensioner locking pin.
- Install inner timing belt cover bolt.
- Install crank sprocket shield with two 10mm bolts.
- Install upper timing bolt cover
- Turn crankshaft through 2 full revolutions and ensure marks line up.
- Install outer timing belt cover.
- Grease and press in rear cam seals.
VII. Loose Ends
- Grease and press in rear cam seals.
- Install rotor plate, rotor, distributor cap, cam position sensor and shutter, plug wires
- Install ground leads
- Install air cleaner housing, turbo pipe, expansion tank, spark plug cover, fuel lines and clips.
- Secure wheel arch liner (if you took off the second plastic nut, you might have to pry the cover through that hole back onto the bolt), install wheel, lower car, torque lug nuts.
- Fill with coolant (slowly, and remember to add more when the thermostat opens, etc.), check oil.
- Start engine, get up to operating temperature, check for leaks.
- Test whether blue-smoke puff on rev after 10min idle is still there. If yes, kick yourself and have a cold one. If no, congratulate yourself and have a cold one.
Procedure, With Photos
The problem: 1996 Volvo 850, 160K miles, with high oil consumption, high hydrocarbons in the California smog test, and, in addition to general stinkiness, the dreaded blue cloud upon rev after 10-minute warm idle:
https://www.youtube.com/embed/GM3zFNy44wk?rel=0&wmode=opaque
On the bright side, the garage smoke alarm works!
Diagnosis: either turbo seals (but I could feel no shaft-play in the turbo), or valve stem seals. It’s cheap in terms of parts, but a lot of work, to replace the seals. A free weekend, and here we go.
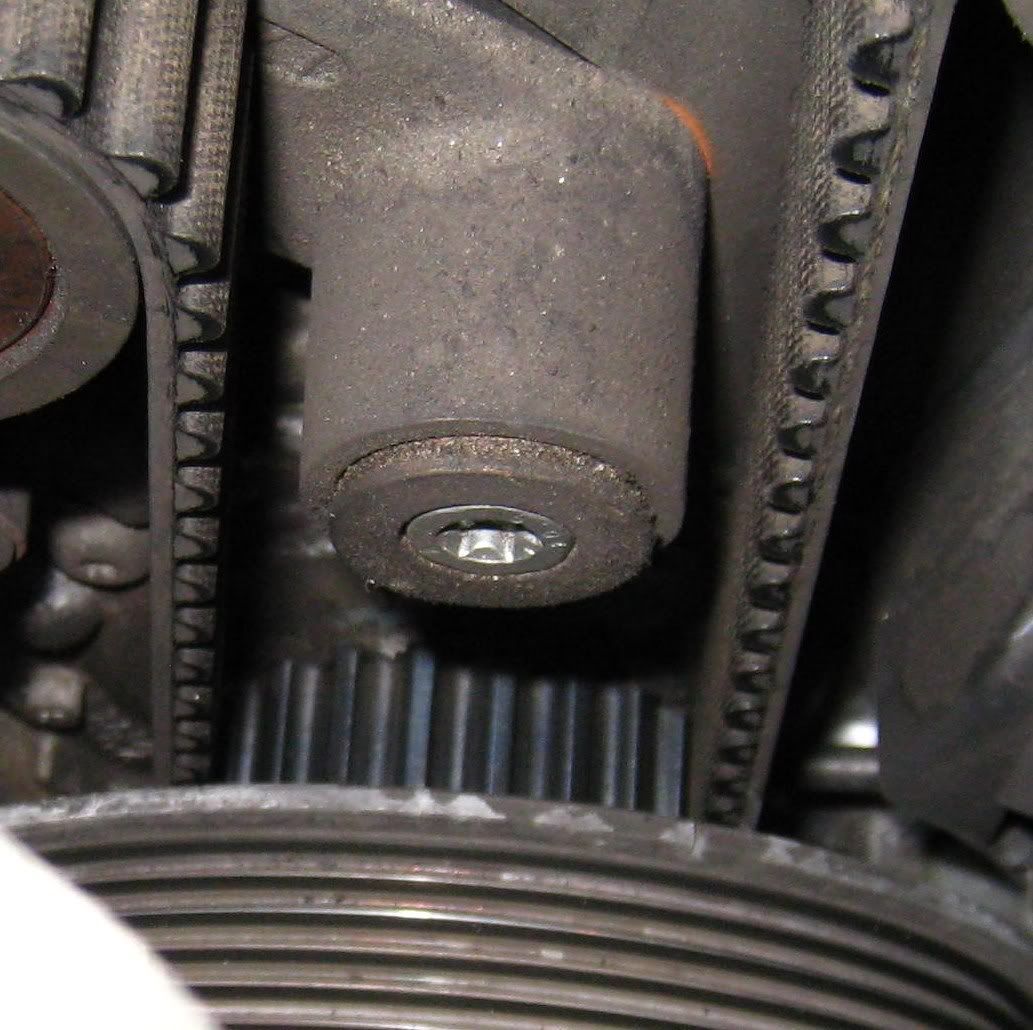
It was also past time for a new timing belt, water pump, and upper engine torque bar bushing; so these will be covered here as well.
The steps for this job are listed in the post called “Step-by-Step Instructions” (click on “Home” over there on the left). Here I will explain how it went for me, and post pictures of the process. Click on the pictures for larger versions.
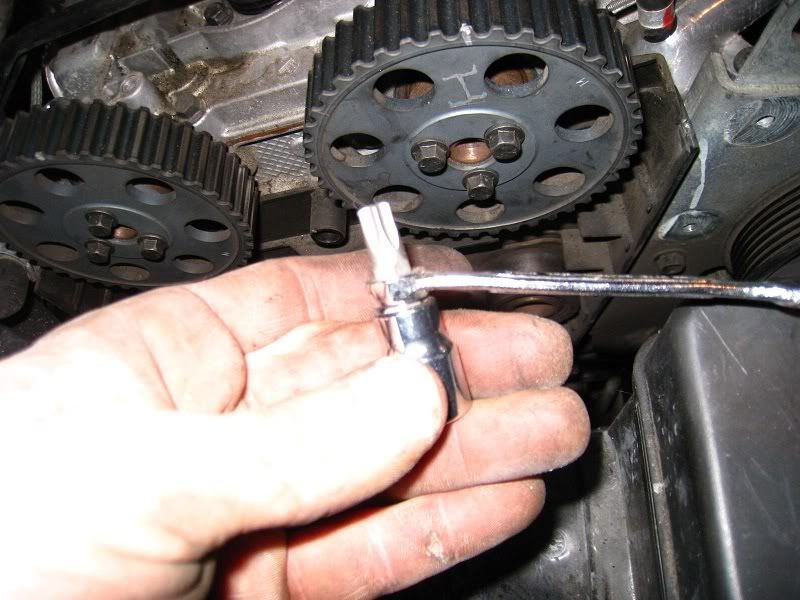
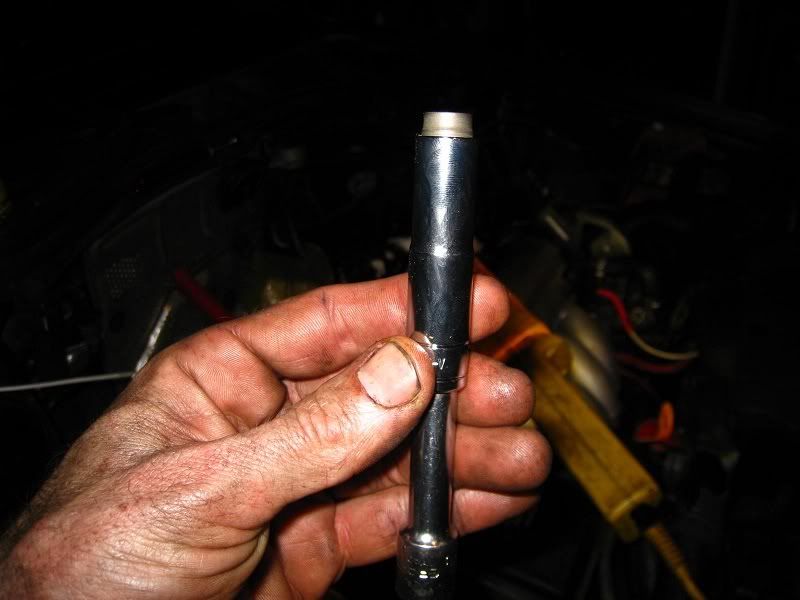
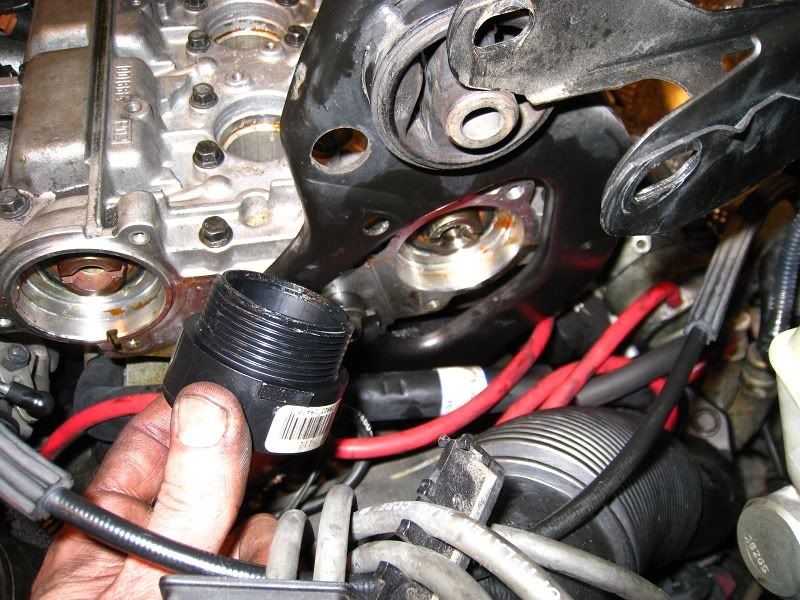
To remove the serpentine belt, you need to stick something in a 3/4 inch square opening on the tensioner and torque it. IPD sells a $30 (!) tool, someone online cobbled together a few plumbing parts to make one for half that, and an ebay entrepreneur sells a specially-fashioned insert, but seriously, this is not that hard! I cut a 5/8 inch length of 3/4 inch angle aluminum stock (about 1/8 inch thick), stuck it in the tensioner, and then a normal 1/2 inch socket wrench does the trick:
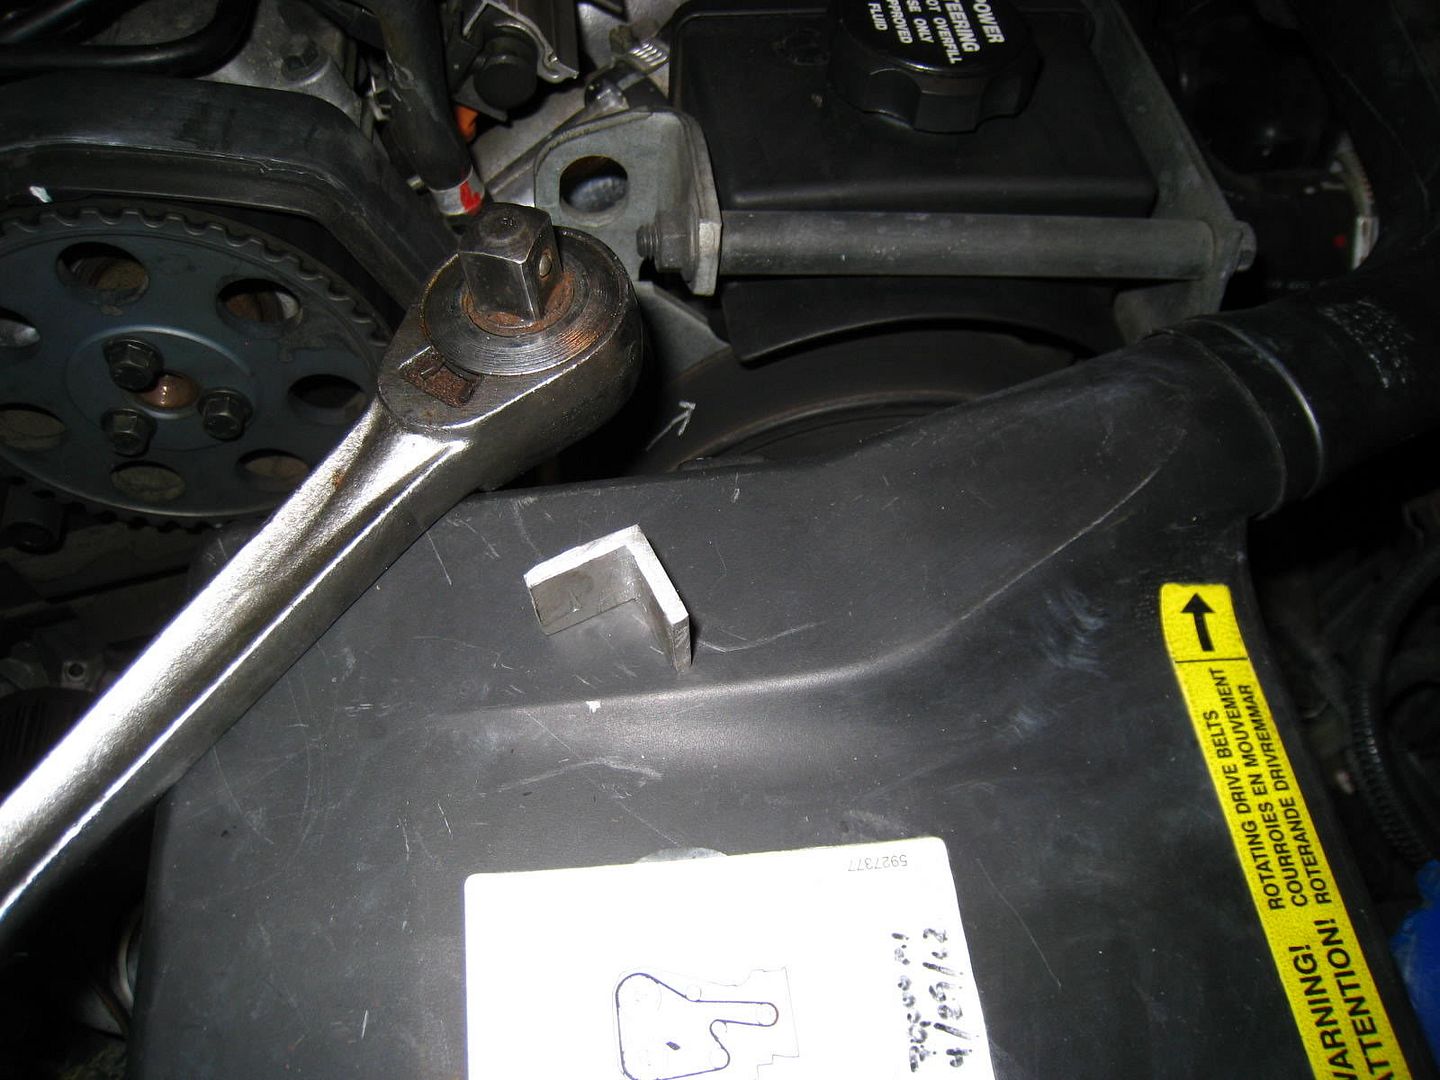
Even if you don’t have the angle stock on hand, a couple of nickels or quarters would do fine. A nail in the tensioner hole locks it.
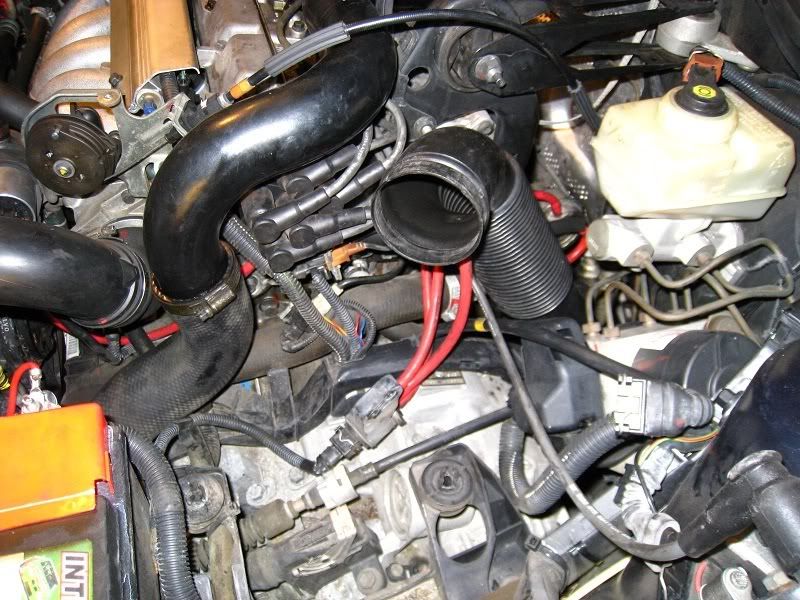
Got stuff out of the way for timing belt removal:
and the wheel well liner out of the way:
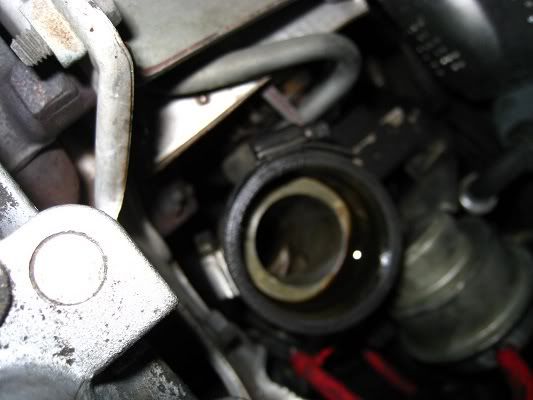
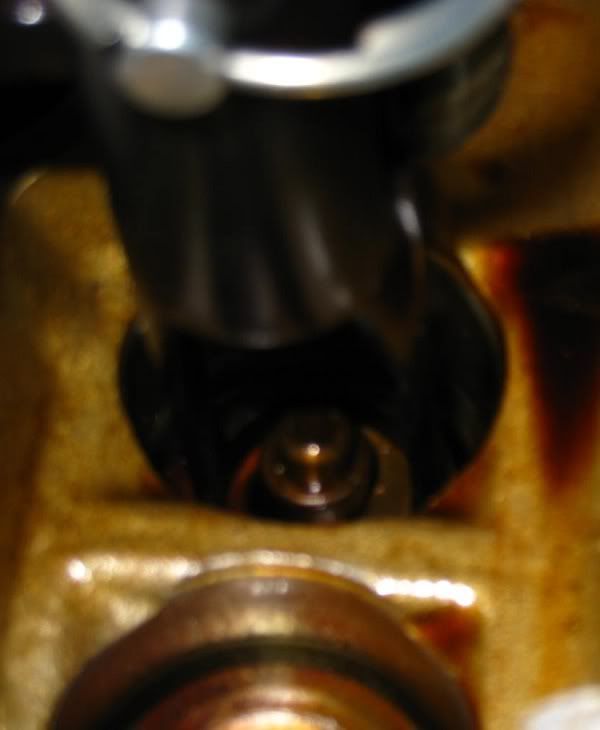
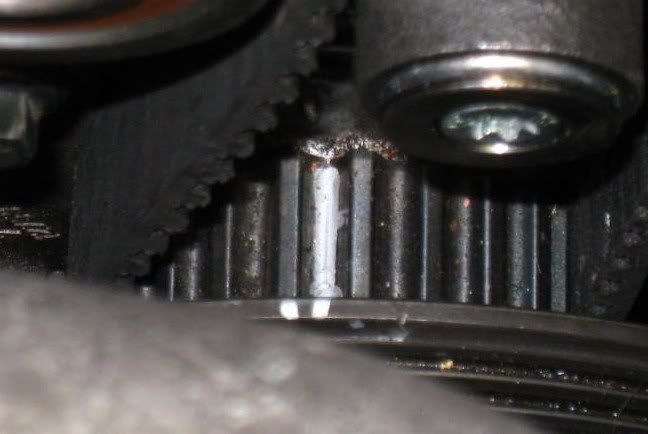
—later it would prove useful to remove another plastic nut and pull more of the liner out of the way. I used a 30mm socket on the crankshaft to line up the timing marks. The crank mark is very subtle:
It’s that tiny notch at the back of the gear trough:
(you won’t realize how hard it was to get that picture until you go in there), So I drew with my “metallic” Sharpie marker on that sprocket trough, to make that trough easier to see later:
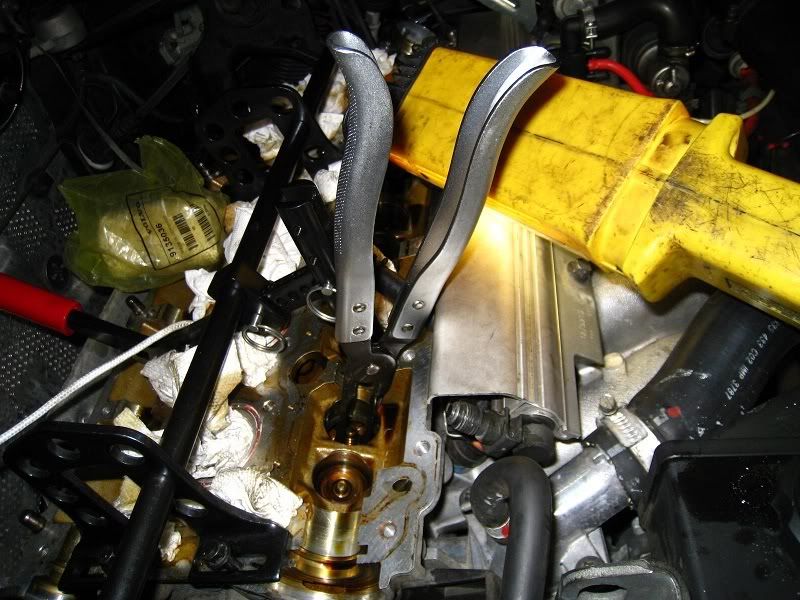
Those are valve stem seal removal pliers—$12 on ebay; you’ll see them again in a less original use. By the way, some of these cars have little notches on the two sprocket teeth surrounding the TDC position (you line the trough between them up with the mark).

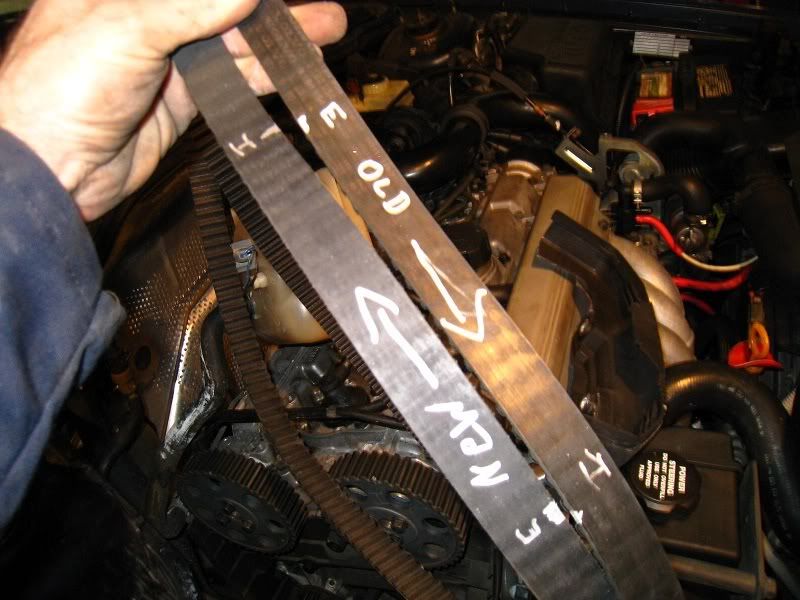
Wriggled off the timing belt—surprisingly quickly, given the hand-wringing about it on the web (putting the new one on took longer). You have to finesse it past some sort of lump at the bottom where there’s not much room between the lump and the pulley (what the heck is that lump there for?) ; you basically just want the belt flat against the back of the pulley so that it can squeeze past the lump. I transfered marks from the old onto the new belt, which made for much less guesswork installing the new belt:
Mark the intake sprocket so that you don’t confuse them. Everyone seems to mark both. LOSERS, there are only two!

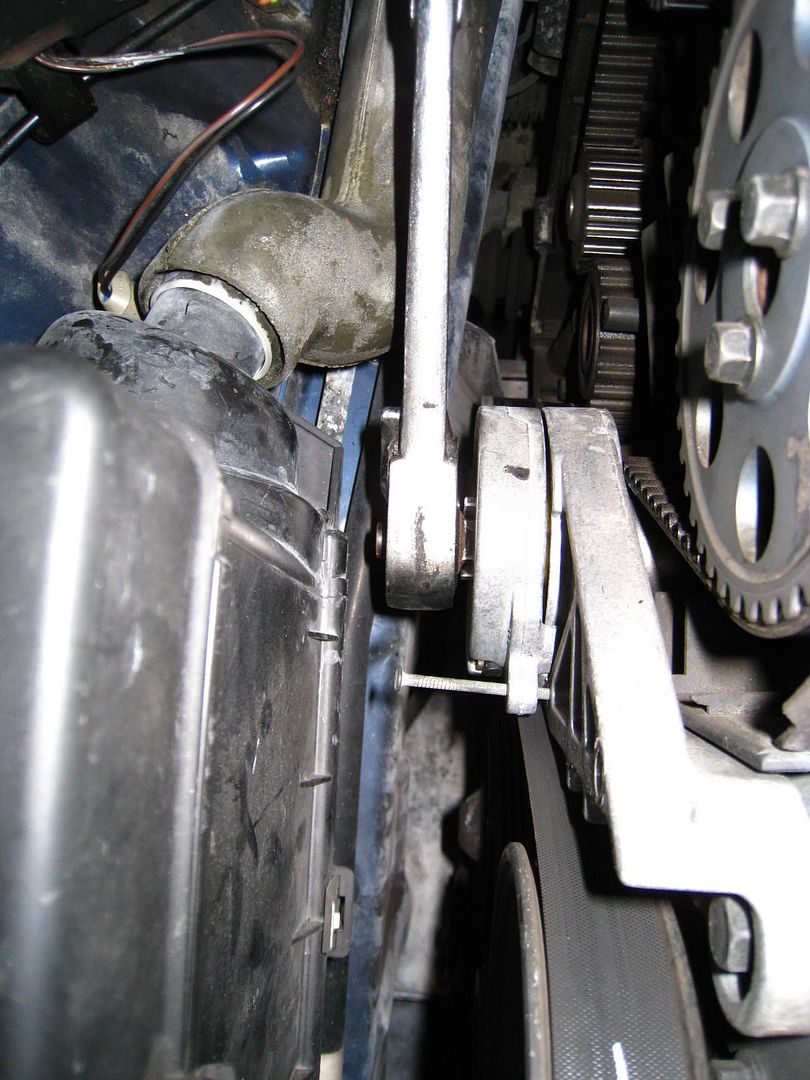
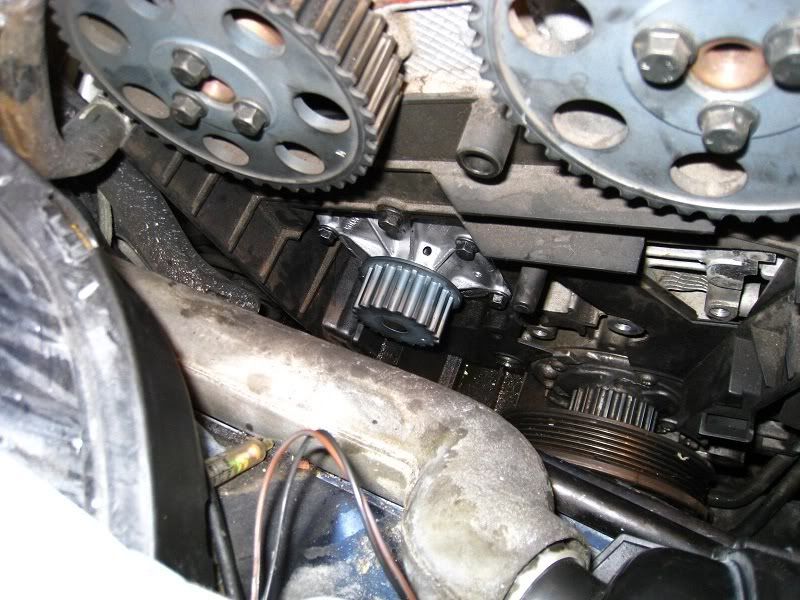
At this stage, I replaced the idler and tensioner pulleys, which are visible in the photo above. There is a silly Torx bolt holding the tensioner pulley on, with very tight clearance to get to it. I used a box-end wrench around the hex shaft of my Torx socket/bit (it turns out that that’s the usual way, though be careful, people report stripping the Torx head), and a pipe on that for leverage:
Next I replaced the water pump. Be sure to get every last bit of the old gasket on the block mating surface; it’s no fun to go in again after a leak—and it DOES happen. I put the new gasket on the block first:
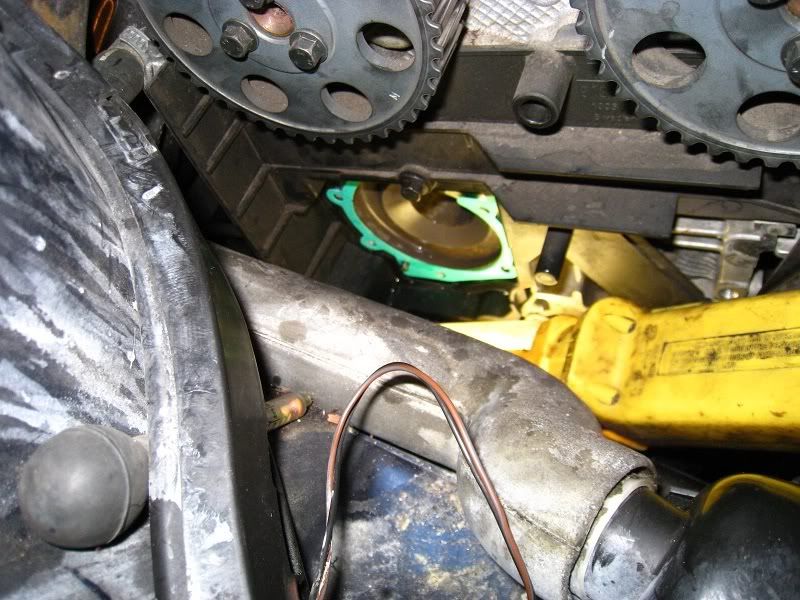
and then just bolted the new pump on:
The old pump did have a tiny bit of bearing play and made a groaning noise, so at 160K miles this was probably a good call.
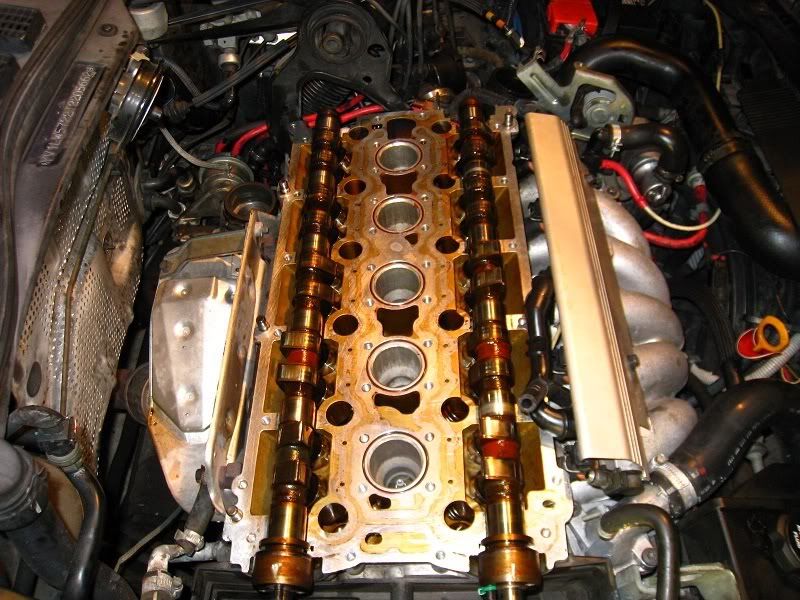
Removing the cam sprockets was not too hard. I used a strap wrench to hold the sprockets while loosening the bolts (which seemed way tighter than spec). In hindsight I would have waited to remove the sprockets until after I had taken off the rotor and cam sensor plates—the bolts on the camshafts at that end are tight enough that you have to hold the cams from rotating while removing them Never mind how I did that; keep the sprockets on for that bit.
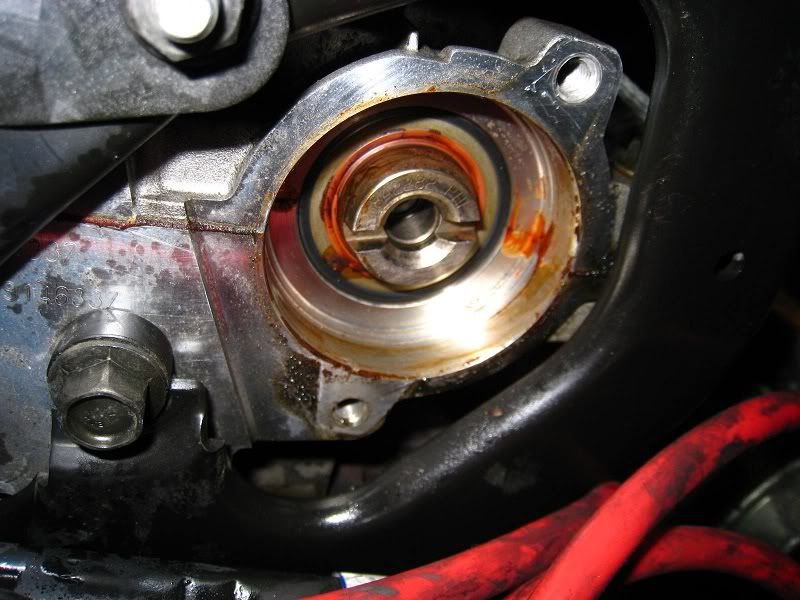
Nice and dry at the front seals, anyway.
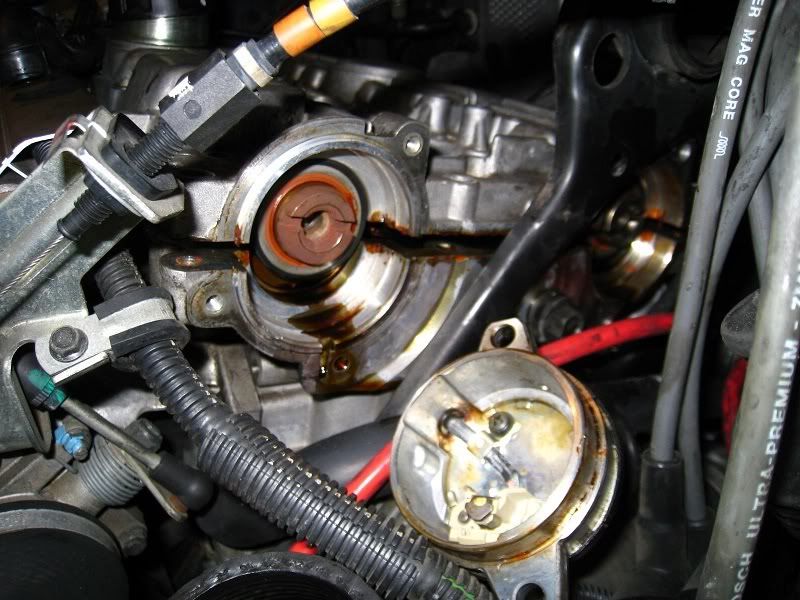
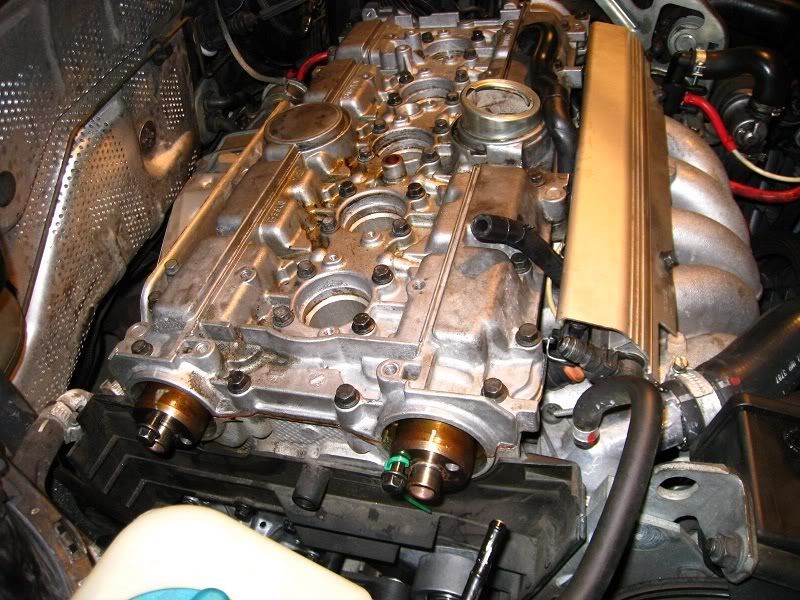
Now to the “rear” side of the engine. I removed the air filter housing to get room to work.
and the turbo pipe that goes over the engine. I’d seen the oil here before. It made me worry that my smoke/oil issues might really owe to the turbo rather than stem seals. But like I said, there is no shaft play in the turbo, so stem seals still seemed to be my best bet.
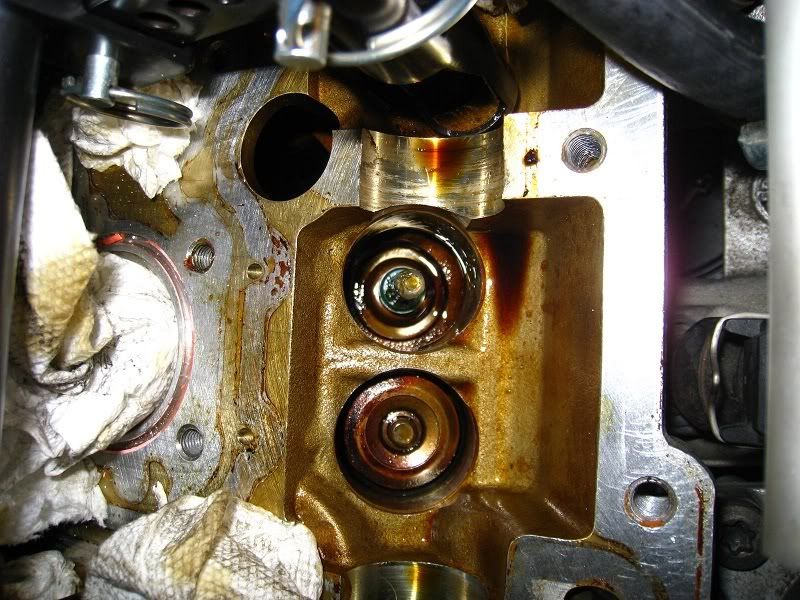
Some oozage at the exhast camshaft rear seal, but maybe not a lot:
The top cam sensor mounting Torx bolt was torqued in like it was an axle nut or something, and the lower one was about finger-tight. Dang those Swedes.
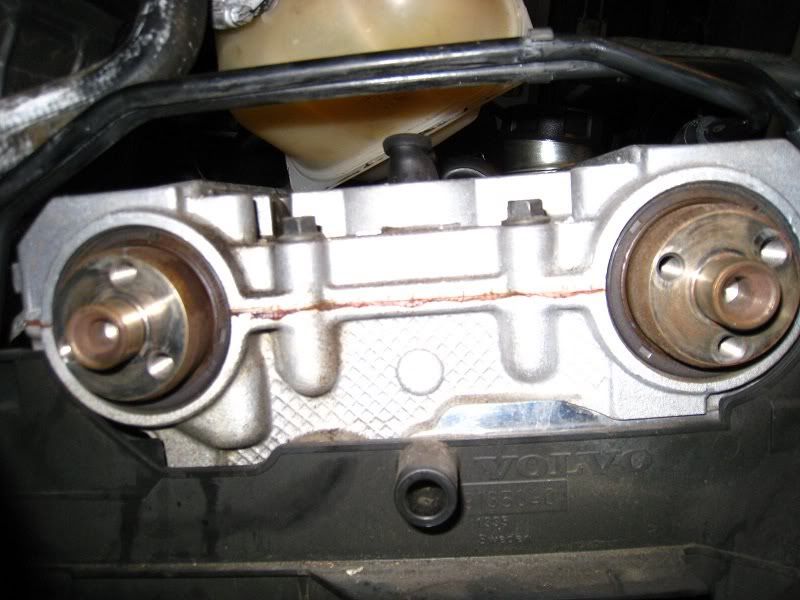
Here is where I took some sage online advice, and I do not hesitate to recommend it. The official line everywhere is to set up some locking devices to hold the camshafts in place and to keep them from rotating. Sage advice guy says there is no point to that. Just back off on the bolts gradually and be sure the upper cylinder head comes up evenly. No need at all for cam holders, locks, or head pullers (people weld old spark plugs to threaded rod, hacksaw angle-iron contraptions, etc., etc.). This appealed to my “don’t do hard things” instinct, and so I tried it. Moreover, it worked. A couple of caveats. First, this doesn’t let you “set timing” very easily, so I was limited to reinstalling the cam sprockets in the same position they had been installed in by whoever did the last timing belt job on my car (I relied on the bolt-wear marks). Second, you really really don’t want to bend the top-half head, and you really really don’t want to bind the camshafts in the head, so you do have to be careful. Also, sure, do not pry between mating surfaces. But I can’t see how to avoid prying between the points that are obviously set up for prying between. I would suggest prying between such points. Back off the bolts an eighth of an inch at a time or so, and…
Gaps appear…
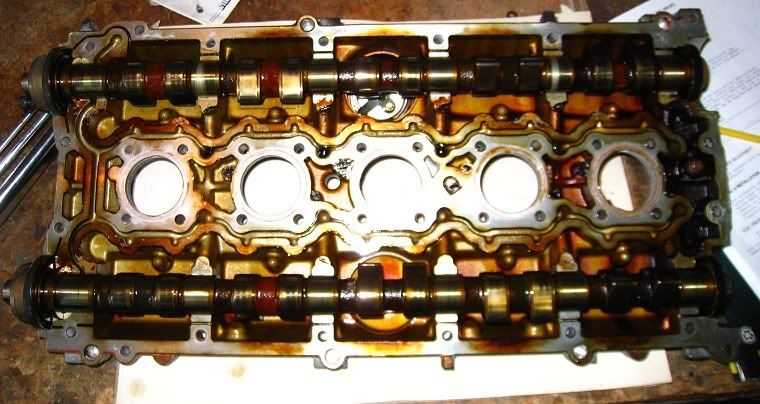
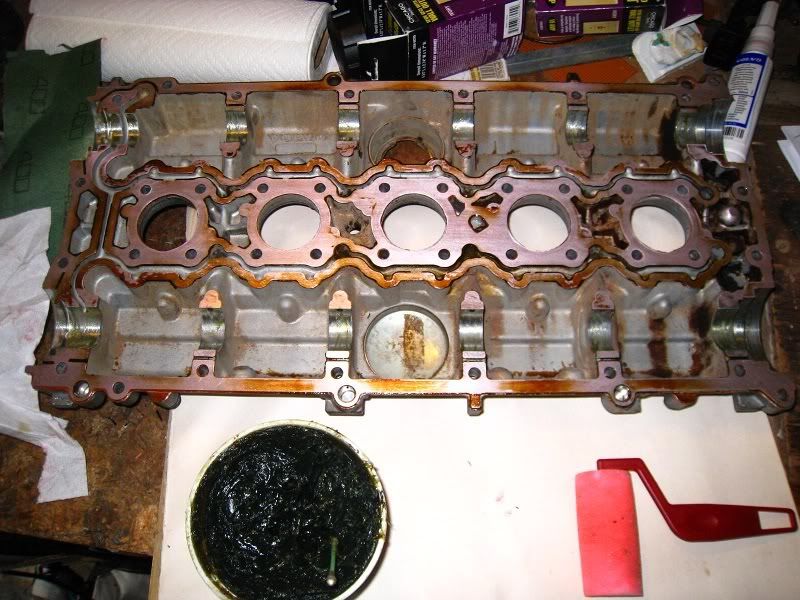
And soon the head is apart.
I stored the lifters upside-down, keeping track of where they go. I did not bathe them in oil. I don’t see how they can lose oil upside-down, but I am not an old hand at this, and I only had them out for a day.
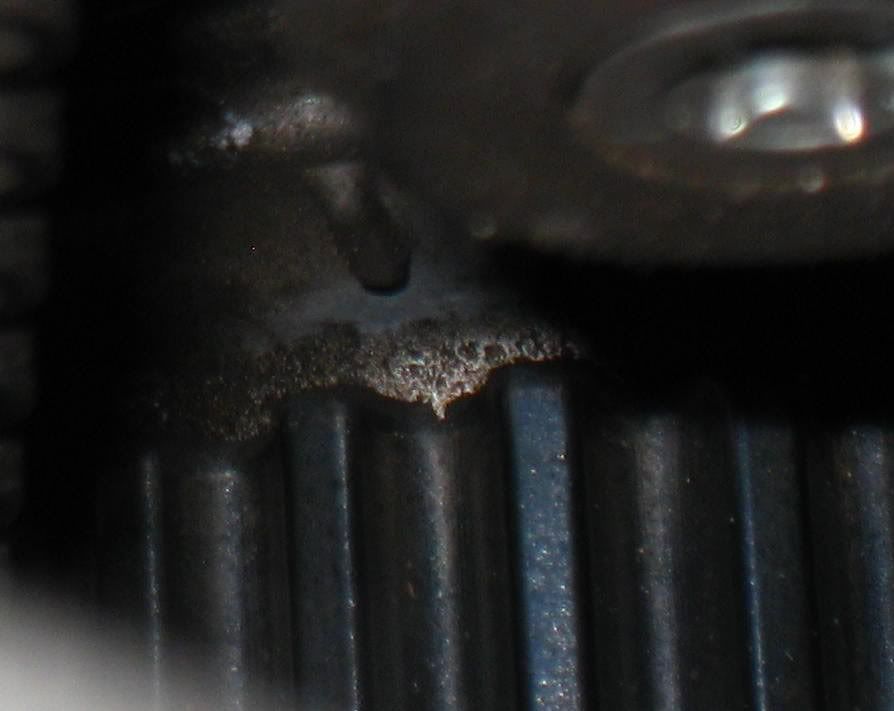
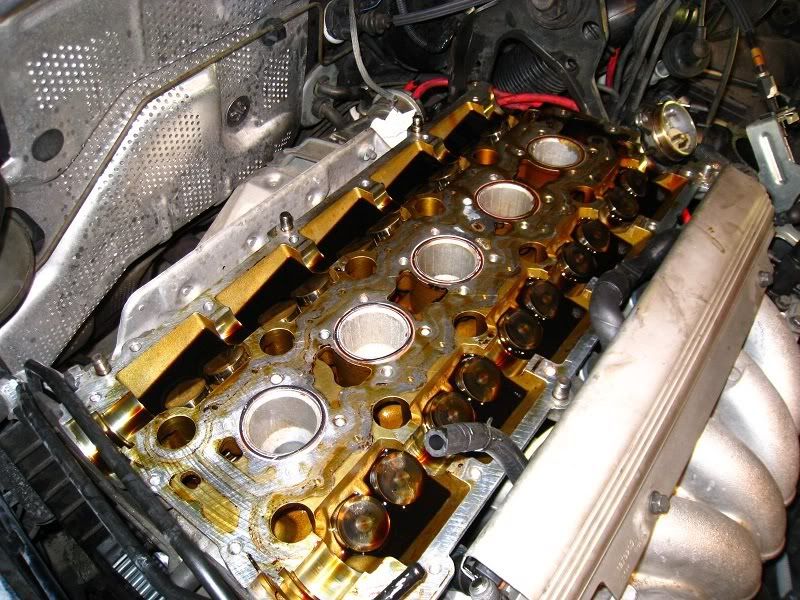
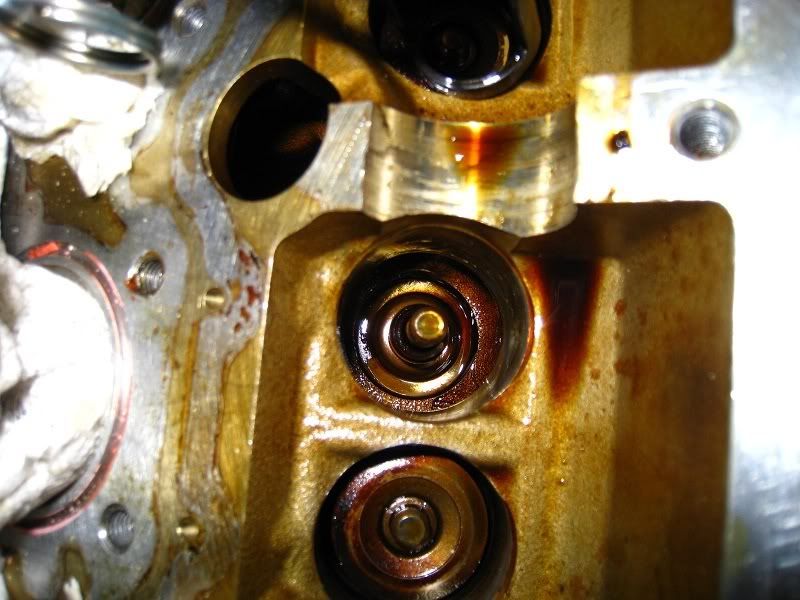
Nasty-looking sludge at the rear—just because there is no flow there, so oil sits and bakes, maybe?
The old camshaft seals. The rear intake (at the distributor) looked nasty, but there were no signs of leakage there.
Okay, so now to the business: replacing the valve stem seals. The Schley tool is great. Instead of using an air compressor (I don’t have one) I shoved rope into the cylinders at their low point and cranked them tight. Just stick some plastic or wooden item longer than 6 inches (I used a big cable tie) in the cylinder to figure out when it’s high or low (obviously never leave any material in a cylinder). I used about 8 feet of 1/4-inch diameter Home Depot poly-something-or-other rope. It takes some strength to use the compressor, and you’ll be glad you spent time at the start making a good prop to hold the handle when the valve spring is sprung. I used a block of maple about 4 inches long. You compress (and prop), pry the keepers from the shaft with a small tool, extract them with a magnetized tool, uncompress, remove the spring, pull the old seal, install the new (I used a deep 11mm socket; takes zero force to install these things, by the way), compress (and prop), fiddle in the keepers, and uncompress.
“Fiddling in” is BY FAR the hardest part of this whole enterprise. My best strategy (which isn’t saying much) is this: put a gob of grease on the slotted side of the keeper; hold it on the tip of a magnetized Torx screwdriver (you can magnetize it by drawing it across a magnet); position it near the shaft and use an unmagnetized tool (I used a wooden shish-kebab skewer) to try to push it into place. Pain. In. The. Butt. (The back, really; help yourself out and find a way to use old pillows or something to make working out across the engine bay less strenuous. I sure wish I had.) Try to find someone with a better fiddling idea! With a 20-valve engine, you only have 40 keepers to place 🙂


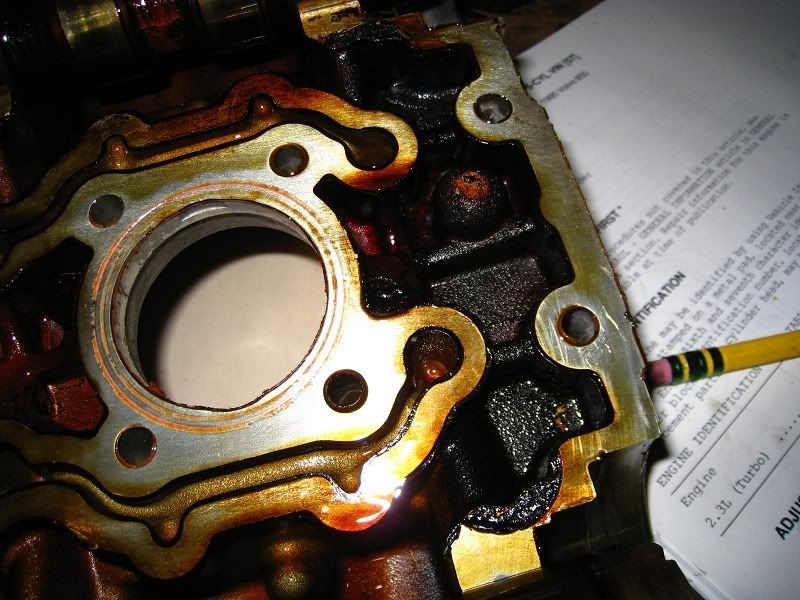
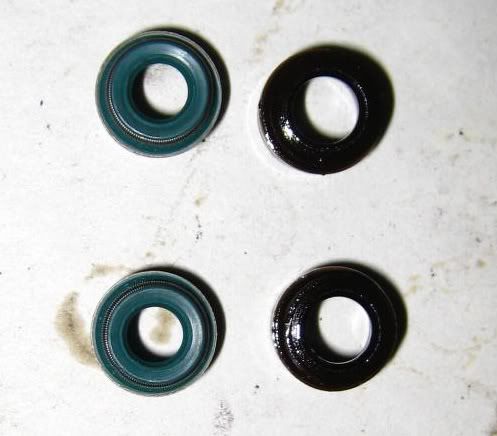
The old seals were rock hard—chalky, as well as having no lip. Not seals anymore:
I started the new ones on the valve shafts by hand — it looked like you could lose one into the nether regions, and I didn’t want to risk that — and then pressed them into place with the deep socket. Volvo supplies valve condoms, but I really don’t see the point: these do not seem to be such delicate seals that you could harm them that way.
A couple of times the rope got pinched by a valve and I had to find the culprit valve by trial and error. I used the spring compressor, but you could probably use a rubber mallet.
Many hours later (just ask my back), I cleaned up the mating surfaces and positioned the camshafts on the engine; be sure you have marked the shafts so that you know the right orientation!!!: If you haven’t, don’t worry; you can figure it out by the offset slots on the rear ends of the shafts—both are horizontal, with the intake above the centerline, and the exhaust below.
Then I spread gasket compound on the cam cover (lightly!) and greased the bearing surfaces (the last time I used this particular tub of assembly grease was in the 80’s for a Honda CB350 motorcycle . . . like the corners of my mind . . . ):
Reinstalled the lifters, positioned the upper head, and gradually tightened the zillion bolts, keeping an eye on evenness, including the rotation of the camshafts (mine didn’t budge). Did I mention that my back hurts?
Put in the front seals with the help of one plumbing thingy:
Installed the cam sprockets, matching the marks left by the bolt-heads to ensure that I installed the sprockets at the original angle with respect to the shafts (there is by design considerable play in the sprocket bolt-holes).
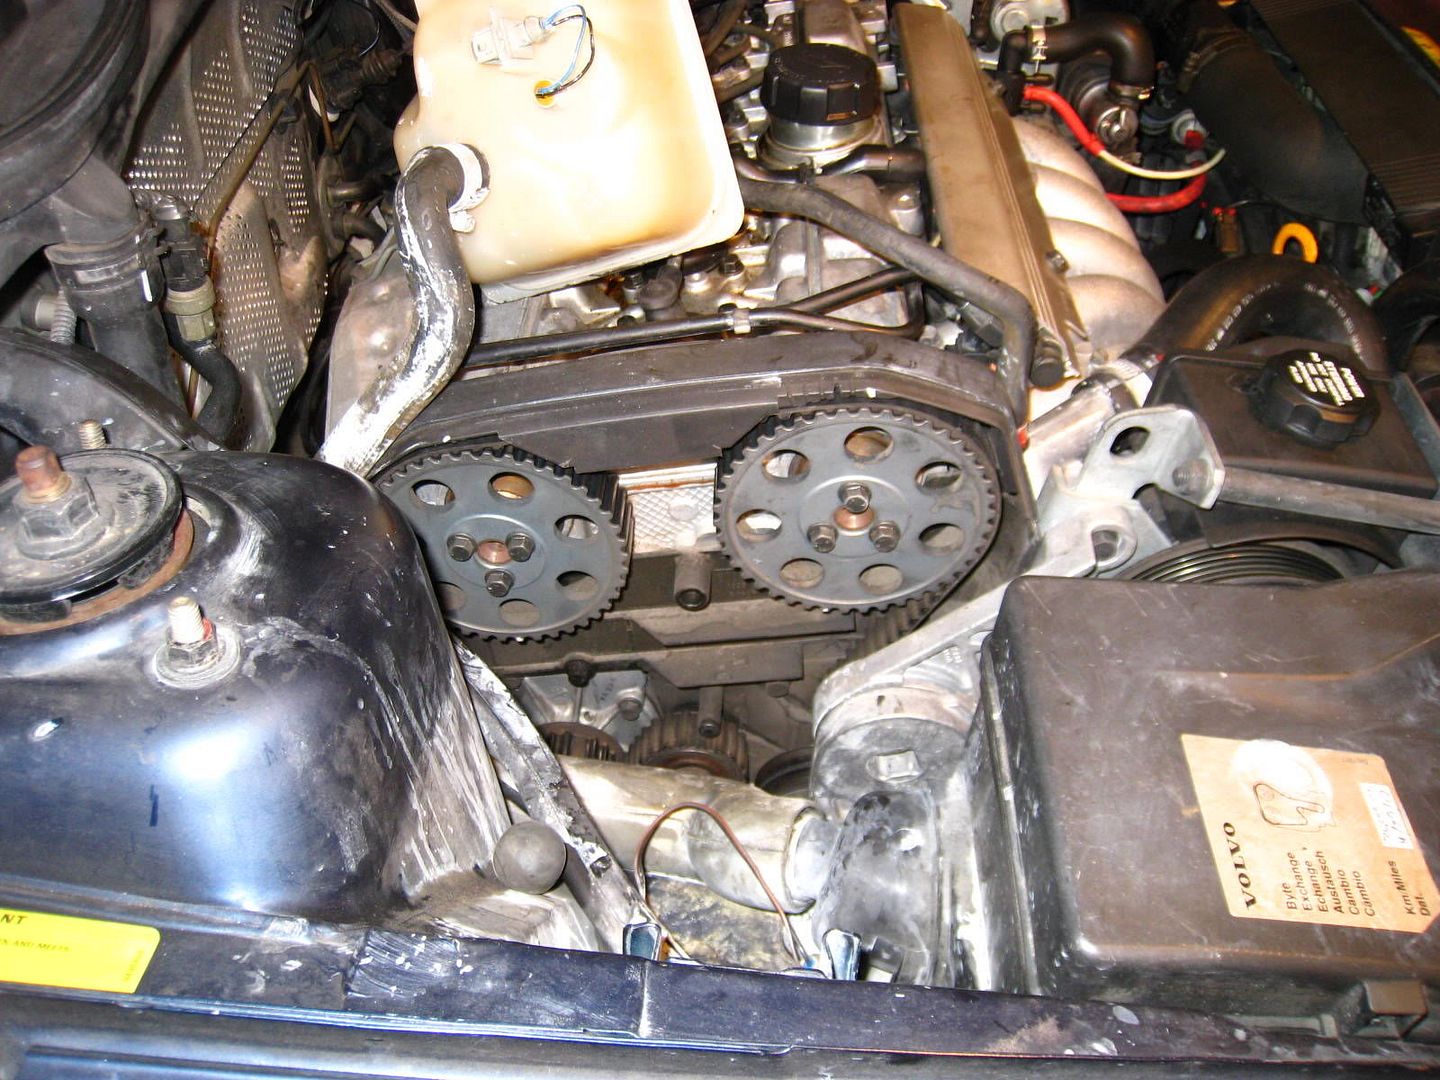
Installed the new timing belt:
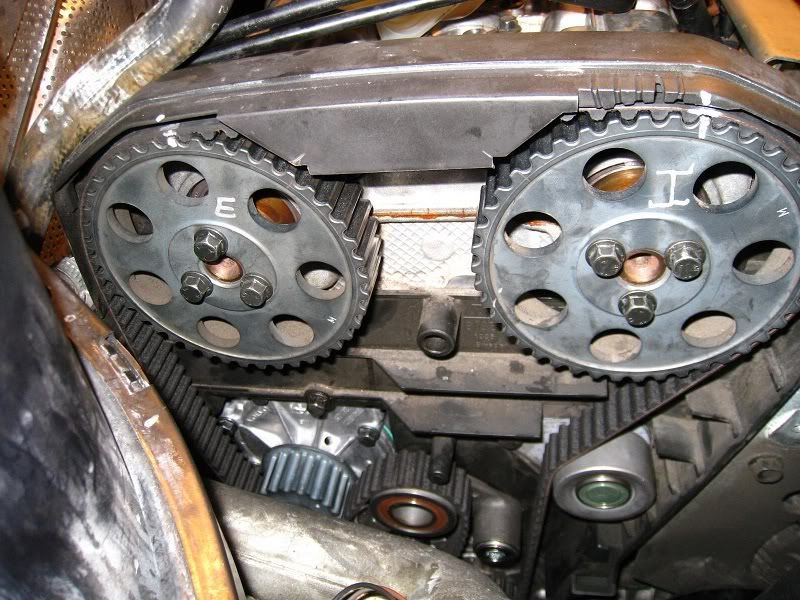
(OK, I did mark the exhaust sprocket. LOSER.)
A good trick is to back the crank off a notch, put on the belt, and tighten the crank back. That way you don’t have to struggle to kep the belt taut between the intake sproket and the crank sprocket.
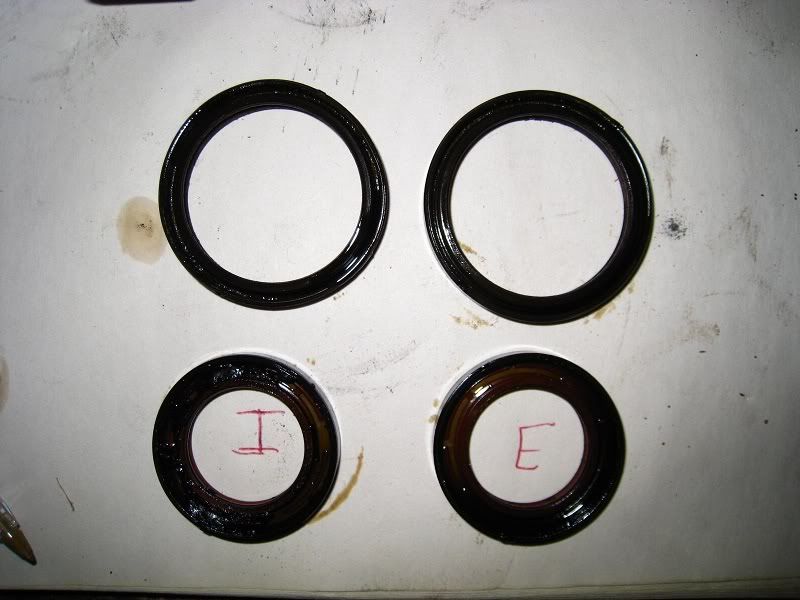
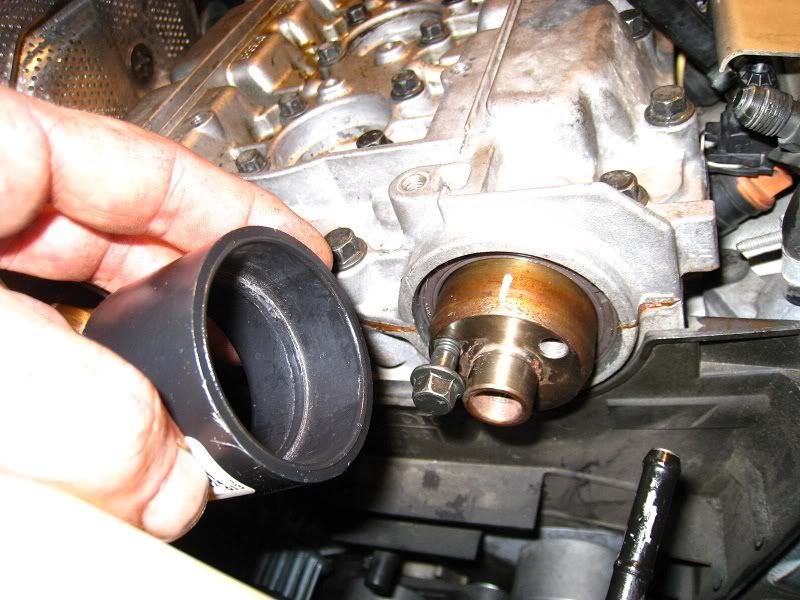
Installed the rear seals with another plumbing thingy (I wandered around Home Depot with a caliper: just under 2.25 inches for the front, and just under 1 7/8 inches for the rear):
And just as I read that my plan said “Install torque arm brackets”, at that exact moment, the mail carrier arrived with a brand new torque arm bracket bushing from FCP Groton. Yay for their fast shipping! (The package also included 75-cent spark plug o-rings, but I had broken down and paid $4.50 each for them at the dealer, making for probably a world record payment for some stupid o-rings, NASA aside.)
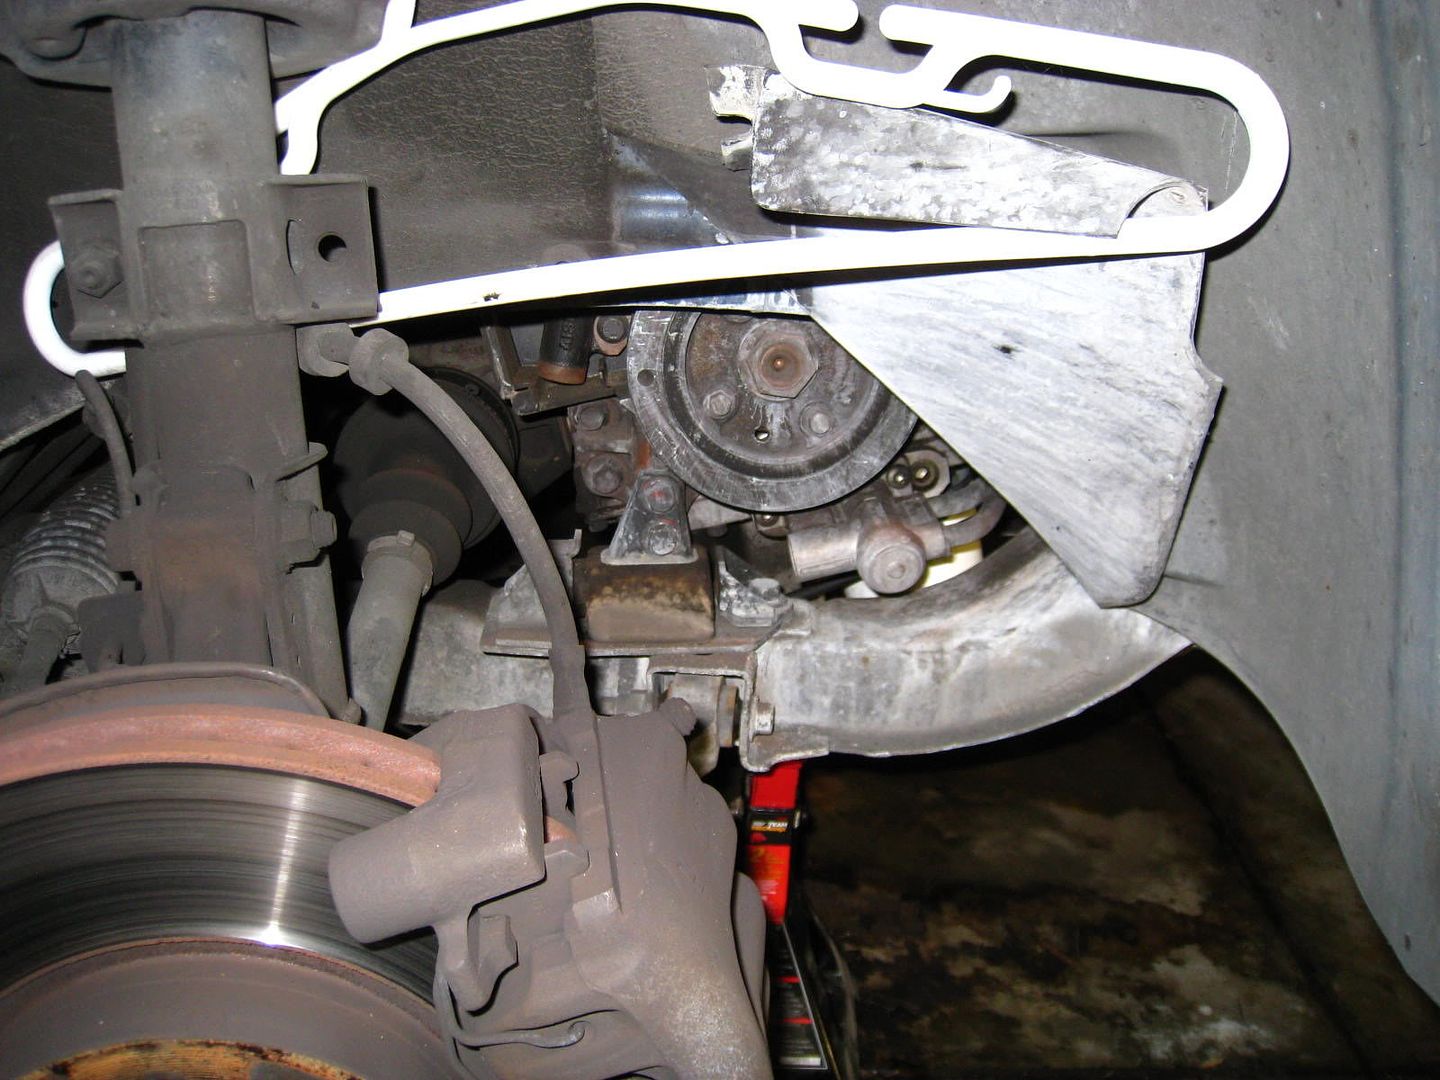
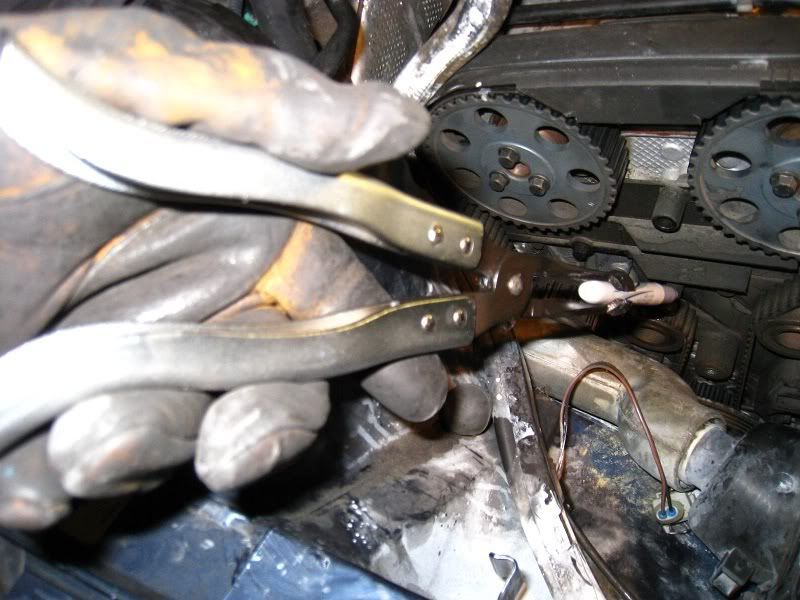
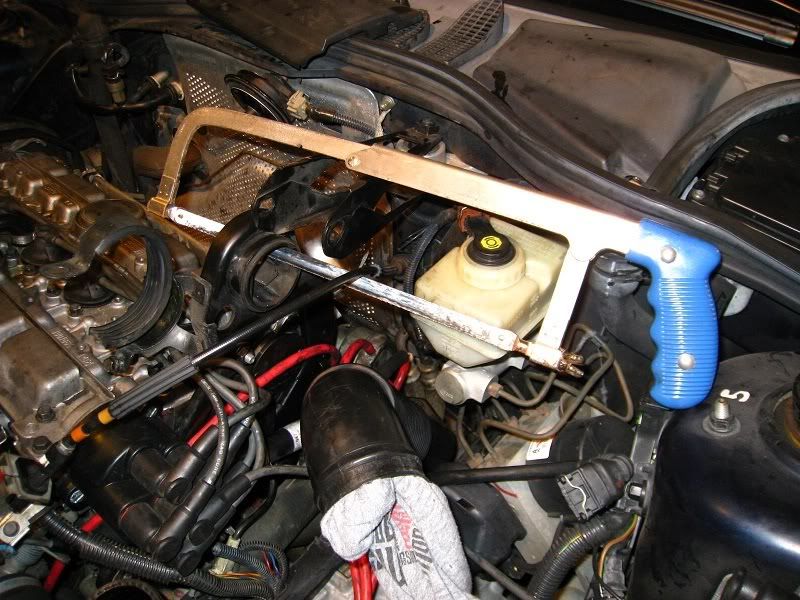
To get the old torque arm bushing out (the middle part was gone already, thanks to decrepitude), I did this (plugged the open intake pipes and vacuumed well afterwards):
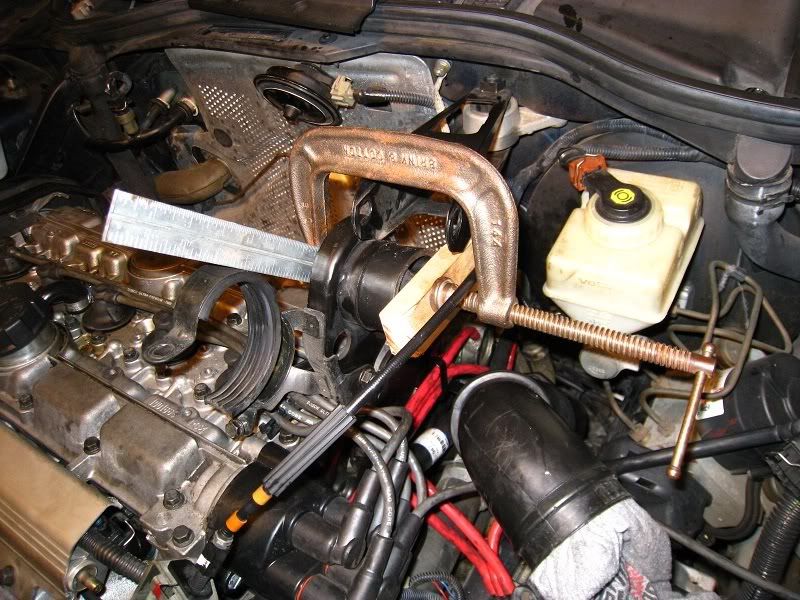
Pushing in the new one, I used a C-clamp and some pieces of wood with 1-inch holes partway through them. Went swimmingly. Hey, since I did this I read that someone brilliantly put their bushing in the freezer to shrink it, which really eases installation (the only part that’s at all tricky is starting the new bushing into the bracket, and apparently I was lucky, because sometimes it’s nearly impossible to get it in there). The arrow on the bushing points at 11 o’clock–a little towards the front of the car.
That’s about it. I took out the fuel pump fuse (#2) and the coil wire, cranked a few seconds a few times to get oil up there, and let it marinate. Then, I reconnected everything and put in the key. Surprisingly, it started right up. I drove around a bit to get it warm, idled for 10 minutes and …
https://www.youtube.com/embed/LgrDD8tnvPs?rel=0&wmode=opaque
Six years and sixty thousand miles later, the car is still running great, getting the same mileage as before, and the oil loss is dramatically reduced, despite the fact that the engine is clearly still leaking from the rear main seal. (Stay tuned for a write-up of that job…when I get around to actually doing that job.) The hydrocarbon emissions are lower than they were when the car had 100K miles, and easily pass the California smog test.
This job took 2 full days. I could get it down to one day, maybe, given the experience. I’d never done a timing belt job on this car before, let alone the valve stem seals, so certainly I wasted some newbie time. But some parts of the job are simply time-consuming, like fiddling in 40 keepers, cleaning gasket material, and gradually loosening and tightening thirty-some bolts. And it’s a back-breaker, so it may be unwise to do it all in one blast. So I’d plan to spend some time on this.
Within a few weeks of finishing, I sold the Schley compressor and stem seal wrench to another Volvo owner. So you needn’t think of tool costs on this job as irrecoverable; as these cars get on in miles, this will become a more and more common procedure.
If you have anything to correct or to suggest about any of this, please leave your comment below, so that people who are thinking of doing this will see it. Thanks!
Added 7/25/2010: Here’s some advice posted on VolvoSpeed from Gihuly, who did this job [and my comments between brackets],
The sprockets don’t have to come off. I just take the whole thing out and put it all back in with seals already in place. When replacing seals they can be worked over the shaft into place. [Not the front seals, surely.]
1. This will fix a smoking at idle 850 which is not from a blown turbo (diagnose by much oil in intercooler), bad rings or bad valve guides. The valve seals looked to have been re-used in a cheap ebay rebuild ($300 rebuilt head last year).
2. I highly recommend this to be a two man job. There is plenty to keep two busy and operating the schley tool really should have a dedicated person. It was helpful when replacing keepers to be able to call, “half way up, no back down, up…..”. We used 4 ft of cheater pipe on the schley handle and this made things much easier. [Great idea.]
3.Take your time on cam cover removal. This is the riskiest part of the job, IMO as you can crack the head where the shafts fit in.
4. Cover all the open holes, including the intercooler piping in back and handle the keepers over the head only. We still had two runaways, one dropped in the engine compartment and another made a break for it and shot out of the head and fell downon the cross member heat shield at bottom.
5. I highly recommend the compressor method for securing the valves using a spark plug hole fitting that can be purchased almost anywhere cheap. The rope trick for us was tricky and the rope got stuck I think 4 ways on the first cylinder. We switched afterward to air.
6. Special implements: I had a dental pick for helping free the keepers which was awesome and also for helping manipulate the keepers back in after seal replacement. Also for keeper replacement using a long slender screw driver and some thick grease gun grease. Put a very small amount of grease on the screwdriver tip and stick the keeper to it and put it in with dental pick or other tool in other hand. Also, have a small diameter telescoping magnet that will fit inside the schley tool for valve keeper retrieval.
Again, I really call this a two man job. We did it in a long day (11 hrs incl lunch). Other skills required are timing belt removal/replacement skills. TDC on #1, crank shaft gear mark lined up on the block and slots on the camshaft ends level with head suface, exhaust slot cheats below the centerline, intake cheats above.
It was very rewarding to take this car back from being a smoking embarrassment (it was bad and came on almost immediately) to a fine running car again. [Exactly! And thanks for the feedback.]
In-car valve stem seals replacement, Volvo 850Last Updated on May 4, 2023


1 Comment
Hi,
Excellent and pristine job description. I would like to ask you for an advice: I will need to have the spark plug tube seals replaced on my 2016 3.0 T6 6 cylinder engine. Any mechanic recommendations, who has already done it? I am on the east Coast. Thank you. Marek