MVS Volvo Forums member extraordinaire CN90 writes a beautiful DIY for how to replace a 1998’s coolant hoses and radiator .
cn90 » This is strictly preventive maintenance:
– The Turbo Coolant Hose was bulging and about explode any time.
– The Lower Rad Hose is leaking at the radiator side.
– Since I am replacing the Turbo Coolant Hose, I may as well replace both Rad Hoses.
PARTS
– Lower Rad Hose PN 9470409 for Turbo (NA different PN); about $35 at dealer.
– Upper Rad Hose PN 1335433, about $15 at dealer.
– Turbo Coolant Inlet Hose PN 6842190, about $8 at dealer.
Optional (but highly recommended):
– Turbo Coolant Outlet Hose, PN 30713305, about $5 at dealer. A few months ago, I replaced this hose using some generic fuel hose lying around in my garage.
– Vacuum Hose for Turbo, I don’t remember the exact I.D., all I know is the O.D. = 10-mm. So my guess is the I.D. is about 6-mm. So a 1/4-inch vacuum hose should work. I happened to use the stuff I have lying around.
For the coolant hoses, stick to Volvo OEM unless you want to do the job twice, not to mention you can cook the engine!
TOOLS
– Super-long screwdriver, about 18-inch or 20-inch type
– 17-mm Box Wrench
– Rubber Hammer
– Coolant: my coolant is relatively new (2 years old Volvo OEM), so I re-used it using coffee filter paper/funnel combo.
– Long needle tip pliers, about 12” to play with clamp on the Turbo vacuum hose.
A GOOD REFERENCE:
Turbo Hose about going South by “tailor”:
https://www.matthewsvolvosite.com/forums … =1&t=16852
PROCEDURE
– Since I replaced the Turbo Coolant Hose, I may as well drain the whole cooling system, it is much easier than you think.
– When old hose bonds to Metal Pipe, just rotate it before removing. Or insert a screwdriver into the space. Or use a utility knife to slice it off.
– Always clean the Metal Pipe nicely before installing new hose: use a small screwdriver/sand paper to clean the old gunk. Just get rid of the junk for a good seal later, no need to be shiny perfect.
– Don’t assume your new hoses are clean inside, wash it with some water to clean out any debris inside before installation.
– During installation, always add a bit of oil/grease (very thin smear) on the Metal Pipe, it makes insertion of the new hose (which tends to be tight) much much easier.
– Inspect the factory clamps, I re-used all the clamps. If in doubt, replace defective clamp(s).
– Likewise, I re-used the two (2) copper washers on the Banjo Bolt on Turbo, zero issues.
– For the Turbo Coolant Hose, don’t even try to replace it from ABOVE. It is very very difficult, if not impossible, I tried and failed. Then I did it from BELOW and believe me, it is much easier than I thought after reading all the DIYs. If you follow the tricks below, it will be super-easy!
1. With front of car raised on wood ramps, drain coolant via Lower Rad Hose. If your Radiator is old (more than 10 years old), don’t touch the petcock as you can crack it, and finding a spare petcock on a Sunday can be very difficult! So the best bet is by loosening Lower Rad Hose.
– Drain coolant into a pan and set it under the car so debris/leaves don’t fall inside and you don’t step on it.
2. Do the easy job first, difficult job later. The Upper Rad Hose is straightforward.
– Note the orientation of the old vs new hose and duplicate it, the white lines on the new hose face up.
3. The Lower Rad Hose: make a note or take a photo of its routing so make install easier.
– Remove top of Air Filter Housing (a few clips) and swing it out of the way.
– D/C the connection downstream of the MAF and tape the Intake Elbow out of the way.
– Now you can see where the Lower Rad Hose connects to the Metal Pipe:
4. It is much easier to use a string and pull the new hose through.
– Prior to install, I pour some water (from a bottle) into the hose’s Upper end to flush out any debris that might have ended up in there.
– Tighten clamps.
5. The Turbo Outlet Hose is straightforward: simply loosen the bolt holding the heat shield and replace the hose.
6. Now take a beer break before the next challenge: the Turbo Coolant Inlet Hose.
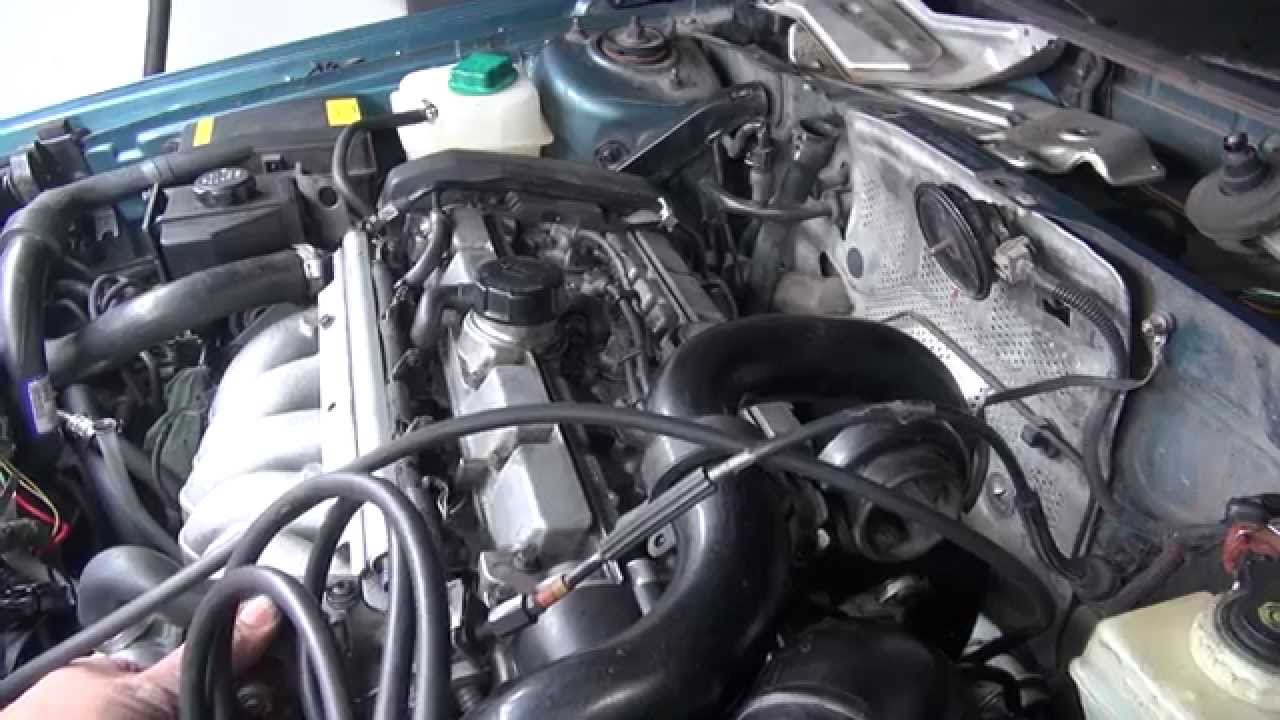
– While underneath, I noticed some oil at the bottom of the Turbo, not a big deal but I wonder if this comes from PCV system vs Turbo itself:
– Anyway, from below: this notorious clamp screw faces up from factory, some people do this do that from above to get to this screw: very long extension etc. via a very crowded place. There is a much easier way: from BELOW, use the very long screwdriver and rubber hammer, tap the clamp slowly and it will rotate around until the screw faces yourself. Now you can use the same long screwdriver to undo it.
– D/C the hose from the nipple using the long screwdriver to pry it out. A bit of coolant will come out, maybe 2 cups or so. Don’t let coolant get in your eyes, if it does, flush your eyes immediately. Another trick, poke a small hole in the old hose and let coolant drip out slowly, it will take 2-3 min to empty the coolant left behind.
– Now you can feel the 17-mm Banjo Bolt, place a wrench there, then go ABOVE and tap it with a rubber hammer to undo it. LEFT hand holding the wrench against the banjo bolt, while tapping the wrench with RIGHT hand using rubber hammer. Note that you should stand from passenger side, so tap the rubber hammer toward the driver side to undo this banjo bolt.
– Don’t lose the 2 copper washers!
– Now you have the Banjo Bolt/Pipe/Hose combo out: don’t disconnect it yet! Note the orientation of the pipe vs hose for install, this is because once it is in the car, you simple cannot get to the clamp between the pipe and the hose!
– Now install the new hose, making sure you have the correct end (the hose has different I.D. on each side), then rotate the hose to match the photo, then clamp it.
– Clean the banjo bolt/washers before install. I flush with some water to clean the combo. Then one drop of oil on the banjo bolt to make sure it goes in smoothly. I don’t know the torque for the banjo bolt, but I hand-tightened until it stopped, then 2-3 gentle tap with rubber hammer and called it a day.
– NOTE: during install of the hose from below, because of tight space, place the clamp on the nipple first, then slide the new hose in. This way you don’t have to fight to get the clamp through the flared part of the nipple/hose combo.
– If you look carefully at the vacuum hose at the Turbo, you will see that after 15 years, it is crumbling.
Replacing this hose was a challenge:
* Note its routing
* Use a string to pull it through
* The hose bonded to the solenoid nipple, so be patient and go slowly to remove all remnants.
* At the bottom, the space is tight, so removing the clamp is difficult. Use the long needle tip pliers
– Now take a break and mentally review that you tightened all the clamps, the banjo bolt (with 2 copper washers) etc. properly.
– Fill coolant, since I re-used my coolant, I used coffee paper filter to filter out debris. It is slow, so be patient if you do it this way.
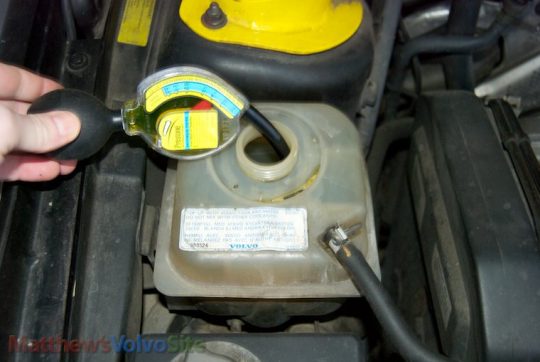
– Now you need to bleed air out of cooling system.
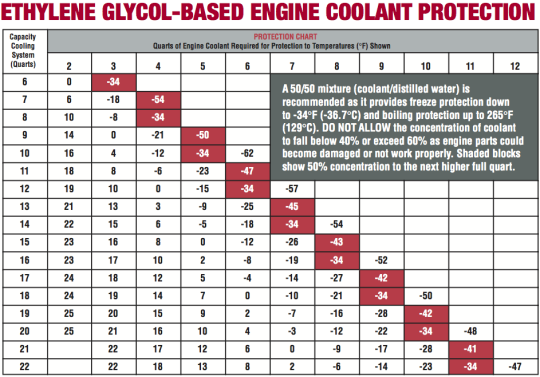
– Start the engine, turn heater on, drive around the block, but don’t go too far from home. Do this until the engine warms up. The “Low Coolant” light will be on as soon as air is expelled. Then you will need to add about 1/3 gallon of the 50-50 mix again.
That is all boys and girls, not that difficult if you are patient and methodical!
DIY: Replace S70 GLT Coolant and Radiator
About The Volvo S70
When 1996 was coming to an end, a new Volvo model was introduced, the Volvo S70.
The Volvo S70 was developed from the successful 850 models, which had been on the market since 1991.
The exterior of the new S70 showed softer styling than its predecessor, but still carried a strong Volvo identity. Inside the car, the dashboard was new as was most of the interior. In the area of safety a number of improvements were made.
The Volvo S70 was produced until 2000.
Technical Specifications
Model: S70
Variants: AWD, Classic, R
Produced: 1996 – 2000
Volume: 243078
Body: 4-door sedan
Engine: 5-cylinder in-line DOHC unit, 1,984 cc to 2,435 cc or 5-cylinder in-line 2,461 cc SOHC turbo-diesel
Transmission: 5-speed manual or 4-speed automatic, FWD or AWD.
Brakes: Hydraulic, all-round disc brakes
Dimensions: Overall length 467 cm Wheelbase 267 cm
Subscribe to the MVS Newsletter
The MVS Volvo Newsletter is a once-a-month email delivered to your email. It’s simple to unsubscribe at any time if you change your mind.
Visit The Official Volvo Cars Website
Last Updated on March 26, 2022