

DavidE7 »
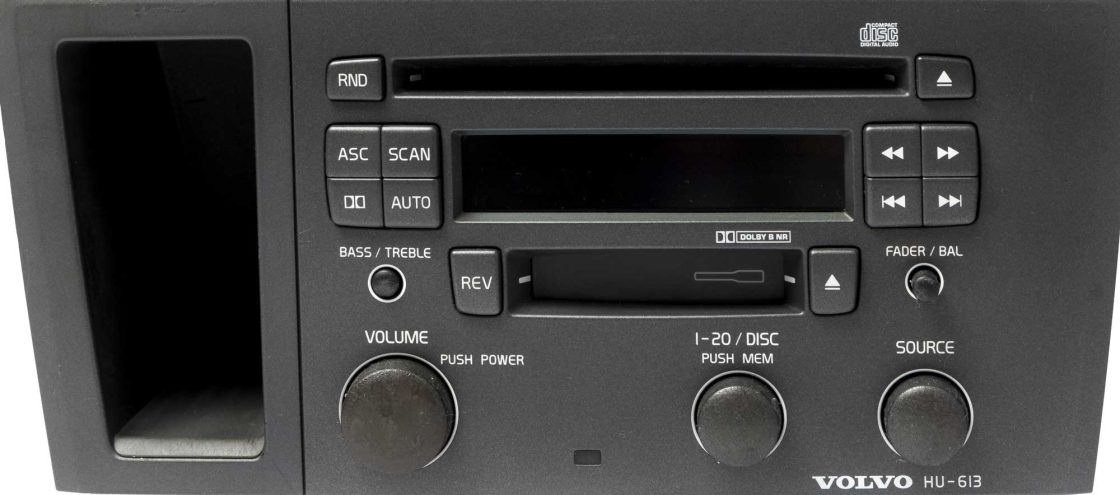
I found a solution for HU-613 radio knobs for volume, disk/channel, and source that are working intermittently. There is contamination inside the switch and by de-soldering and disassembling the switch, it can be cleaned, re-lubed, re-assembled, and soldered back onto the circuit board.
The first thing to do is remove the radio from the vehicle and then remove the face plate assembly from the radio itself. There are other posts and Volvo VIDA with the information for removing the radio from your Volvo. I won’t cover that here.
Start by removing all the knobs. The three big knobs and two small knobs are removed by pulling them straight out. This is a good opportunity to de-gum the knobs using a solvent. There are other posts about removing the soft touch” coating from the knobs. I use a citrus based solvent called De-solv-it to remove the sticky gum and leave a plain plastic knob that feels and looks much better.
The face plate assembly can be removed from the body of the radio with two screws and a dozen plastic snaps that need a small screwdriver and lots of patience to disconnect. The radio body doesn’t need to be disassembled to get the face plate assembly off the radio. This is what you will have after the face plate is removed:
Remove the 9+ small phillips head screws to release the printed circuit board from the plastic face plate.
The next step is to de-solder the problem switch from the circuit board. This is somewhat difficult because there is a decent amount of solder on each of the 5 electrical connections and two mounting tabs.
I don’t have a good hot-solder sucking device so I used the heat-and-slap method of solder removal. I heat the solder with a soldering iron and then very rapidly while the solder is still molten, I slap the PCB against a surface to splash the hot metal out of the joint. This is a good way to break the circuit board and a good way to get solder splashed all over the circuit board causing short circuits. Messy de-soldering of the 7 solder joints:
It is incredibly important to inspect the circuit board thoroughly for solder splashing causing short circuits. The solder that is splashed will flake off easily when pushed with a small screwdriver, fingernail, or other device. Make sure there is no stray solder left over from the de-soldering process.
After getting the switch removed it can be disassembled by bending open the 4 small metal tabs on the bottom of the green plastic housing:
The metal contacts need to be thoroughly cleaned to remove the contamination:
I used electrical connector cleaner for the finger contacts and the metal disk. After thoroughly cleaning, the assembly needs to be re-lubricated with dielectric grease and then reassembled. The metal switch that makes contact when the knob is pressed needs to be installed first:
There are two “ears” to the switch plate that need to be aligned as shown in the picture. The rubber plunger goes on top of the switch plate. Then the entire assembly can be pushed together while aligning the small pins in the corners of the housings. If the parts aren’t going together easily, try rotating the parts and trying again. The parts fit together only one way.
After the small parts are back together, fold the four metal tabs back down to their original position. Then try dry fitting the switch back onto the circuit board. if everything looks like it did before disassembly then you are clear to re-solder the 7 joints between the switch and the PCB assembly.
Continue the reverse process of the disassembly by snapping the PCB into the face plate and re-installing the small screws. Then the face plate can be snapped back onto the body of the radio while making sure the electrical connectors are aligned and engaged.
Good luck! I have an HU-650 radio to try fixing next and I will post an update if the knob switches are similar.
Fix HU-613 knobs

1 Comment
This is a really nice guide and smart fix. Thanks!