Looking for a Delta Link Repair DIY? Ozark Lee » **Editorial Note** This post was largely a “Stream of Conciseness” writeup and much of the original writeup can and should be ignored. There is, however, other very good information in the thread.
As I’ve mentioned before, I have had a persistent “clunk” in my rear suspension and a “wandering” sensation at highway speeds. I tried the fender washer in the shock mount repair which yielded no change in the sound and then, just to make sure on the easy stuff, I ordered some new shock mounts from FCP Groton. I replaced them and still no change in the clunk.
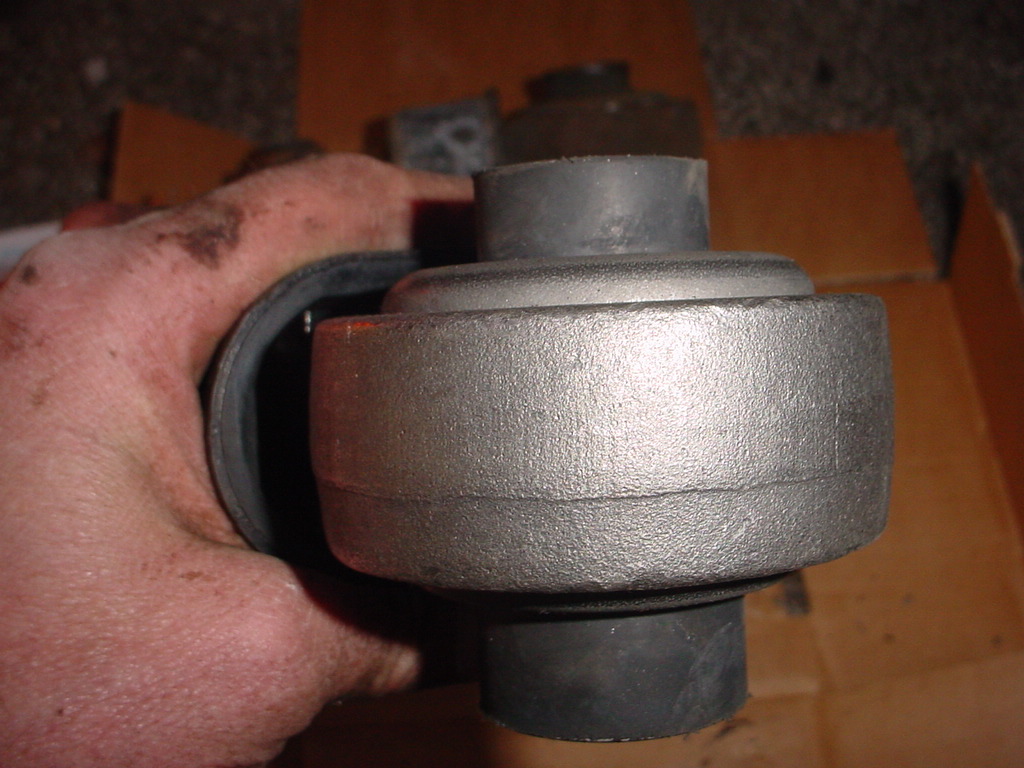
A couple of weeks ago I decided that a Chief’s halftime Sunday project was to find out what the problem was. As soon as I jacked up the car it was apparent, I had over 1 inch (2.5 cm) of vertical travel in my rear trailing arm end links. The right side was the worst as I could actually see the ball joint that should have been immersed in rubber.An example of a bad rear endlink.
OEM Volvo links are, at the best price I have found, US $200 each while the aftermarket versions run roughly half of that. Between eEuroparts.com and FCP Groton I ordered the aftermarket versions and new bolts which we shall see if that was a mistake or not. The Haynes manual and Vadis procedures are quite insistent that the bolts be replaced when doing this procedure so I also ordered new bolts for everything associated with the endlink itself.
Disassembly is quite easy. Do the block the wheels, jackstands, etc. Just to get good access I took off the tire and then I first removed the nut (18mm socket) that holds the end link into the “delta arm”. Vadis says to use a “copper mallet or equivalent” to tap out the bolt. I’ve never seen a copper 5 lb. sledge hammer but I used a 5 lb. steel sledge hammer, leaving the nut on, to release the serrated head bolt from the top of the arm. A tip here is to jam a 2 X 4 above the delta link and the bottom of the car. In my case most of the hammer “wham” was diminished by the vertical travel in the suspension if I didn’t jam it.
The next step is to remove the bolt that holds the end link to the chassis, it is also an 18 mm socket. I just used an air impact wrench and zipped it out.Endlink to frame bolt removal.
The next step is to remove the bolts from the mounting bracket which are 17 mm socket bolts. In this case I was working on the passenger’s side of the car which is where the fuel filter is bracketed. Take note that you have the fuel filter and the fuel lines in close proximity to the link, it will be important later on. I also removed the fuel filter bracket which requires a 12mm socket. I also used a T-27 Torx driver to remove the parking brake cable from the bracket.End link bracket bolts.
I then removed the bolt securing the fuel filter using a 12mm socket and let the bracket drop and hang.The end link with the bracket removed.
The next step is to pry downward on the end link so as to release it from the chassis for removal. Use a pry bar, a crow bar or a pipe, it should pop right out.
At this point Vadis calls for me to utilize Volvo tool # 999 5497 to remove the endlink itself. I looked in every drawer of my toolbox, twice, and I don’t have Volvo tool # 999 5497. I decided to improvise.
Note: (3.5 hours of trial and error and swearing followed this step)
After chiseling, prying , cussing, etc. the endlink refused to come out so I enlisted the trusty come along. I looped a steel cable around the top and the bottom of the link and then hooked it to the come along that was hooked to the frame of the ¾ ton Suburban that was parked next to the Volvo. It makes good ballast.Steel cable around the endlink, a ¼” cable secured through the bushing would likely work as well.
The come along tied between the Suburban and the Volvo.
At this point I started to ratchet the come along and found that the delta arms were moving much more than I was comfortable with so I ran a chain through the delta arm and tied the chain through the tow hoop at the back of the trunk (boot?) so as to limit the forward travel of the arm.Chain through the delta link.
Chain through the tow hook at the rear tow hoop of the car.
I just tied the chain in a knot to secure it through the hoop. Following Lee’s law on knots, if you can’t tie a good knot, tie a lot of them.
I next proceeded to increase the pressure with the come along which nearly took the car off of the jackstand. I added a safety jackstand and tried again to extract the endlink only to get nowhere.
A propane torch is your friend.
In looking at the (albeit ScanTech) replacement endlink I noticed that it was a rubber center with a plastic outer shell. I also noticed that the actual delta arm was aluminum so banging on the delta arm was likely only going to dent it and make the extraction harder. I fired up the torch (remember that you earlier took note that the fuel lines and fuel filter were hanging next to the link) and proceeded to heat the crud out of the delta arm. I still had it under considerable tension with the come along. To my delight plastic began to ooze from the end of the link which meant it was a thermoplastic and it would melt. Once I got it hot enough, and it oozed enough, I took a cold chisel and gave the whole mess a big whack and, just like magic, the end link freed itself from the delta arm.
Note: My attorney has advised me that the preceding procedure should never be done and that it is imperative that you purchase Volvo part number 9995497 when attempting to remove an endlink.The old endlink.
The new endlink.
Now, for the next trick, reinstall the new endlink. I tried for quite a while to feed the new endlink into the delta arm. I cleaned up the melted plastic residue out of the inside of the arm and tried (an hour or so) various methods of lining up the link and then whacking it in with a hammer. Frustrated, (cussing), I looked at the OEM endlink and found that they had beveled the leading edge of the plastic at the Volvo factory. Next stop was the grinder to bevel the leading edge of the plastic on the ScanTech replacement. If you don’t have a grinder you can bevel it with a file or even a pocketknife.
Even with the beveled edge I had a terrible time trying to get the link aligned to tap (smash) in with a hammer. The outside edges would catch but I noticed that I had clearance at the top and the bottom so I enlisted a 2 ¾” hose clamp. I set the hose clamp at roughly ¼ inch (6.5 mm) in from the inside end of the endlink plastic. By adding pressure to the hose clamp I was able to get the shape of the plastic housing to a point where it drove in, quite easily, to about the halfway point.The hose clamp “former”.
I didn’t gain much ground over the halfway point of getting it installed. I was using a hammer on the end of the endlink which is encased in rubber. The rubber was absorbing the force of the hammer and not transferring it to the outside shell. I then enlisted a small (1/2”) pipe to tap the outside edges of the plastic shell frame rather than the outside steel link itself. It is a walk on procedure where three taps on one side followed by three taps on the opposite side (rinse, lather, repeat) ultimately gets it on all the way.
From here it is a matter of bolting everything down. I started by prying the link end itself back onto the stud and then loose fitting the mounting bracket back to the chassis. Using my new bolt I then torqued the end link to chassis bolt to 105 Nm and then added 90° of angle torque. Next I tightened the mounting bracket to 65 Nm + 60° of angle torque and lastly I tightened the end link to delta link bolt to 65 Nm +120° of angle torque.
Carefully remove the chain so as to not damage the brake line and re-attach the fuel filter mounting bracket. This is what is should it should look like after repair.A fully repaired endlink. Notice the difference between this link and the original.
This is a BI itch of a job that took every tool in my toolbox and then some. I only got one link done today working from 11 AM to 7 PM. With what I’ve learned I estimate that the next one will take about 3.5 to 4 hours. Next stop, after I repair the other link, is the alignment shop to get the rear end aligned.
…Lee
Rear End Suspension Link Replacement
[Here’s a good supplement » no photos but solid Delta link DIY advice]
Welcome to Matthews Volvo Site! Your one stop shop for all Volvo news, help and DIY fixes. We feature the Volvo Repair Database, the best Volvo Forum, and an awesome monthly Volvo newsletter. Joining is always free!
Subscribe to the MVS Newsletter
The MVS Volvo Newsletter is a once-a-month email delivered to your email. It’s simple to unsubscribe at any time if you change your mind.
Last Updated on June 15, 2023