How to replace inner and outer tie rods on a Volvo 940. A good write up with pictures.
Here’s what can go wrong:
1. If you let the steering rack rotate, you can ruin the steering rack.
2. If you carelessly counterhold the steering rack in order to prevent 1., above, you can scar the steering rack with your wrench, which will in turn destroy the seals in your steering rack, also resulting in its ruin.
3. If you fail to securely lock the tie rod to the rack, the tie rod can detach from the rack, resulting in a Bad Day for you and yours.
As usual, do this job at your own peril. I take no responsibility or liability for your outcome.
Tools:
- Jack
- Jack stands
- wheel chocks
- 19 mm-22 mm open end wrenches
- half-inch drive deep socket set
- breaker bar
- tie rod separator (pickle fork) or, preferably, a two jaw puller
- pipe wrench
- vise grips or channel locks
- ball peen hammer
- punch kit
- safety glasses
- padding material, such as an athletic shoe inner sole
- PB blaster
- CV boot grease
- medium thread locker
Here’s how I did this:
1. Chock the rear wheels, lift and securely support the corner of the car. With the front wheel off the ground, shake the wheel. A loose tie rod is indicated by play at 9 and 3. Turn the steering in the direction of the side on which you will be working. The idea is to expose as much of the steering rack as possible. Remove the wheel. If both tie rods are loose, consider the condition of the steering rack. If it is in poor condition, it may make sense to replace the steering rack, which will include new inner tie rods. Even with care, there is some risk in damaging the steering rack in removing and installing the tie rods. If the steering rack is already on the way out, it’s probably not worth it to put on new tie rods. Just replace the whole shooting match.
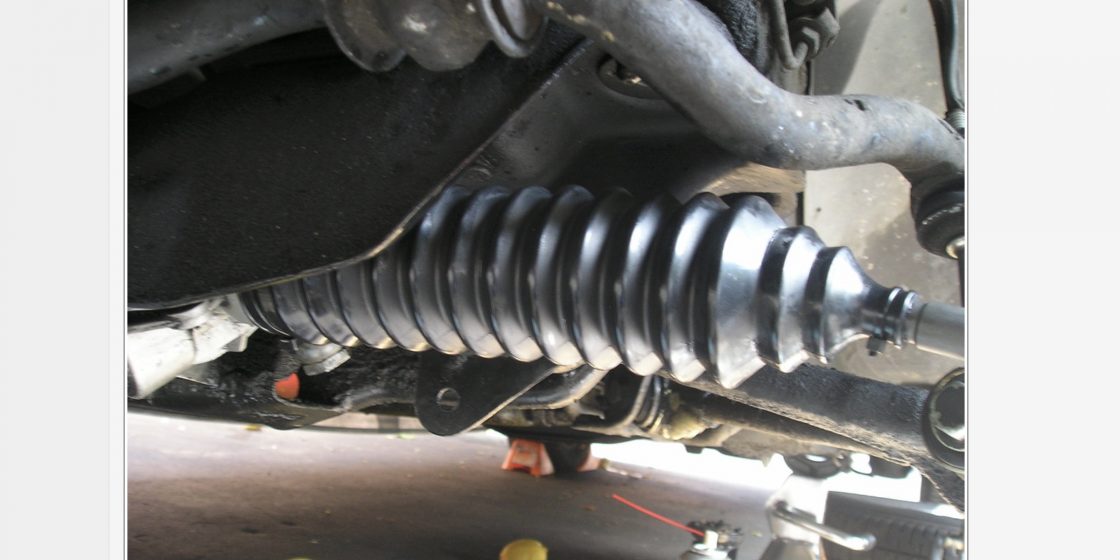
2. Cut off the boot. Push/pull each side in order to gain access to the inner tie rod. NOTE: the product plate on the passenger side of the car by the radiator should indicate which steering rack is installed in your vehicle. However, this is not foolproof. My product plate indicated that a Koyo steering rack had been installed. However, somebody had replaced mine with an 18 mm CAM rack. With no identification on my steering rack, there was no way for me to know this without removing the tie rod. (My advice is to make every effort you can to identify the steering rack and order multiple different kinds of tie rods for the various racks before doing the job. Otherwise, like me, you may have your car sitting in your driveway for a week waiting for parts: a monument to mechanical futility.)
3. With the boot removed, wipe off the grease and detritus off the tie rod and steering rack. Close examination may reveal a notch in the steering rack. More about this later. The inner tie rods are often round, and therefore requiring the use of a pipe wrench to remove them.
4. I recommend replacing both inner and outer tie rods. The other ones are quite inexpensive. Mine cost eight dollars and change each. After soaking the outer tie rod ball joint nut with PB Blaster, use a deep socket and a breaker bar to remove. Then, use a two jaw puller to separate the tie rod end from the steering knuckle. Or, use the inferior pickle fork method, which will usually destroy your tie rod boots.
5. With the outer tie rod loose, you should be able to easily feel the play in the tie rod. Mine had about 1/16 of an inch of play. If there’s no play, there’s no need to replace the inner tie rod. Otherwise, proceed.
6. The inner tie rod may be secured to the steering rack with a lock washer, or, I believe more commonly, with a peen (indentation) driven into the notch mentioned in paragraph 3 above. This peen deforms metal adjacent to the notch, therefore locking the two parts together. If you have access, I recommend using a chisel to knock back the peen in order to allow an easier removal. This will help to put less torque on the steering rack. In my case, I would have to be one of Santa’s elves in order to get in there, so I couldn’t do it.
7. After wiping the steering rack as clean as possible, use the athletic shoe insole to protect the steering rack, then CAREFULLY lock the vice grips on the outermost portion of the steering rack. (The idea being to avoid scarring the portion which will come in contact with the seals on the steering rack.) This is your counter hold. I locked mine North/South, so I could detect any rotation.
8. Take out your pipe wrench and tighten on to the inner tie rod. While carefully holding the vice grips, yank the pipe wrench counterclockwise. Mine came loose in about a half turn. Then I could loosen it by hand. Remove the vice grips and check the steering rack for scarring. If you have a scar, use 1000 grit sandpaper to smooth out.
9. Use the old inner/outer tie rod as a guide to assembling the new inner/outer tie rod. I used masking tape on the new tie rod to show me where the locknut should secure the outer tie rod end.
10. Use medium thread locker on the inner tie rod threads. Tighten down, first by hand, then by counter holding the steering rack with the vice grips, securely tighten with the pipe wrench. The inner tie rod and the steering rack should be flush.
11. But you’re not done yet. Examine the peen in the old tie rod. That’s what you will have to re-create in the new one. For me, access was somewhat difficult, but I was able to use a punch and a ball peen hammer to peen the hell out of the inner tie rod. It doesn’t have to be pretty (mine wasn’t) but just drive a deformity into the inner tie rod to bulge into the notch in the steering rack. the In this way, you will have three things holding the tie rod onto the steering rack: a. the tightened threads, b. the thread locker, and c., the peen you’ve driven into the inner tie rod end. That should give you some confidence on twisty mountain roads.
12. Next, clean any grit off the steering rack. I used WD-40 as a flushing agent. Then slather the steering rack teeth and the tie rod joint with CV boot grease. Slide a new boot on and secure with plastic ties on both ends. Mine were easy to get on.
13. Screw on a new tie rod end, and locknut, using the tape you put on the tie rod as an index of where it should be. Tighten securely with two open end wrenches.
14. Insert the tie rod end ball joint into the steering knuckle. Use blue thread locker and torque to specifications.
15. Reattach road wheel, torque to specification, get an alignment. You’re done.
’94 940: New Inner and Outer Tie Rods: DIY
Last Updated on April 20, 2025