


MVS Forums Contributor CN90 explains in a nice DIY how to fix and repair parking brake components on a 1998 S70:
cn90 » I have 2 problems at 150K:
– Brake Shoe friction material fell off, parking brake was useless.
– Parking Brake Cables were somewhat seized at the rear areas (from cracked areas), and since replacing the cables is a PITA, I elected to save them, read on for the tricks! BTW, each cable is $50, so I saved $100.
Online vendors:
Rear Rotor by BALO: $25/each x 2.
Rear Parking Brake Shoes by TEXTAR: $35 for set of 4 shoes.
Volvo Dealer:
Big Spring…PN 1273836 x2; $6/each.
Small Spring…PN 3546028 x2; $5/each.
For these springs, stick to Volvo OEM and nothing else, unless you want to do the work twice.
—> Retaining clips…PN 9157979 x4 (No need for these).
Parking Brake Fix — Procedure
This DIY is designed to supplement the above DIYs, so I will be brief.
Wear Googles when removing/installing springs!
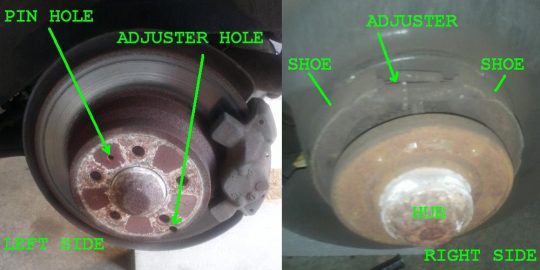
1. Study the Parking Brake Anatomy:
2. Rear End on Jack Stands, safety first! Remove the 13-mm bolts and place brake caliper on a bucket (inverted). Remove the 10-mm nut that holds the rotor in place. Release the pressure by loosening the star wheel adjuster (see below for info, use flash light and small screwdriver), then remove rotor.
3. Once old shoes/springs are removed, take time to free up the seized cable. Oil/Grease the cable entrance (where the cable enters the hub):
4. Grease the following items:
– Adjuster
– Expander/Cable area as mentioned above.
– Where the brake shoes meet the adjuster and expander areas.
– Just make sure no grease is on the friction surface.
– Installation note: For adjuster:
* RIGHT side: star wheel faces REAR.
* LEFT side: star wheel faces FRONT.
This way when you adjust the star whell: UP is tighten and DOWN is loosen.
5. The special brake pliers that I have —> useless!!!
– I used long screwdriver and pick tool or pair of right-angle pliers to install new springs:
—> BIG Spring first
—> SMALL Spring later.
6. How to save the Cables:
– The RIGHT side: 2 crack areas. The rubber sheathing cracked but the metal sheathing was still fine, so I bend the cracked areas a bit, add some WD-40, then 1-2 drops of oil. Repeat the process 10x to allow the oil to soak inside the Cable.
– Tug on the cable a bit, you will see the Expander moves in and out. This is a good sign that the Cable can be saved.
– The LEFT side: only 1 cracked area.
– Again, Oil/grease the area.
– Cover all cracks with 1/2-inch heater hose and zip ties.
– Just slice the heater hose lengthwise and the “opened” area (the part that you spliced) faces downward: this way any water that enters the hose area can drain.
– Since both cables were somewhat seized, I had to pull the Lever (in the cabin) some 20x to free them. Then I tug the cable at the cracked areas a few times. Finally they both freed up, thanks God I saved $100!
7. Installation Note:
– During removal, the force of pulling off the rotors will pull the Retaining Clips outward a bit. Just push them back in with a screwdriver so they hug the new shoes properly.
– Grease the parts as mentioned above.
– I applied a small amount of Anti-squeal compound on the caliper piston areas. This solved my brake squeal noise!
8. How to adjust the PB Lever:
– See other DIY threads above for info.
– Basically release PB Lever.
– Tighten the star wheel until the rotor stops turning, then back off a few 3-4 notches: use flash light and small screwdriver. The rotor should spin with a slight drag, which is normal.
– Once done, make sure the PB Lever does not move more than 7 clicks once engaged. You may need to adjust the PB Lever inside the cabin (Torx key).
9. Road test and brake shoes bedding:
– Do the “Brake bedding” for the Parking Brake. I think it is a few stops using Parking Brake at speed of 30 mph or so.
– Find an empty stretch of the road to do this “bedding” thingy!
That is it boys and girls!
Similar parking brake topics:
- E-brake doesn’t work
- DIY: 98 V70 Brake Hydraulic Overhaul (Hoses, Seals, Parking)
- 850 Ebrake cable replacement
DIY: 1998 Volvo S70 GLT Parking Brake Tips/Tricks
Welcome to Matthews Volvo Site! Your one stop shop for all Volvo news, help and DIY fixes. We feature the Volvo Repair Database, the best Volvo Forum, and an awesome monthly Volvo newsletter. Joining is always free!
Subscribe to the MVS Newsletter
The MVS Volvo Newsletter is a once-a-month email delivered to your email. It’s simple to unsubscribe at any time if you change your mind.


1 Comment
Having done this job myself I found that the two times I purchased replacement cables from FCP, either the actual metal cables were not the exact correct length (too long) OR the thick rubber sheath was not the correct length and prevented mounting the cable with the plastic clamp. I was able to cut the external rubber sheath to the correct length so I could clamp the cable and mount the plastic insert at the end of the cable into the backplate of the brake assembly. This is important to keep moisture out of the brake assembly
The cables that were too long were useless as you could not properly adjust the action of the brake handle (using the Torx 50 adjuster) in the console to apply the parking brake. I went to the PnP and grabbed good cables off a vehicle and used them.