


An automotive sunroof is a fixed or operable (venting or sliding) opening in an automobile roof which allows light and/or fresh air to enter the passenger compartment. Sunroofs are either manually operated or motor driven, and are available in many shapes, sizes and styles.
Lee’s sunroof shade headliner fix procedure
My sunroof shade headliner material had come unglued to the point where it just hung down and hit me in the head if I closed the sunroof shade. Being creative, I shoved the whole mess back into the cover slot and kept the shade open. I think this may be a common problem with many Volvos since I see many of them in this condition.
This is largely a duplication of a Bay 13 post but I picked up a few more tricks and couple of got-ya’s.
The first order of business is to remove the sunroof glass. To do this open the sunroof shade and put the sunroof in the vent position.
Sunroof in the vent position.
Note the plastic trim pieces that go along the sunroof glass and the sunroof track. Those pieces need to be removed on both sides of the sunroof. To remove the trim pieces grasp the lower trim piece near the center and pull outward while lifting at the same time, the trim piece will bow and pop out of its slot. On one of mine the upper piece popped out with it. Assuming that the entire trim piece does not come out, once the lower portion is free swivel it upward and slide the trim piece assembly toward the rear of the car. This should release it from the sunroof glass.
Sunroof track trim removal
Once the trim is removed you will see three T-25 torx bolts, in order to remove the sunroof glass remove the two bolts toward the front of the car on both sides. Leave the rearmost torx screws installed, do not remove it on either side.
Sunroof glass torx screws.
Once the torx screws are removed the entire sunroof glass will swivel up to a, more or less, level position. Slide the glass back about 3/8” (9 or 10 mm) and then lift it upward and out of the track. I just flipped it over and laid it on a beach towel on the roof of the car.
At this point slide the sunroof shade forward all of the way. This will reveal the four mounting clips that hold the shade in its track. I messed up here and only thought there were two clips toward the front. After releasing them, and while sliding the shade out, the other two clips popped out and fell apart. In my case, add 10 minutes to the project to find the pieces (the hard part) and reassemble the clips (the easy part).
Sunroof shade mounting clips.
Release all four mounting clips by pressing them toward the middle of the car with a screwdriver. Once they are depressed lift slightly on the shade so that they extend back above the track. Once all four clips are out of the track the sunroof shade can be lifted out from the top.
The next step is to re-glue the headliner material to the shade. To do this I used 3M number 08088 General Trim Adhesive which costs about US $14.00 at just about any auto parts store.
The droopy sunroof shade.
3M trim adhesive.
To re-glue the fabric to the shade it is necessary to spray an even coat of adhesive on both the back of the fabric and its mating surface on the shade. It should then be allowed to tack up for 3 to 5 minutes. Be careful not to get any adhesive overspray on the pretty side of the fabric. So as to protect the existing portions of the fabric that had not come unglued I laid a chunk of plywood between the fabric I was spraying and the other portion of the fabric that I wanted to protect.
After the adhesive tacks up begin the re-gluing by working from the place it is still attached. I worked from the center outward, smoothing the fabric as I went. Try not to let the portions of the fabric that you have not worked to yet come in contact with the shade as it wants to stick on contact.
I got to the edges and found I hadn’t applied enough adhesive near most of the edges. The dilemma now was how to apply more adhesive without spraying it on the face of the fabric. I grabbed a piece of junk mail and a small paint brush and sprayed a big gob of the adhesive onto the paper. I then used the paintbrush to apply the glue to the fabric and the shade. After it tacked, it stuck very well.
The sunroof shade with the fabric reattached.
From here it is a matter of reinstalling everything. The only problem I ran into was that the shade would not close after I snapped the shade back into its tracks. This problem was solved by releasing the front two clips, sliding the shade back a few inches (a few cm), and then snapping the clips back into their tracks.
This is a very easy project and it only takes an hour or so to complete. Here is the finished product.
Sunroof headliner fix comments
MVS Forum Member Tfor5 asks:
Thanks much for the clear explanation and pics to illustrate how to get to the sun roof parts.
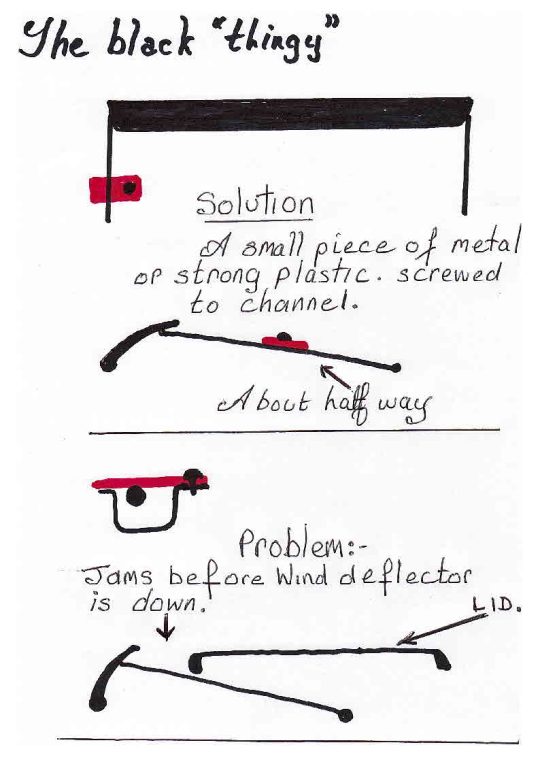
I’ve got a related problem where the sunroof wont even go to vent position at this time. (It used to, but not to full open. From another discussion, I’m told it may be because the tracks got dirty from being left open.)
Do you have any hints as to how to get it to the vent position “manually”?
MVS Forum Member mercharch adds:
I’ve had the saggy sunroof headliner problem for a few years now, only in my case it was the front half that had come loose.
My solution was more of a kludge, but it actually turned out to be quite an elegant solution, and didn’t require the entire sunroof assembly to be taken apart.
Using four ACCO binder clips (small size), I was able to stretch the headliner fabric back over the front edge of the sunshade and secure it in place with the clips. I removed the wire handles, and voila! No more sagging sunshade fabric. The added bonus: the clips are shaped such that they don’t interfere with the operation of the sunshade, and when it’s closed, you can’t even see the clips.
Serendipity, my friends. . .I can’t believe it took me so long to think of it! Enjoy 🙂
Last Updated on December 1, 2020


1 Comment
great instructional procedure. one question, the plastic trim around the headliner is broken. boneyards are not plentiful for this trim. I can epoxy but not an artist. Is there other trim options?