Nine-year MVS Forums veteran Blacklab467 demonstrates how to maintain your P2 Volvo’s drivetrain. Here’s an overview of the AWD system for context.
Blacklab467 »
If you own an AWD Volvo, at some point you will inevitably have to service/ replace/ remove or repair the angle gear, collar sleeve, various seals or propshaft components. I’ve done this job many times and hope that this tutorial will help and clarify the job and demonstrate the easiest and most efficient method for many of these tasks. I would say that this job falls well within the scope of the shade tree mechanic in possession of a complete set of basic hand tools. There are countless posts and videos on every Volvo forum on this job, I believe that the techniques that I describe below are the most effective and efficient.
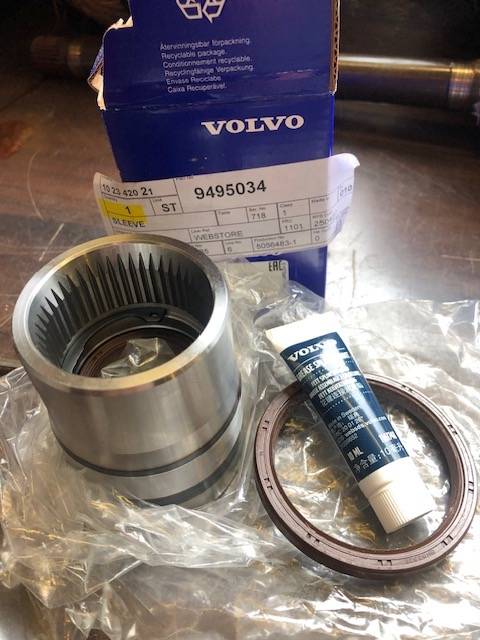
Volvo sells the Collar Sleeve separately and also sells a service kit with the Sleeve and the axle seal (inside the sleeve) plus the transmission housing seal. I’d also recommend replacing the other axle seal on the angle gear at this time.
New Collar Parts
Procedure
Disconnect the battery.
Jack up the car in the front and back and get it high enough on jack stands to work comfortably underneath, remove the passenger side wheel and 13mm axle bolt.
Remove the ABS sensor 10mm bolt, Outer tie rod end, and the 2 strut to knuckle nuts…..leave the bolts in for now. No need to take the lower ball joint apart as many suggest.
Strut to knuckle
Tie rod end
Next remove the bearing retainer on the passenger side CV axle (12mm x 2) Now you can remove the 2 strut to knuckle bolts and the knuckle will drop, turn it to the right and move the strut to the aft of the wheelwell. There is now plenty of room to remove the CV shaft. If you push the knuckle down there will also be no danger of the strut bottom damaging the CV boot.
CV shaft removal
I like to lower the exhaust system at this point by removing the 3 rubber hangers at the back of the system and lowering the exhaust system and moving it to the driver’s side, as shown in the following illustration. This step is not entirely necessary but only takes a couple minutes and give you more room to work on things at the front.
Exhaust moved
Remove the front lower bracket (12mm x 4) and use two of the bolts to hold the exhaust heat shield in the correct position as shown below:
Front bracket
Drop the center support (12mm x 4) bolts and rest the propshaft on the hanging exhaust. Do not remove the 2 bolts holding the bearing support assembly…..not necessary.
Remove the 6 6mm hex bolts on the front flange of the propshaft, I use a standard 6 inch hex wrench but you could also use a hex driver and ratchet. This is probably the worst part of this job as its tight in there and you’ll have to get creative with where you put your hands and tools! Have the car in drive so you can rotate the propshaft to access all the bolts. Once all the bolts are out you should be able to wiggle the propshaft CV out of the flange and move it to the passenger side of the flange, out of the way. The rear flange on the Haldex end gets rusty and can be a real PITA to separate most times. You may consider removing the propshaft completely at this point if you need to change the Haldex pump. The filter can be changed with the shaft in situ.
Front CV Joint propshaft
Remove the angle gear: there are 5 14mm bolts holding it on, 4 can be easily seen, the 5th one is on top and can be reached by a shallow 3/8 socket and 12 inch extension. I use a common box end wrench to remove the 4 visible bolts. Once all the bolts are removed, support the angle gear and move it laterally towards the passenger side until it is off the splines of the collar sleeve….about two inches. it weighs about 30 pounds so don’t drop it on your face or hands. Once its free it’s a bit of a puzzle to get it out the bottom, I turn the flange end up and maneuvre the bottom of it out first. You don’t have to bend the skid plate mounting tab out of the way but many others recommend doing so.
Now you should have a clear view of the collar sleeve and can check condition of the splines as well as the angle gear input shaft splines and can determine which parts warrant replacement. This tutorial covers R&R of the collar and transmission seal only.
Removal of the collar! Probably one of the most intimidating tasks in all of the Volvo forums worldwide. They can sometimes slide right off with almost no effort or stay put with the force of a 5 ton press on them. I came up with my own method after trying several presses, pullers, etc. that were ineffectual. Volvo uses a hydraulic press purpose built to remove these, clearly I don’t have access to one of these. This time, I purchased a blind hole expandable collet puller in effort to find a cleaner way to remove the sleeve, I was dissappointed with the results after an hour of hammering and heating the sleeve with a heat gun, it did’nt budge. This picture shows how the puller attaches on a sleeve that is already removed.
Blind hole expandable collet pulller
My proprietary tried and true method came next, namely cutting two small grooves in the collar with a 4 inch angle grinder 180 degrees apart and using these primitive tools: A masonry chisel and a 14oz ball peen hammer!
Collar removal tools
I’ve used this method on many stubborn sleeves and find it to be the quickest and most effective. the photo below shows the approximate angle to strike the sleeve. I give it a half dozen hits on one groove, then rotate it and give it 6 more hits on the other side. The sleeve will be off in 5 minutes of this being repeated several times.
Collar Groove
With the sleeve out, you’ll lose about 3/4 of a litre of transmission fluid.
Replace the large seal on the transmission output, VIDA has this seal being installed AFTER the new collar sleeve is on with a special seal driver that fits over the sleeve. I prefer to replace the seal before the new collar sleeve gets installed. Special seal drivers below carry the part number: SD2X4 as seen below:
Seal driver
Install the new Collar Sleeve: The service kit has Volvo’s hygroscopic grease in a tube to be applied to the splines. Make sure everything is super clean and put lots of transmission fluid on the seal and collar also. Offer up the collar to the splines and gently tap the collar with a plastic hammer. I’ve seen videos of people that hammer the sleeve all the way on, also people that get it on part of the way and then use the angle gear to press it in using the AG attaching bolts. From an automotive fundamentals perspective; both of these techniques are wrong. I built a simple press out of sturdy L Iron to press the Collar Sleeve in. If you’ve not done this job before there is small interference fit on the splines on the transmission, not so on the angle gear input shaft splines. The sleeve needs to be installed such that it protrudes 41mm proud of the seal bore…….this number is important!
Read the rest in our forum:
Angle gear collar sleeve and seal replacement